
Android MVI with Kotlin Coroutines & Flow
MVI is a common architecture pattern to design your Android apps. There are lots of articles out there about MVI but most of them use RxJava. In this article we instead use Kotlin Coroutines & the Kotlin Flow API to implement an MVI architecture. As a part of this, we specifically explore the new StateFlow API. But first, let’s take a quick look at the MVI pattern in general.
A Quick Introduction to MVI
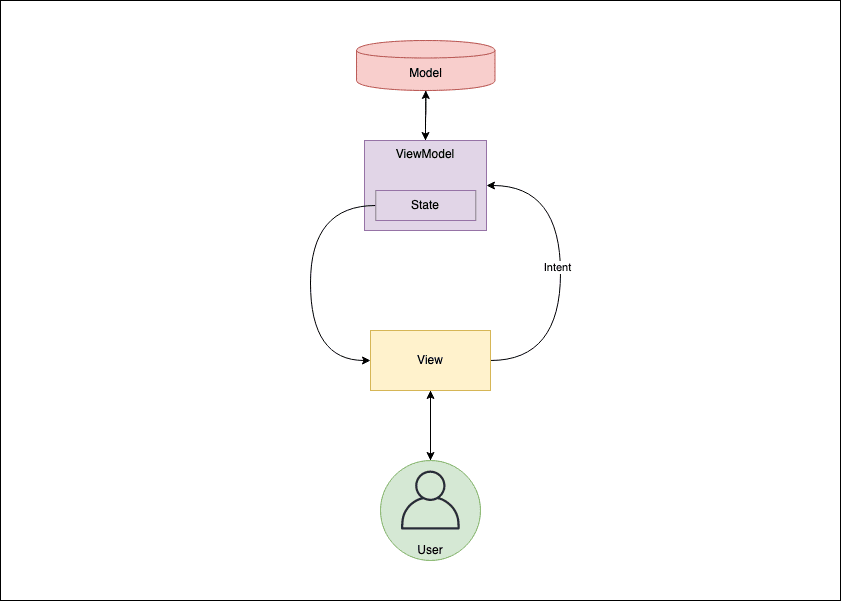
MVI is short for “Model, View, Intent”. Over the last year this architecture pattern received more and more attention among Android developers. It’s similar to other commonly known patterns like MVP or MVVM, but it introduces two new concepts: the intent and the state.
The intent is an event sent to the ViewModel by the View in order to perform a particular task. It can be triggered by the user or by other parts of your app. As a result of that, a new state is set on the ViewModel which in turn updates the user interface. In the MVI architecture, the View listens to the state. Every time the state changes, the View is notified.
The MVI Architecture Pattern
Android MVI with Kotlin Coroutines
MVI can be implemented in different ways. RxJava is one way to go. In this article, however, we are going to use coroutines. Many developers prefer them as a simpler way to handle asynchronous operations. Also you don’t rely on any external libraries. Let’s take a look at how to implement our ViewModel with coroutines and begin with the simplest method. Afterwards, we will improve this code step by step.
First Try: Basic Channels
Let’s first use a basic Channel<T> to listen to intents and state changes in the ViewModel. We create an intentChannel property of type Channel<Intent> for the intents and a stateChannel of type Channel<State> property for handling states. Intents are received by the ViewModel. The state is set by the ViewModel and observed by the Fragment (View).
@OptIn(ExperimentalCoroutinesApi::class)
class AwesomeViewModel(private val initialState: State) : ViewModel() {
    val intentChannel = Channel<Intent>(Channel.UNLIMITED)
    val stateChannel = Channel<State>(Channel.UNLIMITED)

    sealed class Intent {
        object CheckUserLogin : Intent()
    }

    sealed class State {
        object Idle : State()
        object UserLoggedIn : State()
        object UserLoggedOut : State()
    }

    init {
        viewModelScope.launch {
            handleIntents()
        }
    }

    private suspend fun handleIntents() {
        var state = initialState
        suspend fun setState(reducer: (State) -> State) {
            state = reducer(state)
            stateChannel.send(state)
        }
        intentChannel.consumeEach { intent ->
            when (intent) {
                Intent.CheckUserLogin -> {
                    setState { checkUserLogin() }
                }
            }
        }
    }

    private fun checkUserLogin(): State =
        if(userIsLoggedIn()) UserLoggedIn
        else UserLoggedOut
}
In this example, the intents are handled in a coroutine actor (viewModelScope.launch). The actor is the one who reads in all the intents and dispatches the work. After the work of a specific intent is done, the actor mutates the state and sends it to the View.
We still haven’t mentioned how the intents are sent from the View (Fragment) to the ViewModel. This is how we do it:
viewModel.intentChannel.offer(AwesomeViewModel.Intent.CheckUserLogin)
The offer() method is a synchronized way to do what the channel’s send() method does without launching a new coroutine. As we have control over this channel and know it has unlimited capacity, this is a safe way to go and makes things easier for us. However, if offer() violates channel’s capacity restrictions or you don’t know them, you should use send() instead.
Note: Intents do not always need to come from the View. For example, there are cases where sending them in the init{} block of the ViewModel might make sense.
Second Try: ConflatedBroadcastChannel
Let’s go one step further! The intentChannel remains the same, but for the stateChannel, we now use a ConflatedBroadcastChannel instead:
val intentChannel = Channel<Intent>(Channel.UNLIMITED)
val stateChannel = ConflatedBroadcastChannel<State>()
The advantage of a ConflatedBroadcastChannel is that it drops everything inside whenever a new state is set. This way, we don’t run into any trouble when the state changes happen too fast.
Third and Final Version: StateFlow
A major problem with our current code is that it makes use of the consumeEach method, which has already been declared as deprecated. We could use consumeAsFlow().collect{ } instead, but there is a much better way to go: StateFlow.
The StateFlow API was designed specifically for this purpose: to manage a state. So let’s make use of that! We remove our stateChannel completely from the ViewModel and instead define a state property of type StateFlow<State>. To keep the state immutable from the outside, but mutable from the inside, we use a private instance variable _state of type MutableStateFlow<State>.
@OptIn(ExperimentalCoroutinesApi::class)
class AwesomeViewModel : ViewModel() {

    val intentChannel = Channel<Intent>(Channel.UNLIMITED)
    private val _state = MutableStateFlow<State>(State.Idle)
    val state: StateFlow<State>
        get() = _state

    sealed class Intent {
        object CheckUserLogin : Intent()
    }

    sealed class State {
        object Idle : State()
        object UserLoggedIn : State()
        object UserLoggedOut : State()
    }

    init {
        viewModelScope.launch {
            handleIntents()
        }
    }

    private suspend fun handleIntents() {
        intentChannel.consumeAsFlow().collect { intent ->
            when (intent) {
                Intent.CheckUserLogin -> {
                    val userState = checkUserLogin()
                    _state.value = userState
                }
            }
        }
    }

    private fun checkUserLogin(): State =
        if(userIsLoggedIn()) UserLoggedIn
        else UserLoggedOut
}
Note: The StateFlow is available in coroutines version 1.3.3 and they are still in Experimental state. There is also a new discussion in which you can follow related to this API.
From this solution we benefit a lot:
- Changing the state no longer requires a suspending method
StateFlowinherits all the benefits of theFlow- Nothing gets emitted if there is no subscriber. If we were using basic channels, even if there was no listener, the events would pop up every time they got fired.
Handling State Updates in the View
Now that the ViewModel logic is in place, the only thing that’s left for us to do is to update our View according to the current state. With our StateFlow implementation, this is how we do it: We define a method handleState which performs the necessary visual changes based on the current state. We then observe the ViewModel’s state and call this method whenever the state changes.
class MyAwesomeFragment : Fragment() {
   …

   override fun onViewCreated(view: View, savedInstanceState: Bundle?){
       ...
       myawesomeViewModel.state
            .onEach { state ->  handleState(state)}
            .launchIn(lifecycleScope)
   }

    private fun handleState(state: AwesomeViewModel.State) {
        when(state){
            AwesomeViewModel.State.Idle -> Unit
            AwesomeViewModel.State.UserLoggedIn -> routeToMainFragment()
            AwesomeViewModel.State.UserLoggedOut -> routeToLoginFragment()
        }
    }
   ….
}
With this approach, we have a simple and elegant way to handle our state without too much overhead. Now, we have a single point (the channel) which takes our intents and a single exit point (the state managed by StateFlow).
Conclusion
While there are other options to implement an MVI architecture using Kotlin, coroutines are a pretty nice alternative to RxJava when used in conjunction with the new StateFlow API. As with all architectural questions, there is no silver bullet and it will always depend on your project whether this implementation makes sense for your app.
If you decide to go with this architecture, it makes a lot of sense to test your view models properly. We explain how that works in detail in our article Testing MVI View Models on Android.
