Creating an Adaptive Search Widget in Flutter
Why Care About Adaptiveness?
Why do we care about user interfaces that adapt to each platform and don’t just create our own design from scratch?
Each platform typically has its own design system. It’s referenced in Flutter as Material for Android or Cupertino for iOS. The user associates the platform with the look and feel of the system, so consistency is already a good reason in itself.
More importantly, users of a specific platform have learned how to interact with it. They know how to perform typical actions and what specific icons and design elements mean. I short: If you use the platform’s native design system, you can be pretty sure that your users know their way around your app.
The platform design systems are also very well thought through, especially in terms of accessibility and usability. Despite inflicting many restrictions on your app design, many of these systems also provide tools to customize and individualize the UI. This way, you can have the best of both worlds: Consistency with the platform and uniqueness of your app.
Our Goal
We want to have an adaptive search widget in Flutter that has all the above advantages and supports all platforms out of the box with respect to its appearance and usability. In order to achieve this, let’s first analyze the requirements! Here’s what we need:
- a text field where the user can enter a search query
- an action that kicks off the search
- suggestions should already be displayed while the user is typing the search term
- everything should be adjustable and extensible
To make the whole thing a little more descriptive, we concentrate on three platforms:
- Android (Material),
- iOS (Cupertino) and
- Windows (FluentUI)
as their libraries look most mature and cover different layout sizes. Once we’ve implemented the search widget for these three platforms, adding other platforms or completely independent designs should be easy.
So what should our search look like? Let’s have a look at the different design implementations:
|
Material
(Android) |
Cupertino
(iOS) |
FluentUI
(Windows) |
|---|---|---|
 |
 |
 |
Apparently, all implementations look similar. They all have a search bar and a list of search suggestions below. However, there are also some differences:
- The search bar has different actions, e.g. clear text.
- The search UI can either be fullscreen or only cover a part of the scren.
The behavior and logic of the search on the other hand is quite the same for each platform:
- Each search query has to be processed.
- Search suggestions and results must be delivered to the UI.
For that reason, we can create an abstract layer which all platforms inherit from.
Doesn’t Flutter Provide a Search Already?
If you are familiar with Flutter you probably know that there is a widg… delegate for that. 😉 So why we don’t we just use this built-in SearchDelegate? After all, it provides us with some nice options to customize the experience:
SearchDelegate(...) {
  ...

  Widget buildSuggestions(BuildContext context);
  Widget buildResults(BuildContext context);
  Widget buildLeading(BuildContext context);
  List<Widget> buildActions(BuildContext context);
  PreferredSizeWidget? buildBottom(BuildContext context) => null;
  ThemeData appBarTheme(BuildContext context) {...}

  ...
}
For example, we can customize the actions in the AppBar or how our results and suggestions are displayed. By changing the Theme, we can also adjust quite a few things.
But here lies the problem: Because the Theme widget and the MaterialLocalizations are used, we are limited to use widgets from other platform styles like Cupertino by wrapping them with a MaterialApp. And what if we want to completely change the search bar to the CupertinoSearchbar that was introduced in Flutter 2.0?
If you still try to use it with the CupertinoApp, you will receive this error:
To introduce a MaterialLocalizations, either use a MaterialApp at the root of your application to include them automatically, or add a Localization widget with a MaterialLocalizations delegate.
If we want to support more platforms like Desktop or Web, we’ll run into even more problems as the SearchDelegate can only be opened via a showSearch method call. Therefore, the search is currently only displayable in full screen.
Long story short, there is only one way to fix this: We have to create a search delegate ourselves with full support for all platforms and customization options! 🔨

Implementation
Let’s create our own platform-adaptive Flutter search! We’ll start with the abstract layer that includes the logic that all platforms have in common. We’ll leave some room for platform-specific implementations.
The Common Search Logic
First, we need a controller to handle all specific events to the entered text. The best choice for this is a TextEditingController, because it’s widely used for in the community for TextFields. We also use a FocusNode to handle the search field’s focus changes.
Last but not least, we have to add the behaviour that changes the widget below the text field (we’ll call it body from now on).
We have two possible states for the body: It can either show the search suggestions or the result. Let’s model these states with an enumeration for the _SearchBody which can either be suggestions or results. We use a ValueNotifier to update the respected state.
All this logic goes into our custom AbstractPlatformSearchDelegate. (We shortened the code a little for this article, you can see the full result in our open-source repository.)
abstract class AbstractPlatformSearchDelegate<T> {
  final TextEditingController queryTextController = TextEditingController();
  final FocusNode focusNode = FocusNode();
  final ValueNotifier<_SearchBody?> _currentBodyNotifier =
      ValueNotifier<_SearchBody?>(null);

  _SearchBody? get _currentBody => _currentBodyNotifier.value;
  set _currentBody(_SearchBody? value) {
    _currentBodyNotifier.value = value;
  }

  void showResults() {
    focusNode.unfocus();
    _currentBody = _SearchBody.results;
  }

  void showSuggestions() {
    focusNode.requestFocus();
    _currentBody = _SearchBody.suggestions;
  }
}
Now we also have to add the abstract methods for our three main components that all platform searches have in common:
- the suggestions,
- the results
- and the search bar itself.
abstract class AbstractPlatformSearchDelegate<T> {
  ...

  Widget buildSuggestions();
  Widget buildResults();
  Widget buildScaffold(Widget body);
}
With these methods in place, we can now create a PlatformSearchWidget that handles the search state by making use of our AbstractPlatformSearchDelegate. In this widget, we wrap the AbstractPlatformSearchDelegate and handle all method calls. We also have to include the State lifecycle methods to correctly dispose our TextEditingController and FocusNode.
class PlatformSearchWidget<T> extends StatefulWidget {
  const PlatformSearchWidget({
    required this.delegate,
    this.animation,
  });
  final AbstractPlatformSearchDelegate<T> delegate;
  final Animation<double>? animation;
  @override
  State<StatefulWidget> createState() => _PlatformSearchWidgetState<T>();
}
If the query is changed by the user or if the body has changed, we have to rebuild the WidgetTree to make the changes visible. In order to make that happen, we have to listen to the associated events. We attach the listener on the didUpdateWidget method to ensure that it’s always called – even when the widget configuration changes.
class _PlatformSearchWidgetState<T> extends State<PlatformSearchWidget<T>> {

  @override
  void didUpdateWidget(SearchPage<T> oldWidget) {
    super.didUpdateWidget(oldWidget);
    if (widget.delegate != oldWidget.delegate) {
      oldWidget.delegate.queryTextController.removeListener(_onQueryChanged);
      widget.delegate.queryTextController.addListener(_onQueryChanged);
      oldWidget.delegate._currentBodyNotifier
          .removeListener(_onSearchBodyChanged);
      widget.delegate._currentBodyNotifier.addListener(_onSearchBodyChanged);
      oldWidget.delegate.focusNode = null;
      widget.delegate.focusNode = focusNode;
    }
  }

  void _onQueryChanged() {
    setState(() {});
  }

  void _onSearchBodyChanged() {
    setState(() {});
  }
}
What’s left is to create the basic search layout. First, we need to determine what to show in the body: suggestions, results or nothing. We do that by receiving the current body from the AbstractPlatformSearchDelegate.
Next, we call the abstract methods for building the body UI. They will later be implemented for each platform. We also use some syntactic sugar here by using the KeyedSubtree to give all children a unique key (e.g. animations). This way, we don’t need to add a key to every widget when building the suggestions and results.
@override
  Widget build(BuildContext context) {
    Widget? body;
    switch (widget.delegate._currentBody) {
      case _SearchBody.suggestions:
        body = KeyedSubtree(
          key: const ValueKey<_SearchBody>(_SearchBody.suggestions),
          child: widget.delegate.buildSuggestions(context),
        );
        break;
      case _SearchBody.results:
        body = KeyedSubtree(
          key: const ValueKey<_SearchBody>(_SearchBody.results),
          child: widget.delegate.buildResults(context),
        );
        break;
      case null:
        break;
    }
    return widget.delegate.buildScaffold(body);
  }
We also want to have the option to open the search as a new page, so let’s add a utility method to just do that:
Future<T> showSearch<T>({
  required BuildContext context,
  required PlatformSearchDelegate<T> delegate,
  String query = '',
}) {
  delegate.query = query ?? delegate.query;
  delegate._currentBody = _SearchBody.suggestions;
  return Navigator.of(context).push(_SearchPageRoute<T>(
    delegate: delegate,
  ));
}
Now we have our abstract implementation in place. ✅
With the above implementions, we dont’t have to think about the search logic anymore and can focus solely on creating the respective UI for each platform.
The Adaptive UI
Let’s begin with our first design system:
Material (Android)
With the current SearchDelegate, there is already a way to implement the Material search. The result of our MaterialSearchDelegate is a good comparison to the Flutter SearchDelegate. To use the PlatformSearch, we have to extend the PlatformSearchDelegate and implement the abstract methods:
buildScaffold,buildSuggestionsandbuildResults.
Here’s an example for how to build the scaffold by implementing the first of these methods:
class MaterialSearchDelegate extends PlatformSearchDelegate {
  @override
  Widget buildScaffold(Widget body, BuildContext context) {
    return Scaffold(
      appBar: AppBar(
        leading: buildLeading(context),
        title: TextField(
          controller: queryTextController,
          focusNode: focusNode,
          textInputAction: TextInputAction.search,
          onSubmitted: (String _) {
            showResults(context);
          },
          decoration: InputDecoration(hintText: searchFieldLabel),
        ),
        actions: buildActions(context),
      ),
      body: AnimatedSwitcher(
        duration: const Duration(milliseconds: 300),
        child: body,
      ),
    );
  }
}
The only thing that’s missing now is the buildSuggestions and buildResults method implementations. These are usually different for every app, so we’ll leave that job to you.
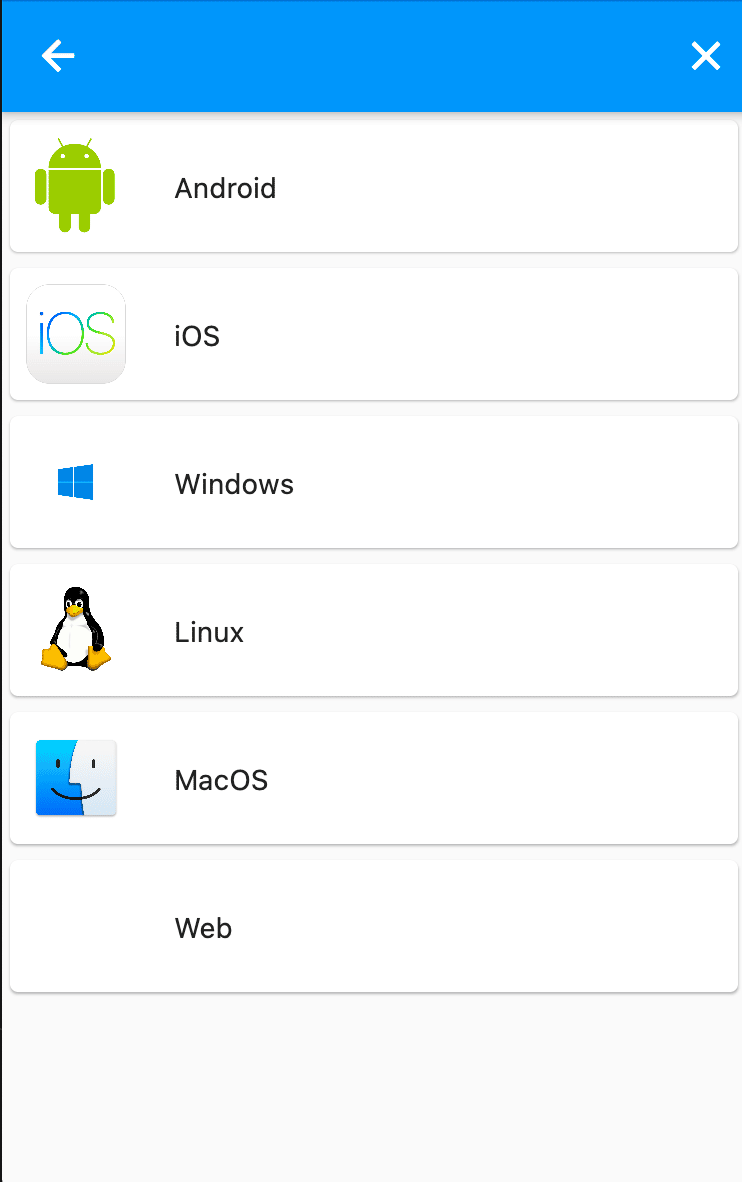
| Material (Android) |
|---|
 |
Cupertino (iOS)
The Material part was fairly easy because all components were already there.
With Flutter 2.0, a new CupertinoSearchTextField was introduced. We can also use other widgets that are already part of Flutter to create an iOS-like search bar. This includes the CupertinoPageScaffold for the overall page and the CupertinoButton to close the search page.
class CupertinoSearchDelegate extends PlatformSearchDelegate {
  @override
  Widget buildScaffold(Widget body, BuildContext context) {
    return CupertinoPageScaffold(
      navigationBar: CupertinoNavigationBar(
        middle: CupertinoSearchTextField(
          controller: queryTextController,
          focusNode: focusNode,
          onSubmitted: (String _) {
            showResults(context);
          },
        ),
        trailing: CupertinoButton(
          child: const Text('Close'),
          padding: EdgeInsets.symmetric(horizontal: 8.0),
          onPressed: () {
            close(context, null);
          },
        ),
      ),
      child: body,
    );
  }
}
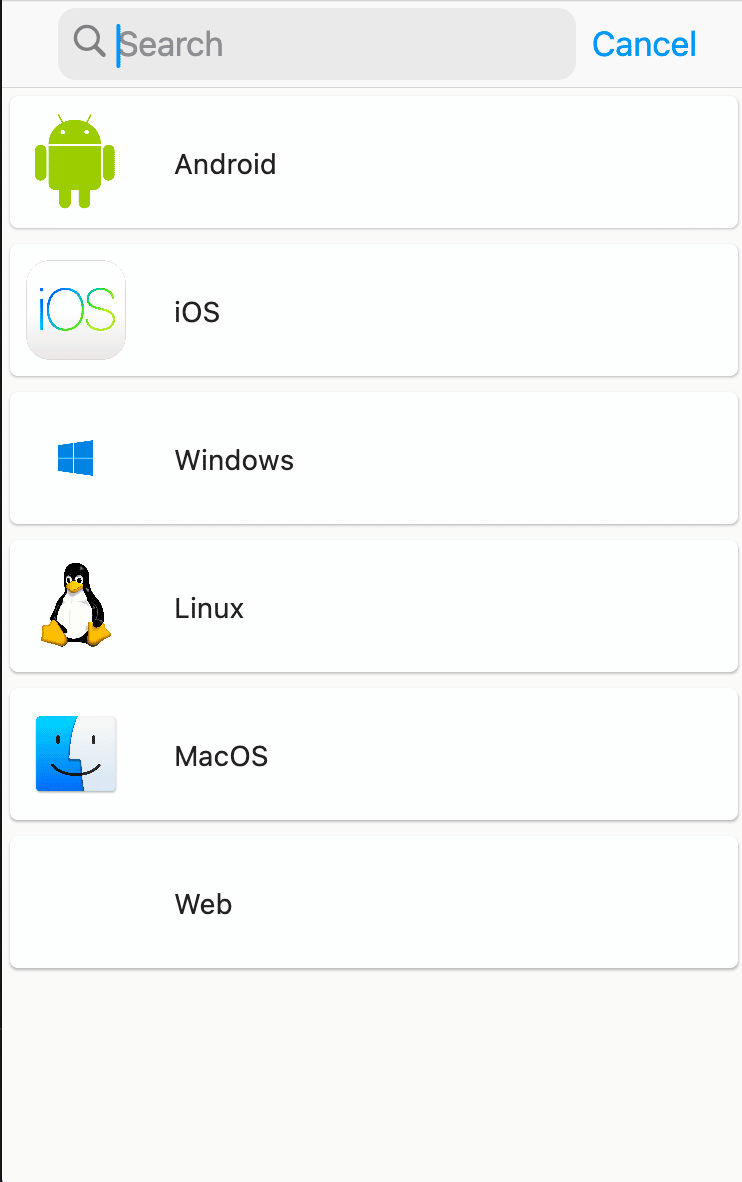
| Cupertino (iOS) |
|---|
 |
FluentUI (Windows)
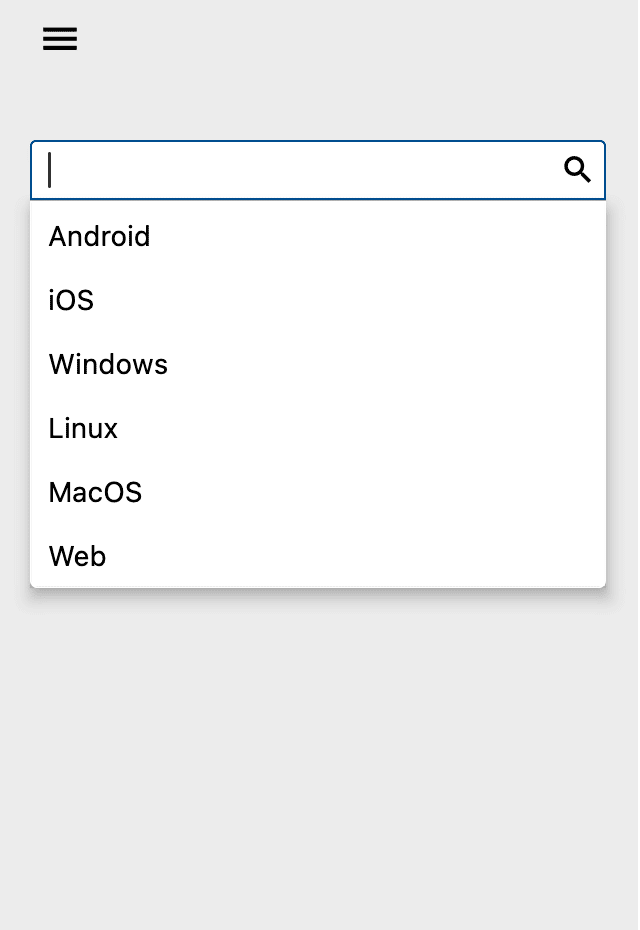
Both the Material search and the Cupertino search look almost the same with their layout. The FluentUI search does some things a little different. It’s not presented as a full screen page but as a part of a page. It displays the suggestions and results in a popup box.
For the implementation, we use a library called FluentUI which is available on pub.dev). It has most of the UI elements implemented already and does a very good job at creating the FluentUI elements in Flutter.
class WindowsSearchDelegate extends PlatformSearchDelegate {
  @override
  Widget buildScaffold(Widget body, BuildContext context) {
    return fluent.AutoSuggestBox(
      controller: queryTextController,
      items: [],
      itemBuilder: (BuildContext context, int index) {
        return buildResults(context);
      },
      textBoxBuilder: (context, controller, focusNode, key) {
        return fluent.TextBox(
          key: key,
          controller: controller,
          focusNode: focusNode,
          suffixMode: fluent.OverlayVisibilityMode.editing,
          suffix: fluent.IconButton(
            icon: Icon(fluent.Icons.close),
            onPressed: () {
              controller.clear();
              focusNode.unfocus();
            },
          ),
        );
      },
    );
  }
}
| FluentUI (Windows) |
|---|
 |
Now we’ve implemented all three platforms. 💪
Conclusion
We kept the code-examples in this article as short as possible to focus on the important aspects. If you want take a deeper look at how we implemented the search ourselves, just check out our open-source repository:
The approach introduced in this article reduces the complexity and the amount of work required to implement a platform-adaptive search in Flutter. It enables us to create a custom search UI in Flutter without thinking much about the logic. In the future, we would love to see abstract platform implementations included in the Flutter repository and just have an implementation in their respective platform libraries. What do you think? Tell us on Twitter!
If you want to make your search more accessible and allow your users to reach the top-most search results with their thumb, check out our article Flutter: Pull-To-Refresh was yesterday. Check out Pull-To-Reach! Thanks for reading!
Do you search for a job as a Flutter Developer?
Do you want to work with people that care about good software engineering?
Join our team in Munich