
The Complete Guide to iOS 16 Passkeys – App and Backend Implementation
Offering authentication always intimidates me, because it’s hard to do correctly and puts my app at risk. If I do mess it up, I know that I’m risking the security of any other service that the user may have used the same password for. It’s a lot of responsibility and incredibly important to get right. Apple’s newest update brought with it the means to revolutionize accessing accounts you have on the internet and keeping your data secure. We’re talking, of course, about passkeys.
In this article, we have a look at how to integrate passkeys in your app and what needs to be done in the backend, especially which API endpoints need to be implemented.
Introduction
Passkeys are Apple’s implementation of the WebAuthn standard. They do this as part of the FIDO Alliance, along with partners like Google and Microsoft.
Most applications today have some form of a backend, and many need to store user credentials. It can ease some fears knowing that if a bad actor gains access to your database there are no passwords that they can access. Hashed or not, those passwords represent an attack vector that someone could use to gain access to your users’ accounts, even on services you don’t own. Personally, if I can make sure I’m not holding onto a key that unlocks the user’s data on my service and possibly on others, I would prefer to do it. That means a lot less pressure and stress for me.
The simple fact is, people are bad at making passwords and randomization, even if they could always remember what they came up with. The WebAuthn protocol solves this by only storing a public key on the server for verification, while the private key lives securely on the user’s device and is never sent as part of authentication. The public key is useless without the private key and is of no interest to an attacker.
It will help to dive into how passkeys work and see an example implementation to show the basic process and explore what data is being held outside of the user’s control.
A note on security
Security, cryptography, authentication, and authorization are all difficult and complex topics. Please, do more research, refrain from writing custom cryptography, and stick to peer-reviewed and well-trusted libraries and frameworks. The code that will be demonstrated is not spec-complete (or even fully accurate) and should not be considered safe to use in production. It is for educational purposes and understanding only.
What can registering and signing in with passkeys look like?
At its simplest, if there’s no need to support traditional passwords as well, registering with a passkey might only require a TextField for the user to enter their username, a register button, and a login button. Maybe you can even imagine versions of this flow that randomly generate an ID for the user and don’t require the TextField at all, but for our purposes, we’ll assume we want to maintain a unique username chosen by the user.
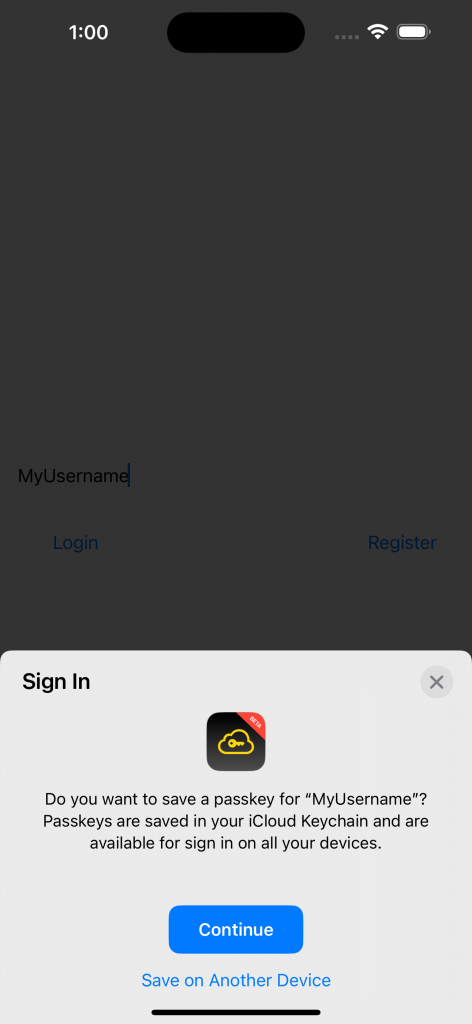
In the sample app that we’ll be looking at today, we’ll use exactly this. The user can type in a username of their choice and tap the register button to attempt to register that username and save their passkey on the device.
From there, the user can fill in (or leave filled in) the same username and tap the login button.
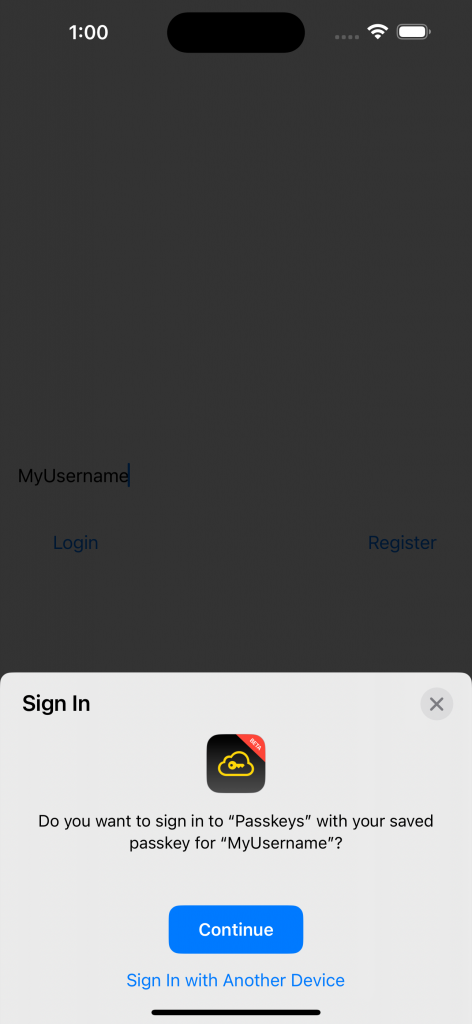
Doing that will allow the user to log in and see the content specific to them. In this case, seeing a screen dynamically shows their username!

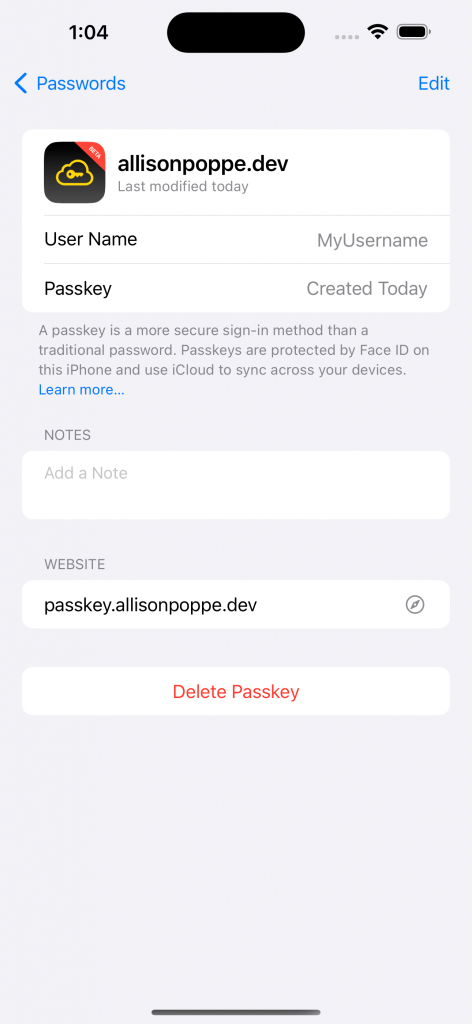
And if we look in the passwords section of the Settings app, we can see the saved key information along with the user’s other saved passwords.
What the process looks like

We need to request a challenge from the server. The challenge will be a unique series of randomized bytes that we can then sign, using the private key on the device. The server makes a note of this challenge, in our case with the session. After receiving the challenge, the device then signs it using the private key and returns the challenge used, the signature, and an assertion with an optional username. From there, the server can make sure that it got the same challenge as a response that it sent, and it can verify the signature using the public key that was stored for that user. If the user exists, the signature matches and the public key wasn’t changed in transit, it returns the same data it normally would in a password flow (such as an auth token) and the process is complete.
Assertion vs Attestation and what a relying party is
There was a word that you may not be familiar with used in the last paragraph. You may have caught it. One of the things that people may get confused about is what exactly is an assertion and what is an attestation. They can be especially confusing because they sound so similar and, their purposes are also similar, but it is important to remember they are not the same.
An attestation is the collection of data that contains client data in JSON format, such as the request origin or the challenge that was issued. The attestation object contains the public key generated by the authenticator. It is generated using the attestation certificate on the device which never changes. Because this attestation certificate is standard for the device type, it can be checked by the server if the auth flow should change based on a certain device type. Attestation is rarely meaningfully validated since we tend to trust that someone is who they say they are upon registration and when adding another authenticator to an account, they will have already authenticated themselves.
An assertion is similar. It’s a collection of data that once again contains things like the challenge used and the origin. This time though, the authenticator uses a generated private key that matches the public key sent during attestation to sign a combination of authenticator data and a hash of the client data. The result is the signature that the server will verify with the public key.
A relying party is an application that will request interaction with the authenticator. A bit complicated? Well, for our purposes we can just use the word server, but don’t be confused if you see both words after this point.
What technologies will be used and what do you need to know
Going forward into a basic implementation, we’ll assume some basic knowledge of Javascript, how web servers work, running a node server with Express, and, obviously, iOS apps in general. For the most part, the only external libraries we’ll be using will be either extremely common or cryptography specific.
The same process can be achieved with any other language or framework, but we’ll use Javascript due to its popularity and recognizability. In your project, you’d be better served relying on one of the many other options which are more fully-featured, more robust, and more secure. Ultimately, you will be responsible for the code you use though, so it’s important to understand the basics of what that code is doing.
Capabilities and webcredentials
The first thing we’ll need to do is make sure that when our app attempts to access and authenticate via our server, our server acknowledges that our app is approved to do so. To do this, we’ll create a document that looks very much like JSON and lists our app prefix id along with our bundle identifier. To find the app prefix ID, head to this page and log in with your Apple Developer account. From there, go to the app you are working on and look for the App ID Prefix in the upper right corner. Afterward, the apple-app-site-association file can be set up as follows. Note the lack of an extension when creating the file name.
{
  "webcredentials": {
    "apps": [
      "<App ID Prefix>.<Bundle Identifier>"
    ]
  }
}
json { ./public/.well-known/apple-app-site-association }
This file is placed in the public/.well-known folder which means we need this line in our express entry point to use the public folder for static files.
// { ./passkey.js }
app.use(express.static("public"));
Inside XCode, we’ll also need to add the Associated Domains capability with the line webcredentials:<fully-qualified-domain>.
If this looks familiar to you, that’s probably because you’ve written something similar if you’ve ever implemented Sign in with Apple, universal links, or app clips for an iOS app before. That’s because it’s the same file. It also means if you already support one or more of them, the final version of your file may look different from the one above.
The Backend (API)
Alright, on to the good stuff. First, let’s start by looking at our API-endpoints.
The first 2 are the first step of the process for the server. Their main role is to create a shared challenge for the device to sign. They are split into 2 separate endpoints because having our register endpoint separate allows us a chance to fail early and loudly to the user, before the key generation on the device, if the username they are attempting to register with is already taken. We store the challenge in the session to ensure it matches the one that comes back to us during the next step of the process.
/challenge endpoint
Our challenge endpoint is relatively simple.
// { ./routes.js }
/**
 * Endpoint: /challenge
 *
 * Returns a generated challenge for authentication
 */
router.post("/challenge", (req, res) => {
	...
});
It clears the stored challenge for the session, creates the credential request for the client, and stores the newly randomized challenge to use as verification when the client responds.
// { ./routes.js }
req.session.challenge = null;

  let credentialRequest = {
    status: "success",
    challenge: helpers.randomBase64URLBuffer(32),
    rp: {
      name: "passkey.allisonpoppe.dev",
    },
  };

  req.session.challenge = credentialRequest.challenge.toString();

  res.json(credentialRequest);
/register endpoint
// { ./routes.js }
/**
 * Endpoint: /register
 *
 * Verifies username can be registered and generates challenge to use for attestation.
 */
router.post("/register", (req, res) => {
	...
});
We fail if the username isn’t included in the request or if it is already taken in the database. If it exists in the database and hasn’t completed registration yet, it’s possible an error or something unexpected prevented it from finishing, so there’s no sense in keeping it around and it is removed.
// { ./routes.js }
if (!req.body || !req.body.username) {
    res.json({
      status: "failed",
      message: "Malformed Registration Request",
    });
    return;
  }

  let username = req.body.username;

  if (db.userExistsWith(username)) {
    if (db.getUserWithUsername(username).registered) {
      res.json({
        status: "failed",
        message: "Username Already In Use",
      });
      return;
    } else {
      db.removeUserWithUsername(username);
    }
  }
Like the /challenge endpoint, a credential request is generated and the user is added to the database (by default unregistered) to ensure consistency and that the client does not send us a challenge with a different user.
// { ./routes.js }
  req.session.challenge = null;
  req.session.user = null;

  let user = new User(db.getNextID(), username);
  db.addUser(user);
  let credentialRequest = {
    status: "success",
    challenge: helpers.randomBase64URLBuffer(32),
    rp: {
      name: "passkey.allisonpoppe.dev",
    },
    user: user,
  };
We set up the information we’ll check for to guarantee we are handling the same user and process and then return the credential request to the device.
// { ./routes.js }
req.session.challenge = credentialRequest.challenge.toString();
req.session.user = user;

res.json(credentialRequest);
/finish endpoint
The other route of note is /finish. This route serves as the end of the authentication process for the server for both registration and logging in, and is also our biggest one to go with that extra responsibility. Both processes involve us checking that the challenge hasn’t changed and there isn’t anything out of place with the request we received. Afterward, based on whether we have an attestationObject (registration) or authenticatorData, we can determine whether the request was for registration or authentication and branch from there. If it was for registration, our “database” is updated with the information we’ll need for future authentication requests. If it was a login request, we check that we can verify the device’s signature using the data we have stored about the user. Hopefully, everything works out and we have successfully registered or authenticated the user!
// { ./routes.js }
/**
 * Endpoint: /finish
 *
 * The second part of the registration/authentication process in which
 * the key is verified
 */
router.post("/finish", async (req, res) => {
	...
});
The first step is to validate that our session returns to us everything we expect it to, which helps us trust that we are dealing with the same user and acting on the same process. We begin by checking the user data itself.
// { ./routes.js }
  if (!req.body || !req.body.clientDataJSON) {
    res.json({
      status: "failed",
      message: "Malformed Registration/Authentication Finish Request",
    });
    return;
  }

  let request = req.body;

  let user;
  if (request.userID) {
    user = db.getUserWithID(request.userID);
    if (!user) {
      res.json({
        status: "failed",
        message: "No unregistered user found. API error.",
      });
      return;
    }
  } else if (req.session.user) {
    user = req.session.user;
  } else {
    res.json({
      status: "failed",
      message: "No user found. API error.",
    });
    return;
  }
Next, we validate the challenge and origin.
// { ./routes.js }
let clientData = JSON.parse(
    new Buffer.from(request.clientDataJSON, "base64")
  );
  let oldChallenge = new Buffer.from(clientData.challenge, "base64");

  if (oldChallenge.toString() !== req.session.challenge) {
    res.json({
      status: "failed",
      message: "Returned challenge doesn't match issued challenge",
    });
    return;
  }

  if (clientData.origin !== "https://passkey.allisonpoppe.dev") {
    res.json({
      status: "failed",
      message: "Returned challenge doesn't match issued challenge",
    });
    return;
  }
Our next step is to check if we’ve received an attestation object or authenticator data. If we’ve received an attestation object, it means the device is letting us know about it and giving us its information. In other words, registering.
// { ./routes.js }
let verified;
  let authInfo;
  if (request.attestationObject !== undefined) {
    authInfo = helpers.getAuthInfo(request);
    verified = true;
    user.authInfo = authInfo;
    user.registered = true;
    db.updateUserById(user.id, user);
  } else...
If it has authenticator data, it is part of the login process and our job is to check that the signature we get back matches what it should be, given what we know about the device. We start by checking that there is already a registered username that matches the one that we are attempting to log in with.
  ...}
  else if (request.authenticatorData !== undefined) {
    if (!db.getUserWithUsername(user.username).registered) {
      res.json({
        status: "failed",
        message: "User does not exist",
      });
      return;
   }
The most challenging chunk of code essentially just parses the data received as part of the login attempt, gets the public key from what we have stored for an authenticator, and verifies the signature using it.
// { ./routes.js }
let signature = new Buffer.from(request.signature, "base64");
    let retreivedPublicKey = new Buffer.from(user.authInfo.publicKey, "base64");
    let hashedCData = helpers.hash(request.clientDataJSON);
    let toSign = new Buffer.concat([
      new Buffer.from(request.authenticatorData, "base64"),
      hashedCData,
    ]);
let pk = await subtle.importKey(
  "raw",
  retreivedPublicKey,
  {
    name: "ECDSA",
    namedCurve: "P-256",
  },
  false,
  ["verify"]
);

verified = subtle.verify(
  { name: "ECDSA", hash: "SHA-256" },
  pk,
  signature,
  toSign
 );
 } else {
  res.json({
    status: "failed",
    message: "Attestation response type is unknown",
   });
  return;
 }
Finally, we check if the user was verified and make sure our session reflects that and return the relevant information to the client.
// { ./routes.js }
if (verified) {
    req.session.loggedIn = true;
    req.session.user = user;
    res.json({ status: "success" });
    return;
  } else {
    res.json({
      status: "failed",
      message: "Can't authenticate signature",
    });
    return;
  }
});
The iOS app
One of the best aspects of passkey implementation is that Apple does a large portion of the work for us. If you have written code that supports Sign in with Apple, you have probably seen very similar code. We’ll start with the login and register methods that are called when tapping on the Login and Register buttons. The request to the API to get the challenge is pretty much the same for both methods, except for including the username for the registration request (as described above). After it returns the relevant information, we create an ASAuthorizationPlatformPublicKeyCredentialProvider (that’s a mouthful) and use that to instantiate an ASAuthorizationController instance. From there we set the AuthManager which conforms to the necessary protocols as a delegate and perform the request to the system to make or sign the challenge.
login(…)
The signature of our login method looks like this.
func login(presentationAnchor: ASPresentationAnchor) async {
		...
}
We set the presentation anchor so the system views have a reference point for displaying themselves. Then we call our API to get the challenge.
        self.presentationAnchor = presentationAnchor

        let result = await apiRequest(address: Const.LOGIN_ADDRESS, httpMethod: "POST")

        guard let result = result else {
            print("Login attempt failed")
            return
        }

        let challenge = Data(result.challenge!.utf8)
Once we have the challenge, we create a request for the system to give us an assertion and pass that to an ASAuthorizationController before calling performRequests() on it.
let platformProvider = ASAuthorizationPlatformPublicKeyCredentialProvider(relyingPartyIdentifier: result.rp!.name)
let assertionRequest = platformProvider.createCredentialAssertionRequest(challenge: challenge)
let authController = ASAuthorizationController(authorizationRequests: [assertionRequest])
authController.delegate = self
authController.presentationContextProvider = self
authController.performRequests()
register(…)
Our register method looks similar to the login one, with the addition of a String to represent the username that the user would like to register.
func register(presentationAnchor: ASPresentationAnchor, username: String) async {
 ...
}
This works similarly to the login request above, only we send the username we’d like to register and parse the ID it gives us back.
self.presentationAnchor = presentationAnchor
let payload = APIPayload(username: username)
let result = await apiRequest(address: Const.REGISTER_ADDRESS, httpMethod: "POST", bodyData: payload)
guard let result = result else {
   print("Register attempt failed")
   return
}

let challenge = Data(result.challenge!.utf8)
let username = result.user!.username
let userId = Data(String(result.user!.id).utf8)

let platformProvider = ASAuthorizationPlatformPublicKeyCredentialProvider(relyingPartyIdentifier: result.rp!.name)

let platformKeyRequest = platformProvider.createCredentialRegistrationRequest(challenge: challenge, name: username, userID:          user. Id)
let authController = ASAuthorizationController(authorizationRequests: [platformKeyRequest])
authController.delegate = self
authController.presentationContextProvider = self
authController.performRequests()
authorizationController(…)
Once the platform comes back with what we asked it for, it will call one of its delegate methods. If there was an error we’ll see a call to authorizationController(controller:didCompleteWithError), but hopefully, the call will be to authorizationController(controller:didCompleteWithAuthorization:). Based on the credential that is passed into that method, we can determine what type of request it was and direct it to the appropriate “finish” method.
If the authorizationController returns with an error, authorizationController(controller:didCompleteWithError) is called for us to handle.
func authorizationController(controller: ASAuthorizationController, didCompleteWithError error: Error) {
   print("Error AuthManager: \(error)")
}
In a successful case though, we check what type of credential was returned to see if it’s part of the login or registration flow, and we call the required method with the information it needs.
    func authorizationController(controller: ASAuthorizationController, didCompleteWithAuthorization authorization: ASAuthorization) {
        switch authorization.credential {
        case let credentialRegistration as ASAuthorizationPlatformPublicKeyCredentialRegistration:
            Task {
                await finishRegistration(credentials: credentialRegistration)
            }
        case let assertionResponse as ASAuthorizationPlatformPublicKeyCredentialAssertion:
            Task {
                await finishLogin(credentials: assertionResponse)
            }
        default:
            print("Unknown authorization type received in callback")
        }
    }
Finally our “finish” methods. Using the data we got back from the delegate methods, we can parse the credentials and make a request to our API with the necessary information. Afterward, our implementation uses NotificationCenter to respond to any changes.
finishRegistration(…)
To finalize the registration flow, we call the finish endpoint with the information returned from our authController so the server will know about our device in the future.
func finishRegistration(credentials: ASAuthorizationPlatformPublicKeyCredentialRegistration) async {
        let attestationObject = credentials.rawAttestationObject!
        let clientDataJSON = credentials.rawClientDataJSON
        let credentialID = credentials.credentialID

        let payload = APIPayload(attestationObject: attestationObject.base64EncodedString(), clientDataJSON: clientDataJSON.base64EncodedString(), credentialID: credentialID.base64EncodedString())

        let result = await apiRequest(address: Const.FINALIZE_ADDRESS, httpMethod: "POST", bodyData: payload)

        if result != nil {
            // Notify of registration success
        }
    }
finishLogin(…)
The login flow finishes by sending the client information, the userID, the signature, and the authenticator data so that the server can verify the signature and verify the request.
    func finishLogin(credentials: ASAuthorizationPlatformPublicKeyCredentialAssertion) async {
        let clientDataJSON = credentials.rawClientDataJSON
        let authenticatorData = credentials.rawAuthenticatorData!
        let credentialID = credentials.credentialID
        let signature = credentials.signature!
        let userID = Int(String(data: credentials.userID!, encoding: String.Encoding.utf8)!)!


        let payload = APIPayload(
            clientDataJSON: clientDataJSON.base64EncodedString(),
            credentialID: credentialID.base64EncodedString(),
            authenticatorData: authenticatorData.base64EncodedString(),
            signature: signature.base64EncodedString(),
            userID: userID
        )
If the result contained an error or failed, it is handled by the apiRequest method, but if it comes back successfully, we use NotificationCenter to inform the relevant parts of our app.
        let result = await apiRequest(address: Const.FINALIZE_ADDRESS, httpMethod: "POST", bodyData: payload)

        if result != nil {
            NotificationCenter.default
                .post(name: NSNotification.Name("com.user.login.success"),
                      object: nil)
        }
    }
Conclusion
That’s been a quick tour of the highlights of a passkey implementation, simplified. To dig in further, you’ll likely find it helpful to see that code in context. It’s only a drop in the bucket of what the full WebAuthn spec looks like, but it may give enough of an overview to get a very high-level idea of what is happening and jump-start the learning process.
If you are interested in another new feature of iOS 16 that will make your life as a developer easier, check out our new article on RegExBuilder.
Did you enjoy this article? Tell us your opinion on Twitter! And if you have any open questions, thoughts or ideas, feel free to get in touch with us! Thanks for reading! 🙏
