
How to Read BLE Characteristics in Swift
When your iOS (or macOS) app needs to read data from a nearby Bluetooth device – how do you decode the data included in the BLE characteristics?
At QuickBird Medical, we often work with medical devices. Our apps need to safely read health data from those devices via BLE, so we’ve had our fair share of reading Bluetooth characteristics. 😉 In this article, we’ll give you a detailed guide and share our insights on how to do just that.
CoreBluetooth and Swift
Apple provides a solid framework to communicate with Bluetooth peripherals via BLE: CoreBluetooth. It’s very powerful, but it’s also very low-level. It leaves all the heavy-lifting to us, the iOS (or macOS) developers.
Our apps work with meaningful Swift types like enums, structs, and classes. However, Bluetooth peripherals need to be as efficient as possible and naturally only send and receive raw data: pure bits and bytes and nibbles. So when we want to send data to a peripheral with CoreBluetooth, we first need to encode our Swift types to raw data. Similarly, when our app receives data from a peripheral, we need to decode the data to construct our meaningful Swift types in order to be able to interpret the data.
That’s easier said than done. The data specified in BLE characteristics often doesn’t have a fixed length. Typically, flag bytes are used to determine which subsequent bytes are present and which ones are not. While it’s certainly no rocket science to decode the characteristic data correctly, it’s hard to make it in a readable and consistent fashion. In this article, we present a workflow to elegantly decode BLE characteristic data.
ℹ️ What’s a Characteristic?
In case you’re not yet familiar with Bluetooth Low Energy (BLE), here’s a quick(bird)™️ overview of the main components. 😉 (Otherwise, just skip this section.)
A BLE peripheral typically offers several services. Each service represents a particular functionality. It groups related data and behaviors. You can think of it as a class in object-oriented programming. The image below shows the services for an imaginary Bluetooth-enabled ice cream dispenser. (We all love ice-cream, don’t we?! 😉)
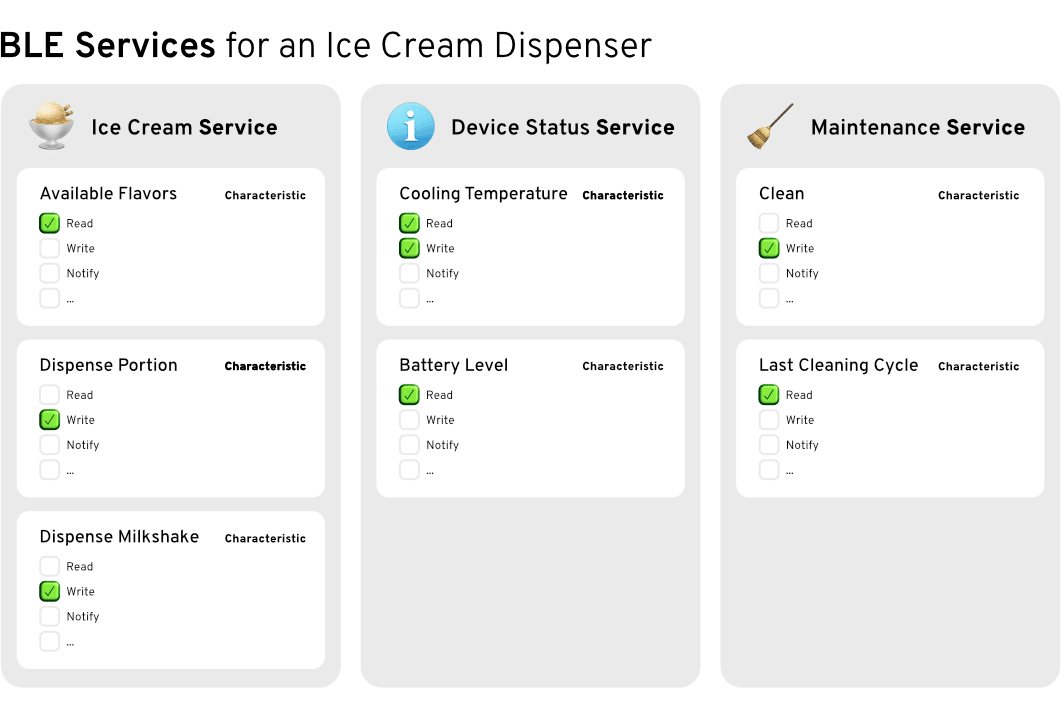
A service provides one or multiple characteristics that contain the actual data to be exchanged between two BLE devices. You can think of them as properties (instance variables) and functions of a class. For example, the ice cream service could have an Available Flavors characteristic that reads all available flavors from the dispenser.
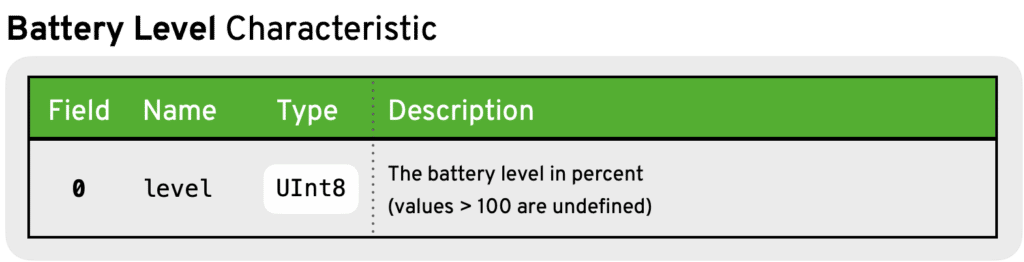
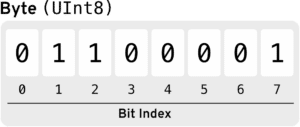
Characteristics have a data value to transmit custom data. For example, the dispenser’s Battery Level characteristic could have a UInt8 field for transmitting the peripheral’s battery level in percent:
However, the data specified in a characteristic can also contain multiple fields. For example, if we have a multi-color LED strip that supports BLE, it could provide a characteristic to read (or set) its color. In this case, the data could consist of 3 subsequent UInt8 fields for specifying the red, green and blue LED color.

Characteristics can be used to read data from a peripheral or to write data to a peripheral. A characteristic’s properties specify what exactly you can do with it. There are 9 different properties represented by the CBCharacteristicProperties type in CoreBluetooth.
Both services and characteristics are identified with a UUID (universally unique identifier). The UUID provides the context required to interpret the transmitted data correctly.
Naturally, a characteristic’s fields can have different types, it doesn’t all have to be UInt8 values, like in the example above. (There could be a Int16 or a UInt32, for example.) And that’s not all…
🏋️ The Challenge
More complex characteristics contain a variable number of fields. Usually, there is one or multiple flag byte(s) preceding other fields, indicating whether a certain field is present or not.
For example, the LED strip could have two different modes:
- boring mode 💡
- party mode 🥳
The boring mode just lights up all LEDs with the specified color. The party mode flashes all LEDs continuously with the specified color. The flashing frequency (i.e. how often the LEDs are switched on and off per minute) can be specified in the characteristic as well. In this case, it would typically have a flag byte at the beginning that indicates the mode:
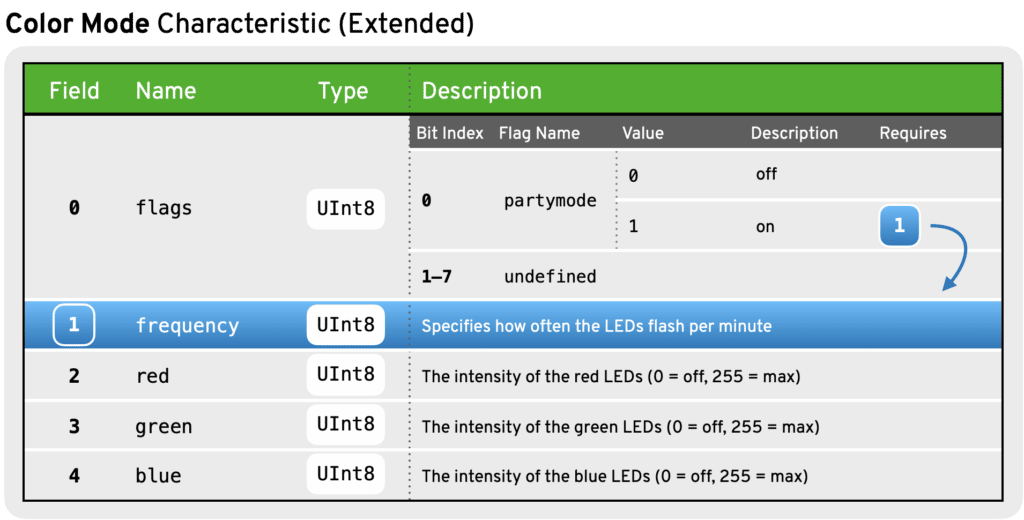
The table specifies that our flags byte only contains a single flag: Its first bit indicates if the party mode is enabled or not. If that bit is 1, it means that party mode is enabled. Otherwise, party mode is disabled (= boring mode).
But this first bit also specifies a requirement: Only if the partymode bit is 1, a frequency field is included in the transmitted data, otherwise that field is missing. In other words: Depending on the flags byte, the data size differs, and the meaning of the following bytes changes. If party mode is enabled, the first byte following the flags byte specifies the flashing frequency. When party mode is disabled, that byte specifies the red color intensity.
And this is our challenge: The value transmitted for a characteristic is just a single, contiguous sequence of data, dynamic in length. When receiving data from a peripheral, we need to make sure that we interpret it correctly and map it to a meaningful model type in Swift. When writing data to a peripheral, we need to make sure that we serialize our Swift model objects accordingly to match the characteristic’s specification so that the peripheral can understand it. The first part is what this article is all about. 😉
🕵️♀️ Discovering Characteristics
Let’s say we want to read the battery level from a BLE peripheral. First, we need to discover and connect the peripheral using CBCentralManager object. We won’t go into detail on how to do that as it’s not the focus of this article. If you need some guidance, check out the CoreBluetooth Programming Guide by Apple or this great tutorial on raywenderlich.com:
Once you have successfully connected with a peripheral, the CBCentralManager will pass you the respective CBPeripheral instance. It’s the representation of the actual peripheral in CoreBluetooth. We’ll assume that you have already retrieved this CBPeripheral instance and start from there.
// A peripheral you discovered and connected with a CBCentralManager
let peripheral: CBPeripheral
Before we can read and write characteristics, we need to discover them on the peripheral. That’s pretty straight-forward. As characteristics are always part of a service, we first need to discover all required services:
// The UUIDs for the services that contain the required characteristics
let serviceUUIDs: [CBUUID] = [batteryServiceUUID, ...]
// Discover these services
peripheral.discoverServices(serviceUUIDs)
If the services with the specified UUIDs are found on the peripheral, the CBPeripheralDelegate method is called and we continue with discovering the required characteristics for each of those services.
func peripheral(
    _ peripheral: CBPeripheral,
    didDiscoverServices error: Error?
) {
    guard let services = peripheral.services, error == nil else {
        // handle error
        return
    }
    for service in services {
        let uuids = requiredCharacteristicUUIDs(for: service)
        peripheral.discoverCharacteristics(uuids, for: service)
    }
}
In this example, we assume that the function requiredCharacteristicUUIDs(for: service) returns the UUIDs for all the characteristics that you want to use for communication with the peripheral. The concrete implementation depends on your project and the peripheral that you want to connect.
Once the specified characteristics have been discovered for a given service, the respective delegate method is called:
func peripheral(
    _ peripheral: CBPeripheral,
    didDiscoverCharacteristicsFor service: CBService,
    error: Error?
) {
    guard let characteristics = service.characteristics else {
        return
    }

    // We can now use these characteristics
    // to exchange data with the peripheral (read or write).

    // [→ EXAMPLE: see below]
}
Please note that this method will be called multiple times – once for each service, so we need to check if the characteristic that we want to read or write was discovered. In our example, we need to verify that the battery level characteristic was discovered and if that’s the case, we can go on and read it from the peripheral.
// EXAMPLE:

// Make sure we have the right service:
guard service.uuid == batteryServiceUUID else {
    return
}
// Find the right characteristic
let batteryLevelCharacteristic = characteristics.first {
    $0.uuid == batteryLevelUUID
}
// We can now read this characteristic.
Note: In “real life”, you probably want to be able to read the battery level any time after the respective characteristic has been discovered. For that reason, we recommend storing all discovered characteristics in a variable, so you have them available when you need them.
👓 Reading a BLE Characteristic
Once we’ve discovered a readable characteristic, we can simply request to read its value from the peripheral. For example, this is how to read the batteryLevelCharacteristic that we discovered in the previous section:
peripheral.readValue(for: batteryLevelCharacteristic)
After the value has been received, CoreBluetooth calls the following delegate method and passes the transmitted data to us:
func peripheral(
    _ peripheral: CBPeripheral,
    didUpdateValueFor characteristic: CBCharacteristic,
    error: Error?
) {
    guard let data = characteristic.value else {
        // no data transmitted, handle if needed
        return
    }

    if characteristic.uuid == batteryLevelUUID {
        // Decode data and map it to your model object
    }
}
This is where things get interesting. 😉 As mentioned in the introduction, we receive raw data from the peripheral, the characteristic’s value has the type Data – and so has our data constant. In order to interpret it correctly, we need a way to decode the data into a model object that we can work with in our app. And that’s precisely what the rest of this article is all about.
🧮 Decoding a Characteristic’s Value
So how do we decode (or deserialize) the data received from a peripheral? Let’s start with the simplest example and then turn up the heat step-by-step. 🔥
Case 1: Single-Field Characteristics
Let’s recall the definition of our battery level characteristic:
Its value consists of a single UInt8 field only, i.e. a single byte. Since the Data type in Swift is simply a wrapper around an array of bytes, all we need to do to read the battery level is to read the first byte of the data we received:
guard let firstByte = data.first else {
    // handle unexpected empty data
    return
}
let batteryLevel = firstByte
print("battery level:", batteryLevel)
The reason this is so simple is that in this case, the type of the decoded value coincidentally matches the type with which we represent data units (bytes). That’s really a special case, so let’s go to the next level!
Case 2: Fixed-Length Characteristics
Remember our LED strip from the beginning? Let’s recall the basic version first (the one without the party mode):
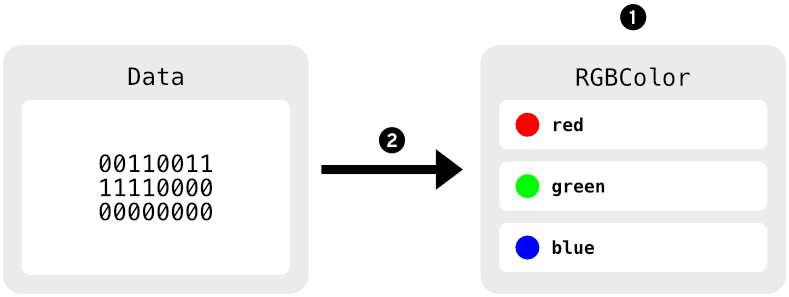
Its value consists of three UInt8 fields. It’s still pretty simple as the fields’ types are all the same and all fields are required, i.e. the characteristic has a fixed length. We could of course go with the same approach as in case 1 and simply extract the individual bytes:
guard data.count == 3 else {
    // handle unexpected number of bytes
    return
}
let red   = data[0]
let green = data[1]
let blue  = data[2]
print("R: \(red)", "G: \(green)", "B: \(blue)", separator: " | ")
With these color value, we could then go ahead and create a model object to represent our RGB-color:
struct RGBColor {
    let red: UInt8
    let green: UInt8
    let blue: UInt8
}
We could then create an instance of this model with the three color values:
let rgbColor = RGBColor(red: red, green: green, blue: blue)
But if we want to read several different characteristics or if any of the field’s types is not UInt8, this approach would quickly get pretty messy and cumbersome. So let’s come up with a way to automate this!
What we’re looking for:
- a way to specify all of a characteristic’s fields in one place
- a function that maps data to a model object when the field specification is provided
We formalize both conditions by defining a simple protocol:
protocol Payload {
    init?(_ data: Data)
}
All model types must conform to this protocol. It requires that each model knows how to construct itself from data. How exactly that is done, will be specified in each model’s initializer. If the data is not in the expected format, the initialization shall fail and nil be returned. For example, we can make our RGBColor model conform to the Payload protocol:
extension RGBColor: Payload {
    init?(_ data: Data) {
        guard data.count == 3 else {
            // unexpected number of bytes
            return nil
        }
        red   = data[0]
        green = data[1]
        blue  = data[2]
    }
}
Now we can directly map the data value to our model whenever we read a color characteristic:
func peripheral(
    _ peripheral: CBPeripheral,
    didUpdateValueFor characteristic: CBCharacteristic,
    error: Error?
) {

    if characteristic.uuid == readColorUUID {
        guard
            error == nil,
            let data = characteristic.value,
            let color = RGBColor(data)
        else {
            // couldn't read characteristic, handle if needed
            return
        }

        // → do something with the color
        // (e.g. pass it to a view controller and update a UI color there)
    }
}
This is much better already! Everything is where it belongs. But we’re not quite there, yet…
Case 3: Dynamic-length Characteristics
Are you ready to party?! Now is the time… to recall our LED strip characteristic that support the party mode:
The data value is dynamic in length: It might be 5 bytes, but it might also be 4 bytes, depending on the value of the first flags byte. As a result, we can no longer go with a fixed subscript syntax. For example, the following code would crash:
init?(_ data: Data) {
    guard data.count == 5 else { // ← What if it's only 4 bytes?
        // unexpected number of bytes
        return nil
    }
    frequency = data[1] // ← If it's only 4 bytes, this is the 'red' value!
    red   = data[2] // would be data[1]
    green = data[3] // would be data[2]
    blue  = data[4] // would be data[3] (data[4] would not be present)
}
Of course, we could fix this problem by evaluating the first byte:
init?(_ data: Data) {
    guard let flagsByte = data.first else {
        // unexpectedly found empty data
        return nil
    }
    switch flagsByte {
    case 0:
        // party mode off --> 4 bytes
        guard data.count == 4 else {
            // unexpected number of bytes
            return nil
        }
        red   = data[1]
        green = data[2]
        blue  = data[3]
    case 1:
        // party mode on --> 5 bytes
        guard data.count == 5 else {
            // unexpected number of bytes
            return nil
        }
        frequency = data[1]
        red   = data[2]
        green = data[3]
        blue  = data[4]
    default:
        // unexpected flags byte
        return nil
    }
}
But merely from the length of this code example, it should become clear that this approach doesn’t scale well. Why is that?
- Our code doesn’t make use of the fact that the order of bytes never changes. By adding the
frequencybyte, there’s simply an index offset of +1. If we take that into account, the code in both cases is actually the same. - The code is not really expressive! We simply assume that the reader knows what the meaning of the
flagByte‘s value is – but we have to comment that, so the code is not really self-explanatory.
Let’s solve these two problems! 🔨
📖 Using a Data Reader
We can solve the first problem by using a custom data reader with a cursor. The cursor moves through the bytes like text editor’s cursor through the characters. So the data reader has a state and remembers how many of the bytes it has already read.
class DataReader {
    let data: Data
    private var cursor: Int = 0

    init(_ data: Data) {
        self.data = data
    }
}
Did you notice what’s missing? 🤔 Right! The only other thing we need is a function to actually read the data and map it to the expected type, something like this:
func readNext() -> ExpectedType {
    // To be implemented...
}
When this function is called,
- it starts from the current cursor position in the data
- reads the next n number of bytes (depending on the
ExpectedType) and maps them to theExpectedType - and finally moves the cursor by n bytes.
But what is the ExpectedType?! It’s the type of the field that’s specified in the BLE characteristic. In our previous examples, it was always UInt8 (a single byte), but it could be other types as well, say Int32 (4 bytes), for example, or some floating-point representation.
And where did we specify that type for each field? Exactly! In our Payload implementation. For example, we specified the type of the RGBColor payload fields to be all UInt8:
struct RGBColor: Payload {
    let red: UInt8
    let green: UInt8
    let blue: UInt8
}
If we want to use these types, we better make our data reader’s readNext function generic!
func readNext<T>() -> T {
    // To be implemented...
}
Now our expected type T is inferred on the caller side. So if we define our Payload model as follows,
struct ColorMode: Payload {
    let frequency: UInt8?
    let red: UInt8
    let green: UInt8
    let blue: UInt8
}
the generic type of the readNext function is inferred from the ColorMode‘s properties:
init?(_ data: Data) {
    let dataReader = DataReader(data)
    guard let flagsByte: UInt8 = dataReader.readNext() else {
        // unexpectedly found empty data
        return nil
    }
    guard flagsByte <= 1 else {
        // unexpected flag value
        return nil
    }

    if flagsByte == 1 {
        // party mode on --> the next byte is the frequency
        self.frequency = .some(dataReader.readNext())
    }
    self.red = dataReader.readNext()
    self.green = dataReader.readNext()
    self.blue = dataReader.readNext()
}
Great! So now we’ve seen how we want to use our data reader, but we still haven’t implemented that mysterious readNext function. So let’s do that!
class DataReader {
    let data: Data
    private var cursor: Int = 0

    init(_ data: Data) {
        self.data = data
    }

    func readNext<T>() -> T {
        // Get the number of bytes occupied by the type T
        let chunkSize = MemoryLayout<T>.size
        // Get the bytes that contain next value
        let nextDataChunk = Data(data[cursor..<cursor+chunkSize])
        // Read the actual value from the data chunk
        let value = nextDataChunk.withUnsafeBytes { bufferPointer in
            bufferPointer.load(fromByteOffset: 0, as: T.self)
        }
        // Move the cursor to the next position
        cursor += chunkSize
        // Return the value that we just read
        return value
    }
}
That’s already the entire DataReader class! Isn’t that awesome?! 🙃
→ Problem 1: Solved! ✅
⚠️ Run-time Safety:
You might have noticed that we don’t have a safety check anymore if the cursor is still within the bounds of the data. This is for simplicity. In a production app, you might want to add a bounds check and throw an error if the cursor has reached (or exceeded) the end.
⚠️ Byte Order:
Please be aware that our DataReader implementation above only works with a little-endian byte order. This is the standard on iOS devices, but your BLE peripheral might use the opposite byte order (big-endian). In that case, you need to adjust the readNext method accordingly for integer types. If you don’t know what little-endian or big-endian is, please check out our article Unsafe Territory! Understanding Raw Bytes and Pointers in Swift, where we explain this concept in detail.
🏳️ Using Semantic Flags
We still haven’t solved the second problem. We’ve changed the syntax a bit, but we still have this condition
if flagsByte == 1 { ... }
which doesn’t explain at all why we do something different in this case. Let’s fix that!
There are two good ways to represent a flag in Swift:
- an
OptionSet - an enumeration
The first way is probably the most common one and definitely has some advantages. However, the code to define flag options in an OptionSet is very verbose and not very elegant. So we’ll do it with the second way and you’ll see in a minute why.
Our goal is to define a custom enumeration for each flag type locally in a Payload (where it belongs). We will use each case’s rawValue to represent the flag’s bit index within the flag byte(s).
Therefore, the raw value type must be Int. Let’s specify these conditions in a protocol:
public protocol Flag: RawRepresentable, CaseIterable where RawValue == Int {
    associatedtype IntegerType: UnsignedInteger
}
We also require that the Flag is CaseIterable in order to be able to iterate over all known flags. Sometimes, when more than 8 flags are required, we don’t have a single flag byte (UInt8), but multiple bytes that constitute an unsigned integer. We specify that integer’s concrete type with the associated type IntegerType. It might be UInt16 (2 bytes) or UInt32 (4 bytes), for example.
ℹ️ We don’t necessarily need the associated type, but it increases the run-time safety as it will cause a compiler error whenever we try to map a non-matching integer type to a certain Flag type.
As a convenience and for improved readability, we add a bitIndex property to the protocol that simply returns the enumeration’s rawValue.
extension Flag {
    var bitIndex: Int {
        rawValue
    }
}
With this protocol, we can now define a custom flag enumeration. For example, if we were talking to a fancy Bluetooth ice cream dispenser, there could be a characteristic to read all the flavors that it can currently dispense:
enum IceCreamFlavor: Int, Flag {
    typealias IntegerType = UInt8

    case strawberry = 0
    case raspberry = 1
    case vanilla = 2
    case lemonBasil = 3
    case chocolate = 4
    case straciatella = 5
    case cookieDough = 6
    case fudgeTartInsanity = 7
}
The “delicious” part here is not only that we’re talking about ice cream, but also that we can simply omit the numbers specifying each case’s raw value altogether if the flags are all contiguous (which they usually are). So instead of case strawberry = 0, we can simply write case strawberry etc. 😍
Switching back to our party mode-enabled LED strip, the flag byte is much simpler as only the first bit has a meaning:
enum Mode: Int, Flag {
    typealias IntegerType = UInt8

    case party
}
Now the only thing we need is a way to convert a given unsigned integer (that we read from the peripheral as part of the characteristic) to a collection of flags. The best place to implement this function is on the IntegerType itself, or more precisely: on the protocol that every IntegerType conforms to – UnsignerInteger!
extension UnsignedInteger {
    func flags<FlagType: Flag>() -> [FlagType] {
        FlagType.allCases.filter { self[$0.bitIndex] }
    }
}
As you can see, this function is generic as well, in the Flag type. And it’s for the same reason as before: to infer that type from the place where the function is called. For example, it allows us to do this:
let flavorFlags: [IceCreamFlavor] = flagByte.flags() // ← type is inferred
if flavorFlags.contains(.cookieDough) {
    // Flag "cookieDough" is set
    print("Thank god! 😅 My favorite flavor is still available! 🍨")
}
But let’s take one step back. Did you notice the subscript notation that we used in the flags function above?
self[$0.bitIndex]
It’s supposed to return the boolean value of the bit at the specified index, i.e. true if the bit is 1 or false if the bit is 0. But Swift doesn’t provide this functionality, so we’ll have to implement this subscript function ourselves:
public extension UnsignedInteger {
    subscript(index: Int) -> Bool {
        guard index < self.bitWidth else {
            fatalError("Index out of range!")
        }
        let bit: Self = 1
        let indexByte = bit << index
        let logicalValue = (self & indexByte) >> index
        return logicalValue != 0
    }
}
We first create a value of the type on which the subscript is called and set it to 1. This way, we can always be sure that the least significant bit (at index 0) is 1 and all other bits are 0, regardless of whether Self is a UInt8, UInt16 or UInt32.
Next, we shift that bit to the left until we have moved it to the index that we’re interested in. Then we add the resulting indexByte and the integer itself bitwise to isolate that single bit in the indexByte. In order to get its actual value (0 or 1), we need to shift it back by the same amount of steps. Finally, we return true when the bit is not 0.
Now we have all the pieces we need to read every kind of characteristic in an elegant, safe and expressive way.
→ Problem 2: Solved! ✅
🧩 Putting The Pieces Together
Making use of the Flag protocol and our DataReader, the final version of our ColorMode payload looks as follows:
struct ColorMode: Payload {
    let frequency: UInt8?
    let red: UInt8
    let green: UInt8
    let blue: UInt8

    enum Mode: Int, Flag {
        case party
    }

    init?(_ data: Data) {
        let dataReader = DataReader(data)
        guard let flagsByte: UInt8 = dataReader.readNext() else {
            // unexpectedly found empty data
            return nil
        }

        let modeFlags: [Mode] = flagsByte.flags()
        if modeFlags.contains(.party) {
            self.frequency = .some(dataReader.readNext())
        }
        self.red = dataReader.readNext()
        self.green = dataReader.readNext()
        self.blue = dataReader.readNext()
    }
}
The highlighted lines are the changes caused by introducing our new Flag approach. Instead of
if flagsByte == 1 {
    // read frequency byte
}
we now have
if modeFlags.contains(.party) {
    // read frequency byte
}
which is a subtle, yet important improvement as the latter code clearly explains our intent.
🏗 A Suitable Architecture
When working with BLE peripherals that come with many complex characteristics, we highly recommend to not manually read each byte. Instead, think of a way to properly encapsulate the various tasks that you need to perform in order to interpret the BLE data correctly. A concrete architecture always depends on your project’s requirements, but we want to share some advice for best practices that worked well for us in our projects:
- Separate the process of actually reading data from assigning it to specific meaningful properties.
In this article, this reading data is encapsulated in theDataReader, assigning it to properties is done in thePayloadinitializer. - Oftentimes, it makes sense to add a second model layer.
At QuickBird Studios, we strictly model thePayloadafter the characteristic specification. Its properties exactly reflect the fields in the characteristic’s value. This way, it’s very easy to discover bugs or incorrect mappings. However, it also means that thePayloadcan only contain primitive Swift types, mostlyIntandUInttypes. For that reason, we create a second layer that we call “the model”. It converts the Payload into meaningful properties that we can conveniently work with in the app. For example, a timestamp integer value in thePayloadmight be converted to aDateobject in the model, or aUInt8value might be converted into an enumeration with meaningful case labels. - Use a
PeripheralManager.
Most BLE apps we have worked with use a custom peripheral manager to wrap aCBPeripheraland also act as aCBPeripheralDelegate. This class is typically calledPeripheralManager(or similar). It’s a good approach in our opinion as it hides CoreBluetooth away and with it, the handling of bits and bytes. A peripheral manager can have peripheral-specific methods likereadColor()orsetBrightness(level:)etc. It might also define its own delegate or use completion closures to asynchronously return information to the caller. Each class of BLE devices would typically have its own peripheral manager (e.g.LEDStripPeripheralManager,IceCreamDispenserPeripheralManageretc.). - [Advanced:] Use generics to abstract characteristics.
Many BLE libraries define a characteristic as a protocol and make it generic itsPayloadtype (it’s defined as an associated type in the protocol). This way, you can automate the process of reading a characteristic and mapping the received data to its respectivePayloadtype. It really depends on the kind of BLE peripheral your app needs to talk to, but if the peripheral is complex with lots of different characteristics or your app supports different kinds of BLE peripherals, we would recommend going with this abstraction.
🚶♀️ Where to Go From Here
In this article, we’ve introduced a workflow to conveniently read and interpret BLE characteristics. We didn’t go into too much detail when it comes to pointers and the byte order in Swift, which is often a source of confusion. If you want to learn more about this topic, we’ve got you covered with our article Unsafe Territory! Understanding Raw Bytes and Pointers in Swift.
Reading raw data and mapping it to your Swift model types can be a mess and is often difficult to read. By structuring your model layers well and making use of the Flag protocol introduced in this article, you can make your code both readable and maintainable.
BLE supports encryption and integrity checks of sent and received data by default. Yet, some security-critical BLE devices have an extra checksum specified in their characteristics to ensure that the received information is correct. In our article Data Integrity: CRC with Swift on iOS, we explain how to verify these checksums.
What we didn’t cover in this article is how to write BLE characteristics to a peripheral. If you’re interested in another article that explains the process, please let us know on Twitter!
Lastly, it remains to be said that you don’t necessarily need to write all the code the read BLE characteristics yourself. There are of course some libraries that do much of the heavy lifting for you:
- Our favorite is bluejay.
- If you work a lot with RxSwift in your project, RxBluetoothKit is probably the right choice for you.
The downside of using a library is that you first need to learn how to use the library and it’s often not quite as flexible as writing it yourself.
Phew! You’ve made it through this article! 🎉 We hope that you gained some new insights that you can use for your own projects. If that’s the case, please share the article and if you have any feedback or suggestions, just let us know by dropping us a tweet! 😊
If you’re planning to create an app that uses Bluetooth to exchange data with other devices, feel free to reach out to our team at QuickBird Studios or QuickBird Medical.
