
Swift Macros: Understanding Freestanding & Attached Macros
Have you ever started using a library and you were outraged by all the boilerplate code you need to write to make it work? Have you misused an API, because it wasn’t obvious to use? Have you thought that you just want to make some code just so much easier without all the manual work of writing complex code for all that repetitive logic? Well, there is a new Swift language feature to the rescue: Macros. We take a look at freestanding and attached macros and show you how they work.
Macros allow packages to expose code generation functionality that you can use in your code, just like any other function or type. Maybe you have already used that new @Observablemacro for SwiftUI? Rather than having a type conform to ObservableObjectand then needing to put @Published in front of every single property that needs to be observed, you can now simply annotate a type with @Observable and that’s it. There’s a lot more to figure out about Swift Macros – let’s find out.
Types of Macros
With macros, you have quite a few options to choose from. On a broader level, we can divide them into two categories: freestanding and attached. While attached macros are put in front of a declaration, freestanding macros are placed on their own. Both freestanding and attached macros have knowledge about their context though, so if you use them inside a certain context (say a declaration of a class or an extension), the macro can make use of that in both cases.
You can easily spot the difference between freestanding and attached macros when they are being used since freestanding macros use a # before their name and attached macros need to be used with a @prefix.
Freestanding Macros (#)
Freestanding macros are not attached to an existing declaration, which is why there are only two types of it: the expression macro and the declaration macro.
Expression Macros
As the name expression macro implies, an expression macro generates expressions. Therefore they can be used like methods you are calling to get some return value. Rather than that macro simply being executed though, the macro expands before the code is even compiled into another expression.
One example of an expression macro would be this macro, where a static string is checked at compile time to be a valid URL and if it doesn’t pass the test, it would result in a compile-time error rather than a crash.
let blogURL = #URL("https://quickbirdstudios.com/blog")
That code is expanded by the macro as this, so why wouldn’t we simply write that directly?
let blogURL = URL(string: "https://quickbirdstudios.com/blog")!
Well, while generating that code, the macro can check the string already and make sure that this expression wouldn’t result in anil value.
Declaration Macros
For a few more advanced use cases, where one would like to create declarations, such as adding properties to the enclosing type or creating new types altogether, a declaration macro needs to be used.
Since a freestanding declaration macro can create declarations on the global scope (i.e. without being nested in another type declaration), you will need to adhere to a specific naming scheme of the expanded declarations. You may, for example, choose to start all the expansions with a certain prefix or suffix. This naming scheme is required to be specified for the declaration of the macro.
One scenario where a freestanding declaration macro would be super helpful is to create union types. Since Swift doesn’t allow to specify that a function parameter could be any of multiple types (without creating protocol/type hierarchies), a union type could be generated using an enum with associated objects of the different types. The cases could also be named according to the type of the associated object. For a union type of Int and Double, this macro could be used like this:
@Union<Int, Double>("Number")
This macro could expand into an enum like the following. There could even be computed properties to access the associated objects without the need for pattern matching (i.e. case-let or switch-case constructs).
enum NumberUnion {
    case int(Int)
    case double(Double)
}
Attached Macros (@)
Attached macros are always specified right before a declaration, be it a property, a type, an extension or even a protocol. Depending on the specific type of macro, other expansion options are available.
Accessor Macros
Accessor macros are attached to member property declarations of a type. In many cases, one can easily mistaken accessor macros with property wrappers, since they are indistinguishable from how they are being used. There is, however, one important difference: A property wrapper is a run-time concept, while a macro is performed at compile-time.
Similar to a property wrapper though, you can define the getters and setters of a property, i.e. the body of a computed property. It could also define willSet/didSet observers.
In the following example, we could make sure, that a database update operation is performed whenever a property has been changed:
class DatabaseObject {
    @ObservedProperty var id: UUID
    @ObservedProperty var name: String
}
These properties could now be rewritten to this code:
class DatabaseObject {
    var id: UUID {
        didSet {
            Database.shared.update(self)
        }
    }

    var name: String {
        didSet {
            Database.shared.update(self)
        }
    }
}
Conformance Macros
Conformance macros can add properties and methods to a type to make sure, it conforms to a protocol or super class.
As shown in this example, you can also define a macro that requires parameters.
@JSON(["id": "_id", "companyName": "company"])
struct CompanyResponse: Codable {
    var id: String
    var companyName: String
}
Here, the macro could implement the Codable protocol by adding CodingKeys based on the provided dictionary.
struct CompanyResponse {}

extension CompanyResponse: Codable {
    private enum CodingKeys: String, CodingKey {
        case id = "_id"
        case companyName = "company"
    }
}
Member Macros
To add new members such as properties and methods to a declaration, you can use member macros. As an example one could create a macro to generate type-safe properties from a localizable file SwiftGen or R.swift):
@Localization("Localizable")
enum L18n {}
This macro could generate definitions like the following:
enum L18n {
    enum Welcome {
    		static let title = NSLocalizedString("Welcome.title", comment: "")
    		static let nextAction = NSLocalizedString("Welcome.nextAction", comment: "")
    }
}
Member Attribute Macros
A member attribute macro cannot create new members to an existing declaration. It can, however, change the attributes of members, by e.g. marking them @objc or @nonobjc or adding property wrappers.
A database framework relying on dynamic Objective-C features could use this macro to make sure properties are correctly marked:
class MyDatabaseObject: NSManagedObject {
    @ManagedProperty var id: UUID?
}
Therefore, it could make sure to mark properties both dynamic and @objc:
class MyDatabaseObject: NSManagedObject {
    @objc dynamic var id: UUID?
}
Peer Macros
Peer macros expand new declarations on the same scope as the declaration it was attached to. For example, a macro might generate a protocol from the definitions defined in the attached context.
@Protocolize("MyProtocol")
class MyClass {
    var someProperty = String()
    func someMethod() {}
}
This macro could generate code like this:
protocol MyProtocol {
    var someProperty: String { get set }
    func someMethod()
}
Let’s create a macro!
Let’s build a small macro to get more familiar with what macros can do. In this example, we will build a macro to generate SwiftUI’s EnvironmentKey for us.
How is this useful? Let’s have a look at the code we would normally need to write:
extension EnvironmentValues {
    private enum TertiaryColorEnvironmentKey: EnvironmentKey {
        static var defaultValue: Color { .primary.opacity(0.5) }
    }

    var tertiaryColor: Color {
        get {
        		self[TertiaryColorEnvironmentKey.self]
        	}
        	set {
        	    self[TertiaryColorEnvironmentKey.self] = newValue
        	}
    }
}
Rather than that, we simply want to be able to write this:
extension EnvironmentValues {
    #GenerateEnvironmentKey<Color>("tertiaryColor", default: .primary.opacity(0.5))
}
This macro might not be the most useful in reducing a whole lot of boilerplate code, it does remove the need to create that EnvironmentKey enum manually.
What do we need to do to make this happen? First, we will discuss project setup, then we will define how our macro is called and finally, we will implement the macro.
Project setup
To create a new Swift package that will contain our macro, we will use the macro template in Xcode. Select File > New > Package... to start the creation process of a new Swift Package.
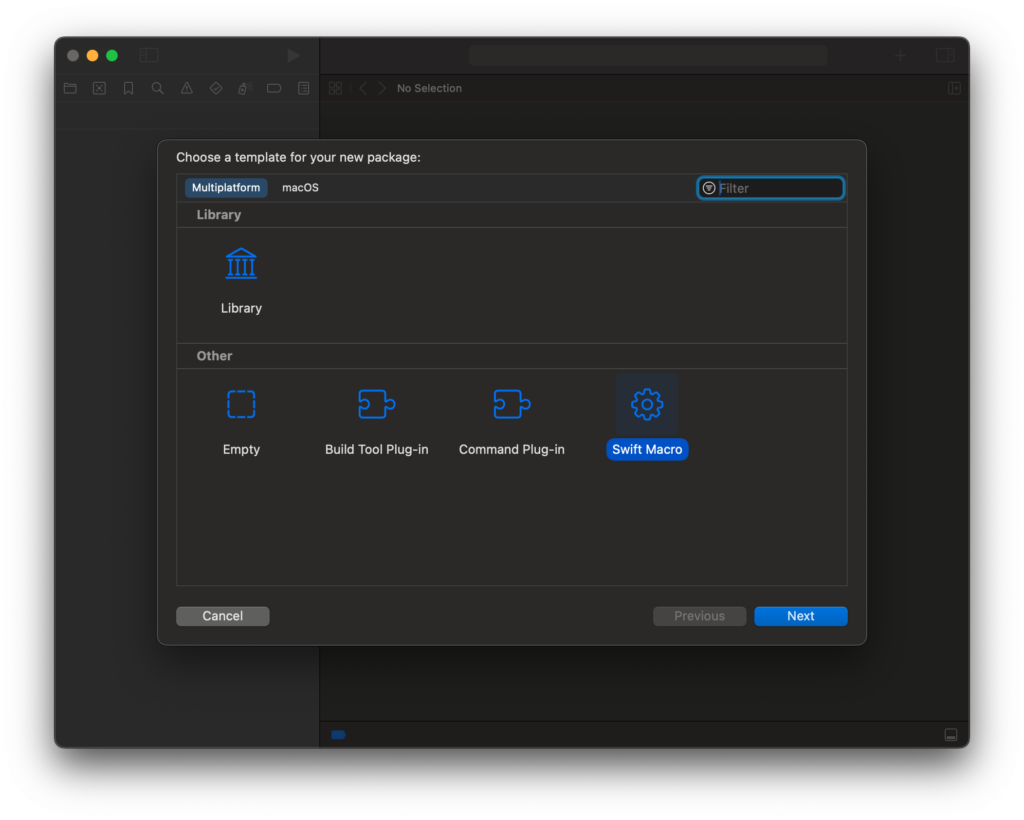
By choosing Multiplatform > Other > Swift Macro (as shown in the screenshot above), Xcode already sets up 4 targets for us:
| Target | Explanation | Questions | Compiled for |
| <name> | Macro declaration | How can macros be used?” “What parameters will need to be provided” “What names can be specified by a macro?” | Client |
| <name>Macros | Macro Expansions | “What code does a macro generate?” | Development computer |
| <name>Client | A client to use the macros | Client | |
| <name>Tests | A test suite for the macros | “How would I be able to check whether my expansion implementation is correct?” | Development computer |
–> The names of the targets depend on user input replaced by <name>.
The macro expansions will be run on the host machine (i.e. the machine the code is compiled on), which is why the extra <name>Macros package is needed. The code contained in it won’t be contained in the executable, but instead it will only be run when compiling.
How is my macro being called?
Now that the project setup is done, we can dive into writing some code, right? Before we get into the depths of the abstract syntax tree, let’s first define how our macro is going to be called. We do this by adding a new declaration in the <name> target, i.e. in the target that a user would import into their code.
@freestanding(declaration, names: arbitrary)
public macro GenerateEnvironmentKey<T>(_ name: StaticString, `default` builder: @autoclosure @escaping () -> T) = #externalMacro(module: "TestMacros", type: "GenerateEnvironmentKeyMacro")
We first declare the category (freestanding vs attached) of the macro followed by the concrete type. Additionally, some macros are required to specify a certain naming scheme. Since the GenerateEnvironmentKey macro is exclusively going to be used inside extensions of EnvironmentValues, we can specify arbitrary names here. After the macro keyword, the signature looks just like every other function signature, right? Yes, but it’s not followed by a body, but rather assigned to this #externalMacro construct where the module of the macros needs to be specified and the type implementing the code expansion. In this example, we will use the <name>Macros target (in the example above called TestMacros) and the type name GenerateEnvironmentKeyMacro.
Where does the macro implementation go?
As you might have noticed, the <name>Macros target doesn’t yet have a GenerateEnvironmentKeyMacro type, so let’s create that and make it conform to the DeclarationMacro protocol.
public struct GenerateEnvironmentKeyMacro: DeclarationMacro {
    public static func expansion(
        of node: some FreestandingMacroExpansionSyntax,
        in context: some MacroExpansionContext
    ) throws -> [DeclSyntax] {
    		return []
    }
}
To make our macro conform to the DeclarationMacro protocol, we need to implement the expansion function, but before we get there, we still need to do one important but easy-to-miss step: We need to expose that macro to the outside. We do this by adding the type to the providingMacros property of the <name>Plugin struct.
@main
struct TestPlugin: CompilerPlugin {
    let providingMacros: [Macro.Type] = [
        GenerateEnvironmentKeyMacro.self,
    ]
}
With all this set up, we can finally get to implementing the actual expansion code.
Writing macro expansion code
Let’s reiterate how our macro is supposed to be called:
extension EnvironmentValues {
    #GenerateEnvironmentKey<Color>("tertiaryColor", default: .primary.opacity(0.5))
}
As you might have noticed, we don’t just get those parameters in the expansion function directly. No, we will need to extract them from the node parameter. The node parameter provides us with the syntax elements making up the call site of the macro.
public static func expansion(
    of node: some FreestandingMacroExpansionSyntax,
    in context: some MacroExpansionContext
) throws -> [DeclSyntax] {
    // Firstly, we extract the name parameter as a string literal:
    guard let name = node.argumentList.first?.expression.as(StringLiteralExprSyntax.self)?.representedLiteralValue else {
    	    throw CocoaError(.featureUnsupported) // You might want to replace this error with a more descriptive replacement
    }

    // Secondly, we extract the default value's builder function:
    guard let builder = node.argumentList.dropFirst().first?.as(LabeledExprSyntax.self)?.expression else {
       throw CocoaError(.featureUnsupported) // You might want to replace this error with a more descriptive replacement
    }

    // Thirdly, we also need to know about the generic type being used:
    guard let genericArgument = node.genericArgumentClause?.arguments.first else {
        throw CocoaError(.featureUnsupported) // You might want to replace this error with a more descriptive replacement
    }

    return []
}
With all this code in place, we have access to our two parameters for the name and default value as well as the generic type.
– Warning: The macro makes the assumption that the generic type is specified explicitly. What if the macro is called as #GenerateEnvironmentKey("myNumber", 5) though?
Let’s expand some code, then! We can make use of SwiftSyntax’s awesome string literal conversions:
public static func expansion(
    of node: some FreestandingMacroExpansionSyntax,
    in context: some MacroExpansionContext
) throws -> [DeclSyntax] {
    // .. the previous code setting name, builder and genericArgument variables.

    let keyName = name.capitalized + "EnvironmentKey"
    return [
        """
        private enum \(raw: keyName): EnvironmentKey {
            static var defaultValue: \(genericArgument) { { \(builder) }() }
        }
        """,
        """
        var \(raw: name): \(genericArgument) {
            get { self[\(raw: keyName).self] }
            set { self[\(raw: keyName).self] = newValue }
        }
        """
    ]
}
That’s all that’s needed! We now generate both the EnvironmentKey conforming enum with the defaultValue generated as specified in the macro and add a property with the specified name using that key.
– Note: The code above makes heavy use of string literals with raw strings injected. To write safer code, you may want to check out Swift AST Explorer to see how the individual syntax nodes can be created more explicitly and without the use of raw string injection.
Trying out macros in the Client target
We can use the Client target to see whether our macro works correctly. Let’s just define a tertiaryColor environment key for our app’s color scheme:
extension EnvironmentValues {
    #GenerateEnvironmentKey<Color>("tertiaryColor", default: .primary.opacity(0.5))
}
Does this actually work though? Well, let’s check in a SwiftUI view whether we can access the tertiaryColor property:
struct MyView: View {
    @Environment(\.tertiaryColor) var tertiaryColor

    var body: some View {
        Text("MyView")
            .foregroundStyle(tertiaryColor)
    }
}
Works as expected!
– Warning: Keep in mind that the macro makes many assumptions about its usage context (e.g. that it is only used within EnvironmentValues extensions) or that there is an explicit generic argument clause, so you might want to adapt the code before making use of it.
Testing
As you might want to use the Client target for an actual executable and test more advanced edge cases, let’s check out the testing capabilities of Swift for macros. The SwiftSyntaxMacrosTestSupport module provides us with the assertMacroExpansion function to see whether our macro correctly expands. Let’s change the test in <name>Tests/<name>Tests.swift to actually call our macro:
import SwiftSyntaxMacros
import SwiftSyntaxMacrosTestSupport
import XCTest

#if canImport(TestMacros)
import TestMacros

let testMacros: [String: Macro.Type] = [
    "GenerateEnvironmentKey": GenerateEnvironmentKeyMacro.self,
]
#endif

final class MacroTests: XCTestCase {
    func testGenerateEnvKeyMacro() throws {
        #if canImport(TestMacros)
        assertMacroExpansion(
            """
            extension EnvironmentValues {
                #GenerateEnvironmentKey<Color>("tertiaryColor", default: .primary.opacity(0.5))
            }
            """,
            expandedSource: """
            extension EnvironmentValues {
    				private enum TertiaryColorEnvironmentKey: EnvironmentKey {
        				static var defaultValue: Color { .primary.opacity(0.5) }
    				}

    				var tertiaryColor: Color {
        				get {
        					self[TertiaryColorEnvironmentKey.self]
        				}
        				set {
        	    				self[TertiaryColorEnvironmentKey.self] = newValue
        				}
    				}
    			}
            """,
            macros: testMacros
        )
        #else
        throw XCTSkip("macros are only supported when running tests for the host platform")
        #endif
    }
}
As you might have noticed, there are quite a few compiler directives (including #if). They are needed, since the code relevant to calling the macros can only be executed on the host platform (i.e. the machine the code is compiled on) and not as part of the rest of the code of the Swift Package.
– Note: Now you have seen all that is needed to write your own macro. What do you think about them so far?
Discussion
As with every new concept added to a compiler or language, there are some benefits of using it, but also some limitations or disadvantages. Where do they really make our lives easier and where might they create more issues than they solve? Let’s see.
Benefits
First and foremost: By reducing boilerplate code and complicated, unintuitive patterns, macros can lead to a cleaner and smaller code base of your application. The complexity is moved from a macro user to a macro developer and can be implemented once in a more generalized fashion rather than being handled multiple times over by a macro user. This can especially be useful for libraries containing with rather strict patterns that can easily be misused. With macros, the library maintainer can itself control how the code is written and which modifications are even possible. One example: One might easily forget wrapping properties of an @ObservableObject with a @Publishedproperty wrapper – with the @Observable macro, this cannot happen.
Code generation tools have so far been integrated into the build pipeline using shell scripts or simply executables. There is often a need for an external dependency management system, such as RubyGems, manually placed binaries or programs that need to be installed on the device before it even allows you to build (e.g. using Homebrew). With the use of macros, we can integrate these tools in the dependency management of the application itself and therefore simplify the setup drastically. If not all our tools support Swift Macros though, we might just add yet another way our build pipeline can break and therefore introduce more complexity instead.
Limitations
Swift Macros are not necessarily beginner-friendly. To maintain a Swift macro, one needs extensive knowledge about the Swift AST (Abstract Syntax Tree) and the SwiftSyntax library. While tools like the Swift AST Explorer can help a developer quickly gain a lot of knowledge on how Swift’s syntax is structured, it is easy to simply miss this one edge case that hasn’t been thought about while developing a macro. Testing can help a lot here, but there can always be that one edge-case or new language feature that one can easily miss during development.
For a developer making use of macros, they seem to “just work like magic”, until they don’t. Then, it will be hard to figure out what is causing code to no longer compile. Being able to dig through the generated, non-compiling code might be helpful, but can easily render a codebase useless, too.
Adding on to this: Macros aren’t very transparent. While you might be able to see the code generated by a macro dependency when you first compile it, are you going to check whether each subsequent version of that macro is going to generate the same code? Of course, this issue exists in dependencies in general, but in contrast to regular source dependencies, a macro interacts with your own code in a more integrated way potentially leading to more severe issues.
Adding Swift macros to an existing package will lead to at least one more target required to be added to the Swift package setup. Yes, it may just be a single target in simple packages. More complex setups might want to think twice about adding this new target though, if they intend to have multiple targets include macros though, since it can easily double the amount of targets needed.
The Swift macro API is not necessarily modularity-friendly. A macro seems to be intended to be written for expanding one or more concrete points in your code. Assuming you have found an issue with a macro and would like to just add this one feature to it, you will most likely have a hard time figuring out how to do this without changing the dependency’s code directly (e.g. by forking it).
Swift macros that generate code on the global scope (i.e. without being nested in a type) need to conform to a specific naming scheme. You may decide to always use a specific prefix or suffix on the definitions generated by a macro, but it might still limit the possibilities to generate certain code.
Conclusion
Swift Macros can be a great tool for libraries currently forcing users into using repeating patterns or writing unsafe code that could already be checked at compile-time. As with every new tool or feature, one shouldn’t overdo it though. While macros come with their own limitations, they can also introduce potential issues that wouldn’t be otherwise possible with “regular” dependencies, such as making your own code no longer compile.
Don’t be afraid to dive into this new fascinating feature of Swift though, a lot of the examples in the SwiftSyntax repository can help you get started!
