
Supporting Both CocoaPods & The Swift Package Manager
When creating a library, we usually strive to support all commonly used package managers. For iOS libraries, the most popular ones are Cocoapods, the Swift Package Manager (SPM), and Carthage.
Different package managers have different ways of organizing your project’s dependencies. Thus, supporting multiple package managers is a little challenging. In this article, we’ll show you how to setup up your library to support both Cocoapods and the Swift Package Manager.
🤔 The Challenge
Cocoapods and SPM use different folder structures, e.g. the paths for unit tests, assets, example projects, etc. are not the same. That’s the main reason why supporting both CocoaPods and the Swift Package Manager is not straightforward and requires some adjustments.
| CocoaPods | Swift Package Manager |
|---|---|
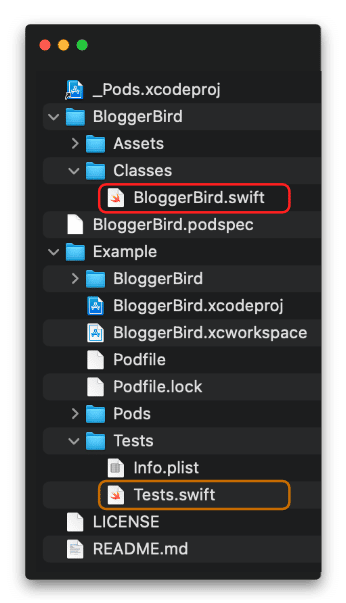 |
 |
🏁 How to Start?
There are two ways to get started to set up your library’s folder structure: You can either set up a project with CocoaPods and then adjust it in order to work with SPM, or you can do it the other way around and start with the Swift Package Manager.
We usually prefer and recommend the latter approach because the Swift Package Manager provides us with a clean folder structure to start with, reduced to the absolutely necessary basics. We can start from there and extend the package according to our specific requirements. Also, adopting support for CocoaPods for a project created with SPM is easier than vice-versa as the only files we need to create are the podspec and the license file.
Initializing a library with CocoaPods auto-generates many files and folders with a more verbose structure. However, if you want to have a demo application, testing frameworks and UI tests right from the start, starting with CocoaPods might still be a better choice for you as it generates them automatically (if you want).
📦 Creating Your Library With The Swift Package Manager
Let’s dive right in and set up your library with the Swift Package Manager!
- Open the terminal,
- navigate to the directory where you want to create your library,
- and execute
swift package init.
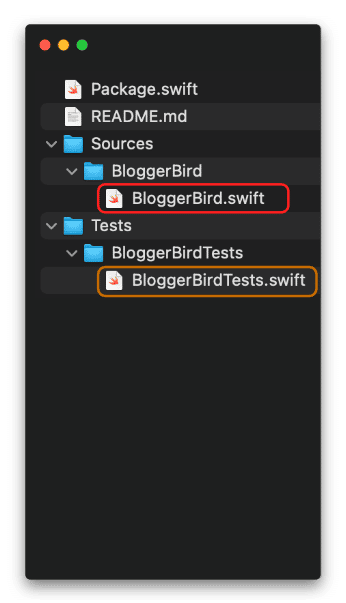
The Swift Package Manager will now create the two files
Package.swiftREADME.md
alongside the two folders
SourcesandTests.
All source files and resources typically go into the Sources folder, all unit tests go into the Tests folder.
For CocoaPods, it also required to have a license file, otherwise you will get these warnings during validation:
- WARN | attributes: Missing required attribute license.
- WARN | license: Missing license type.
We’re going to need a license anyway. So let’s add one:
Create a new file LICENSE.md in your library directory. Open the file and add your license text. We typically go with the MIT License:
Copyright (c) 2021 Quickbird Studios

Permission is hereby granted, free of charge, to any person obtaining a copy
of this software and associated documentation files (the "Software"), to deal
in the Software without restriction, including without limitation the rights
to use, copy, modify, merge, publish, distribute, sublicense, and/or sell
copies of the Software, and to permit persons to whom the Software is
furnished to do so, subject to the following conditions:

The above copyright notice and this permission notice shall be included in
all copies or substantial portions of the Software.

THE SOFTWARE IS PROVIDED "AS IS", WITHOUT WARRANTY OF ANY KIND, EXPRESS OR
IMPLIED, INCLUDING BUT NOT LIMITED TO THE WARRANTIES OF MERCHANTABILITY,
FITNESS FOR A PARTICULAR PURPOSE AND NONINFRINGEMENT. IN NO EVENT SHALL THE
AUTHORS OR COPYRIGHT HOLDERS BE LIABLE FOR ANY CLAIM, DAMAGES OR OTHER
LIABILITY, WHETHER IN AN ACTION OF CONTRACT, TORT OR OTHERWISE, ARISING FROM,
OUT OF OR IN CONNECTION WITH THE SOFTWARE OR THE USE OR OTHER DEALINGS IN
THE SOFTWARE.
Feel free to copy & paste the license above, but don’t forget to replace Quickbird Studios in the header with your (or your company’s) name. If you are uncertain which license to use, check out the website choosealicense.com. It makes it much easier to go through the “license jungle” and pick a suitable one for you.
⚙️ Setting Up Package.swift
Package.swift is the configuration file for your library. The Swift Package Manager prefills it with some default properties. But we need to add some more:
platforms: [.iOS(v13)]
represents the minimum version for the target. If you support other platforms like iPadOS, macOS, tvOS, watchOS, you can specify the respective versions here as well. It’s crucial that we use the same values for both Cocoapods and SPM to build a stable and reliable library. Supporting different target versions might cause build issues: The library might build with Cocoapods but not with the Swift Package Manager, or vice-versa.swiftLanguageVersions: [.v5]
provides the Swift version number(s) that your library is compatible with.
Our entire Package.swift now looks as follows:
// swift-tools-version:5.3

import PackageDescription

let package = Package(
    name: "BloggerBird",
    platforms: [.iOS(.v13)],
    products: [
        .library(
            name: "BloggerBird",
            targets: ["BloggerBird"]),
    ],
    dependencies: [],
    targets: [
        .target(
            name: "BloggerBird",
            dependencies: []),
        .testTarget(
            name: "BloggerBirdTests",
            dependencies: ["BloggerBird"]),
    ],
    swiftLanguageVersions: [.v5]
)
🤝 Adding CocoaPods Support
Now it’s time to add support for CocoaPods! Open your library’s root directory (the one that contains the Sources and Tests folders) and create a new file BloggerBird.podspec (replace BloggerBird with your library’s name). This file is your library’s configuration file through the eyes of CocoaPods. Open it with a text editor and add the following specifications:
Pod::Spec.new do |s|
  s.name             = 'BloggerBird'
  s.version          = '0.1.0'
  s.summary          = 'A short description of BloggerBird.'

  s.homepage         = 'https://github.com/quickbirdeng/BloggerBird'
  s.license          = { :type => 'MIT', :file => 'LICENSE.md' }
  s.author           = { 'Quick Bird' => 'mascot@quickbirdstudios.com' }
  s.source           = { :git => 'https://github.com/quickbirdeng/BloggerBird.git', :tag => s.version.to_s }

  s.ios.deployment_target = '13.0'
  s.swift_version = '5.0'

  s.source_files = 'Sources/BloggerBird/**/*'
end
Adjust the different specs according to your library’s requirements. Make sure that the version numbers specified in ios.deployment_target and swift_version are the same as the version numbers you specified in Package.swift. If you forget to specify the swift_version, you’ll get the following warning during validation:
- WARN | [iOS] swift: The validator used Swift 4.0 by default because no Swift version was specified. To specify a Swift version during validation, add the swift_versions attribute in your podspec. Note that usage of a swift-version file is now deprecated
The most important spec is the source_files path. The first part must point to the directory we created with the Swift Package Manager, followed by /**/*.
**indicates that all subfolders are included recursively.*is a wildcard for any file.
Please make sure that all your library’s source files are placed in the path that you specified (Sources/BloggerBird in our case). Otherwise, the project won’t compile and you’ll get the following error:
- ERROR | [iOS] file patterns: The source_files pattern did not match any file.
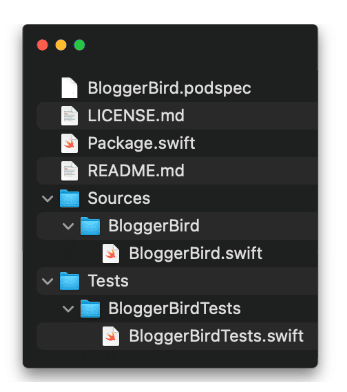
Here’s what our final folder structure looks like:
🏆 Congratulations!
You’ve successfully set up your library to support both CocoaPods and the Swift Package Manager! 🎉
