SwiftUI Architectures: Model-View, Redux & MVVM
With SwiftUI and Xcode 11 released just recently, we decided to investigate different app architectures that can be used with SwiftUI. We’re going to look into a rather simple Model-View architecture, the Redux architecture pattern and the ViewState MVVM.
Since SwiftUI uses a declarative UI approach, writing UI code has drastically changed. Instead of UIKit’s rather imperative approach with objects that are instantiated once and used until they are deallocated, SwiftUI recreates a View’s subviews every time the state changes. Due to this, we check whether our current MVVM architecture (see our previous blog post for more information) can simply be ported to SwiftUI and also try new architecture approaches, which might fit even better. Let’s see!
What we will build
Before we start with the different app architectures for SwiftUI, let me introduce you to our example app for this article: QBChat. QBChat is a simple chat app we want to implement using the different app architectures to give you an idea of how these architectures look in code. QBChat has a ChatListView with a list of different chats and a ChatDetailView with only messages from a single chat.
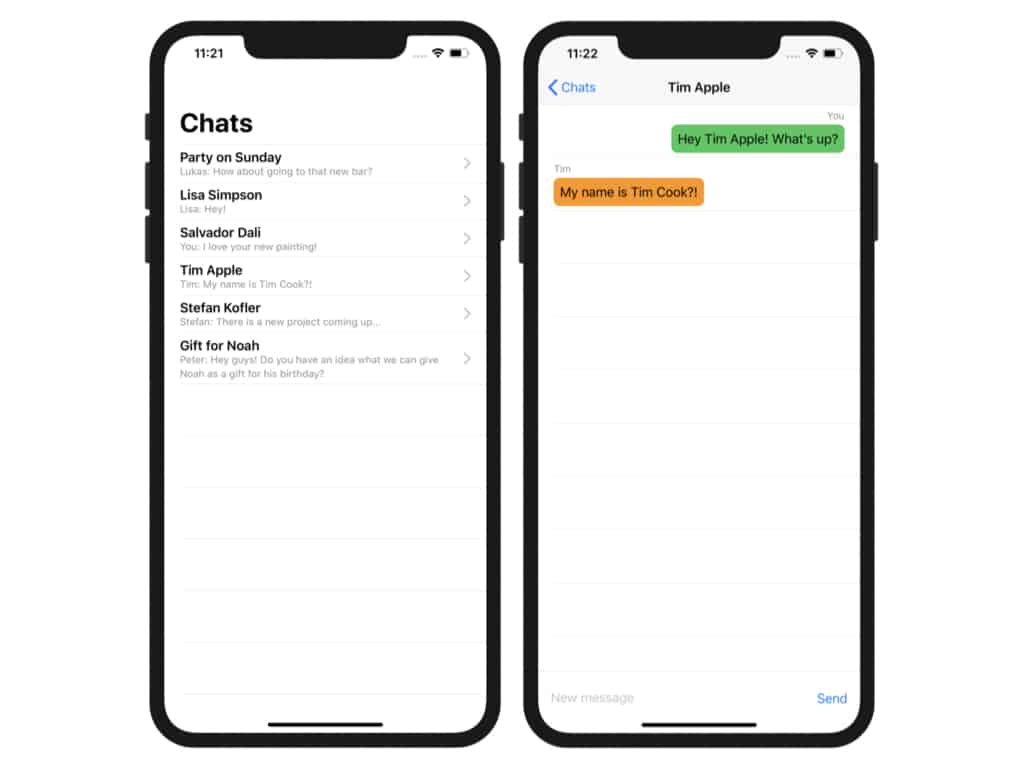
Since this app should only be used as a small example, we use the following models to express what information we have about a chat and a message.
We further define a ChatService to handle all chat-related model manipulations with the following interface:
In addition to that, we predefined the Views ChatCell and MessageView to display chat/message information. Since both of these Views are only displaying static information, we simply use them but do not further adapt them to each architecture.
SwiftUI App Architectures
We first describe and discuss the app architectures Model-View, Redux and ViewState MVVM individually by showing an example implementation (which you can also find in this Github repository). We then evaluate them in comparison to each other.

Model-View
We start with a simple-to-understand trivial architecture to show which problems might arise once an app starts getting bigger and why there might be the need for an intermediate layer between View and Model code.
Overview / Idea
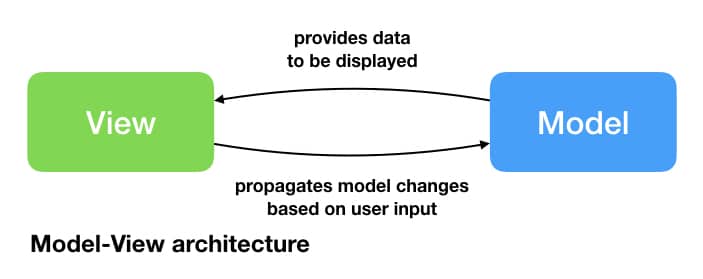
In a Model-View app architecture, the View layer has full access to the Model layer and translates user input by itself into Model manipulation actions. The View also accesses the Model layer to display the current state the app is in.
Implementation
For the Model-View app architecture, we add the necessary services and model state in the View directly, as you can see in ChatListView and ChatDetailView. In this example, we simply add our ChatService to the Views itself and access their methods directly to create the different Views from them. We also forward the ChatService to the ChatDetailView for it to be used accordingly.
As we see in ChatDetailView, we need to store state in the View itself, including the current chat and the messages inside a chat.
Discussion
If we were to consider these Views as always screen-filling, they seem to be very similar to how UIViewControllers work in a UIKit-MVC app architecture. Similar to the problems encountered by using an MVC app architecture, we could also identify the following advantages and disadvantages of using a Model-View app architecture:
Advantages:
- Low code overhead: No need to write intermediate layers for business logic or even handle code in different files. This allows for fast and simple development.
- Low update rate: The View is only updated when the state important for that View actually changed. There is only a limited amount of shared state between Views.
Disadvantages:
- “Massive View”: Views can easily grow in complexity over time once there is more complex business logic needed.
- Low Reusability: Views cannot easily be reused since business logic is strongly coupled to UI code.
- Low Testability: Views cannot easily be tested with mock data. Dependencies between different UI controls can also only be tested in a close-to-production environment.
Redux
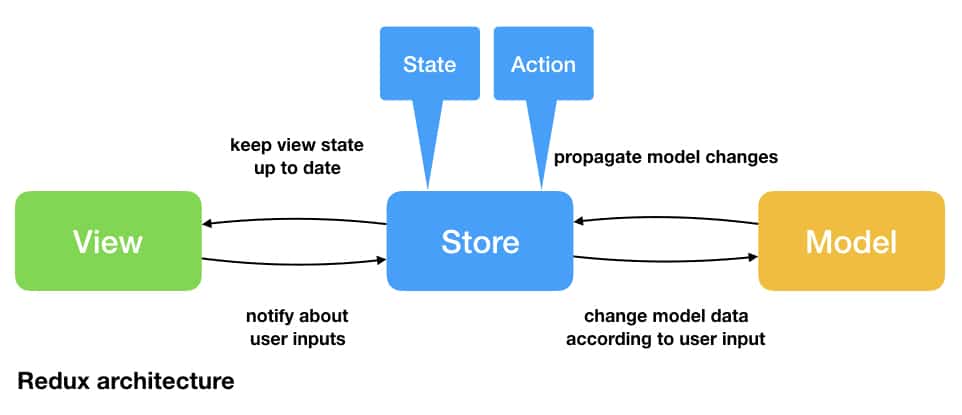
In a Redux-like architecture, View components access the state of Store objects and send Action objects to trigger certain actions. An Action will be performed by a Reducer, which is part of a Store, resulting in a state change. In contrast to more scene-centric architectures, Redux is generally considered to have a global state.
Overview / Idea
The Redux app architecture is based on the idea of a global app state, which all Views can access and only View-specific information (like Model identifiers or View states) in the specific View-structs. For an implementation of a Redux-like architecture for UIKit, have a look at ReSwift.
There are multiple ways of implementing the Redux architecture pattern. You can use multiple Reducers for all the different actions that might be triggered. You can also have a global state or define certain substates of that global state. Since the main advantage of a Redux-like app architecture is often considered to be its single-source-of-truth nature, we are focussing on having a single state and reducer defining the whole business logic of the app. How this is working in detail will be explained in the following.
Generic Implementation
We first define how a generic Store and Reducer work and then decide on a global app state, available actions and a reducer.
This implementation is based on the implementation provided by Majid Jabrayilov. In contrast to Majid’s approach to differentiate between synchronous and asynchronous actions, we simply combine them into the same interface. Therefore, a Reducer always returns a publisher, which describes how to change the state once an event from the publisher is handled. Whenever there is a synchronous state change, you can use the Reducer.sync method.
A Reducer takes the current app state and a triggered action to compute how to adapt the app’s state in this case. Therefore, a reducer only needs a single closure returning a Publisher on how to change an app’s state based on the input of the current app state and the triggered action.
A Store has a global app state. Users of that Store can send Actions to it, which will get reduced by the Reducer to state changes. We, therefore, inject an initial state and a reducer into our Store object.
App-specific Implementation
With this generic implementation in mind, we now continue by defining an app state for QBChat and available actions. We define a global app state containing all chats and all messages, as well as information about the current user.
To be able to differentiate between different actions and from which scene they originate from, we define the following enumerations. AppAction is the app-wide action type, while its cases handle each subscene. Since we start the app with an empty state, we introduce the reload cases to be triggered when a View appears.
To handle these actions, we define a single reducer handling these actions. As you can see, we are capturing a chatService inside, so we are able to handle the triggered actions.
View-specific Implementation
We now integrate a Store<AppState, AppAction> into our ChatListView and ChatDetailView. In contrast to the Model-View architecture, we now only access the state from our Store and trigger Actions when necessary. There is also no need for forwarding the store to any of ChatListView‘s subviews, since we will inject the Store into the environment. We only need to forward the selected chat.
To now initialize our Store into the ChatListView, we are simply injecting it in our SceneDelegate using the .environmentObject(..) view modifier. It will therefore be available through the environment to all ChatListView and all its subviews.
Discussion
With all that in mind, we now investigate some advantages and disadvantages of a Redux-like architecture.
Advantages:
- Consistent, global state: Since we now have one store to contain the app’s state, a change to that state will automatically update all Views.
- High App-Wide Testability: Testing the whole app at once with a mock state is rather simple, since it only requires injecting a different store at the root of the View hierarchy.
Disadvantages:
- High update rate: Invalidating SwiftUI Views is inexpensive, however triggering it too often is still unnecessary load. Since updating a
Store‘s state invalidates all Views, this could potentially lead to performance issues in certain edge cases. - Low Scene-Specific Testability: Since we have a single
Storefor the whole app containing one state and reducer, testing individual screens with mock states is rather difficult. - High memory usage: Since the state should be accessible to the whole app at once, there might be more state available than is actually displayed or needed. This could be prohibited by providing different
Storesfor certain parts of your app, but that would then require higher development efforts. - Low modularity: We initially define a single reducer for mapping state changes to app actions. This gives us low flexibility to have hidden state (not visible to UI components but used in business logic) or to reuse existing components not conforming to this rather strict architecture pattern. Further modularity is not required by the architecture itself, but requires further adaptions such as creating different
Storesfor different parts of an app, if reuse in a different context would be intended.
ViewState MVVM
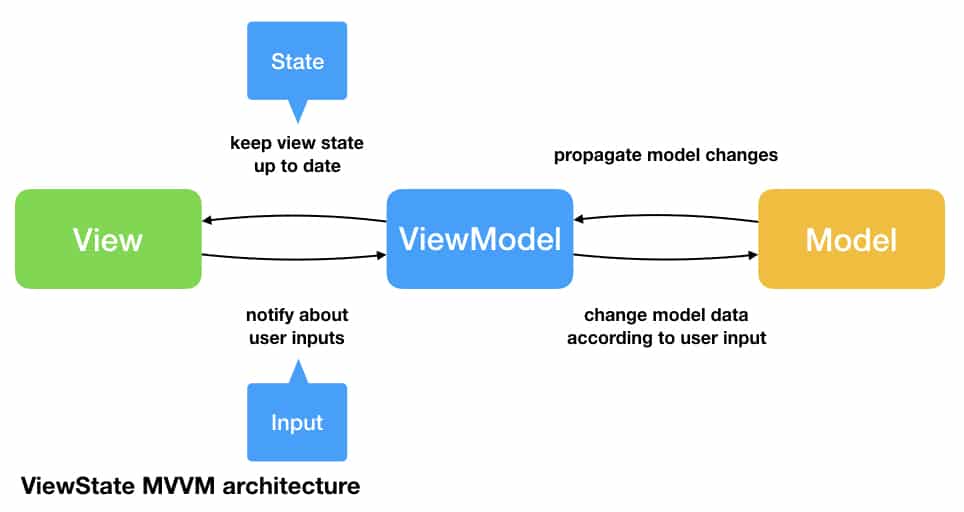
In a ViewState MVVM architecture, View components each have a ViewModel, which provides a scene-specific State to the View. The ViewModelcan be triggered via Input objects. While a Store in a Redux architecture normally fully exposes its state, ViewModels might also contain hidden internal state that is not important to the View itself, but might be needed due to dependencies between state properties. In our example, it is not important to the ChatDetailView to know about all the Chat properties, but only about the title to display to the user, as the ViewModel might later be required to display completely different information as the title.
Overview / Idea
In this example, we are building a MVVM architecture based on the ViewState architecture pattern inspired by Sebastian Sellmair’s Quantum approach. It can be seen as a more formalized version of the MVVM architecture pattern. Instead of specifying a global state of the app, we are now specifying a view-specific state.
ViewState MVVM is based on the concepts of a read-only view-specific state and actions triggered by specified inputs. Since the ViewModel also has write permission to its state, these inputs can be translated into state-changes in the ViewModel.
Generic Implementation
Since we want to be able to change the business logic of the ViewModel (i.e. the actions of a ViewModel) without any changes in the View components, we define a ViewModel protocol, as well as an AnyViewModel wrapper being a type erasure.
The ViewModel protocol has two associated types. The associated type State refers to the type of the state of a certain scene, while Input can be used to specify an input which can be triggered using the trigger method. This trigger method can be implemented to perform certain actions on the state based on the given input.
You can simply think of the AnyViewModel type as a wrapper conforming to the ViewModel protocol with the associated types being the specified generic type State and Input.
View-specific Implementation
For each View, we define a separate state and input.
Starting with the ChatListView, our state contains all the different chats, as well as the chatService to forward it to the ChatDetailView. Since there is no user input resulting in a state change, we can use Never as our input type for ChatListViewModel.
The implementation of a ChatListViewModel is rather trivial, since it only provides a static state.
For our ChatDetailView, we define a ChatDetailState containing the title, the current user (to differentiate between messages from the user itself and messages from other users) and all the messages in the selected chat. As our input, we define a simple enumeration with only one case.
https://gist.github.com/LizzieStudeneer/408b6c5e2f89204326f6748e116a18da
In our ChatDetailViewModel, we now map our action enumeration to state changes.
Discussion
Considering a ViewState MVVM architecture, we identified the following benefits and flaws.
Advantages:
- High modularity: Since a View is not dependent on an app-wide state or a specific viewModel implementation, we can reuse that View in multiple places or even different apps without changing a View’s code itself.
- No inter-view dependencies: Since we only have view-specific states, unforeseen inter-view state dependencies are not possible.
- High maintainability: Since the state of a single view is immediately visible, developers unfamiliar with a certain project can easily identify bugs without understanding how all components work in depth.
- High reusability: We can easily use a different viewModel for an existing view and completely change its behaviour without changing a view’s appearance.
- Possibility for hidden state: Caching specific data or having state that is not accessible to the user is easily possible, without the need of capturing services in closures (compare: Redux).
Disadvantages:
- No single source of truth: Since different
ViewModelsare rather separate objects and do not necessarily share a state, there is no single source of truth by default. - High code overhead: The increased modularisation of an app increases the code overhead, since instead of using a
Storefor multiple views (possibly even your whole app), we define a similarly complexViewModelclass for each view individually.
Evaluation
Before we dive in to the evaluation, let’s check how the architectures are different, then let’s find out how to evaluate app architectures in general and how they stack up in these metrics.
What are the differences?
Model-View, Redux and ViewState MVVM are inherently completely different architectures designed for different needs. The following table illustrates how they differentiate themselves in terms of having a global state, abstracting business logic from view components and being able to swap out business logic for a whole and different parts of an app.
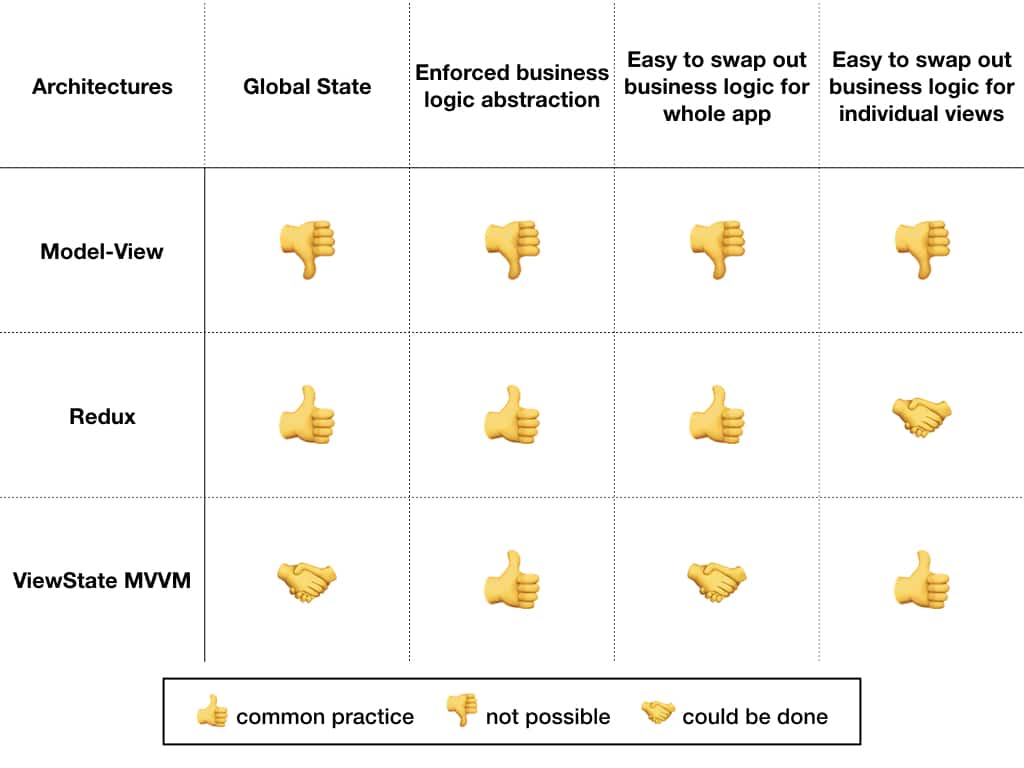
While only a Redux architecture enforces a global state, ViewState MVVM does not completely enforce not to have state across different scenes.
How can we evaluate App Architectures?
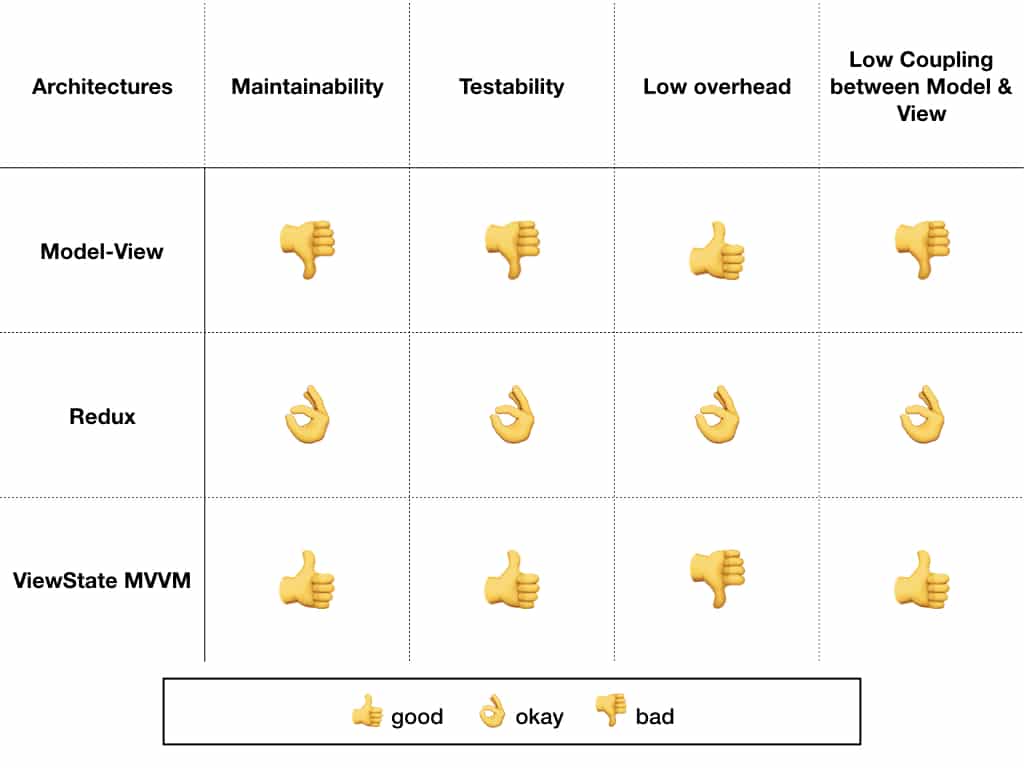
We chose to evaluate the above-mentioned app architectures according to the following metrics:
- Maintainability: A developer should be able to easily understand code without intervention of the original author.
- Testability: Mocking the Model should be easily possible in one or multiple scenes without the need of changing production code, i.e. we want to be able to inject a mock state similar to the Bridge pattern.
- Code overhead: Conforming your app to an architecture should not result in excessive code overhead. We are assuming that no excessive reuse of views is intended, since this is often the case.
- Low coupling between View & Model: Reusing scenes should be able without changing a view’s code, if possible not even the parent view.
When we compare the given architectures according to these metrics, we identified the following standings (of course, this evaluation is partly subjective and discussable):
Conclusion
While a Model-View architecture might look great in the beginning and is probably the way to go for a lot of beginners of SwiftUI, it comes with huge downsides when it comes to reusability and maintainability. It is of course rather simple and fast to write and might be perfect to be used when prototyping a new idea.
Since Redux-like architectures ensure that state is consistent across different Views, it makes sense in smaller apps that can easily be represented using a rather small state object. It, however, also allows to easily swap out the behaviour of the app as a whole, which might be useful in some use cases.
When it comes to resource-heavy and highly modular apps, ViewState MVVM abstracts business logic for each scene individually and therefore provides a great way to reuse individual Views or ViewModels even across different apps.
I hope this article helped you differentiate between the different architectures and with your decision for an app architecture in your SwiftUI app. If you’re interested in how to implement the famous Coordinator pattern with MVVM in SwiftUI, we got you covered with another in-depth article and some practical code examples: How to Use the Coordinator Pattern in SwiftUI.
You can find all code examples from this article in our GitHub repository.

