
Testing MVI View Models on Android
In MVI, View Models are the main connection between the user interface and all the logic and services of an app. Without this connection working correctly, the app won’t do what it’s supposed to, regardless of how beautiful the user interface might look. In this article, we’re going to build some MVI View Models on Android and explore how we can test them efficiently.
ℹ️ In case you’ve never heard of MVI (“Model, View, Intent”), you might want to read our article Android MVI with Kotlin Coroutines & Flow first to get a basic understanding. This article assumes that you are familiar with the core concepts of MVI.
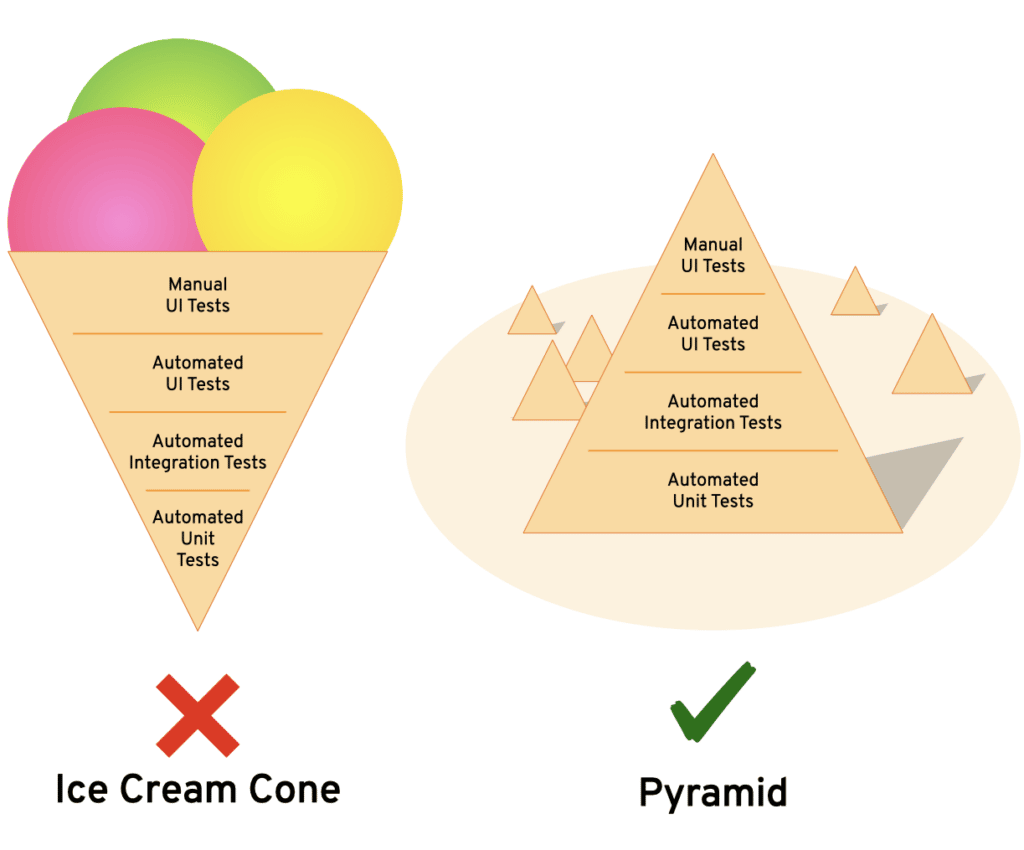
View Models are often tested implicitly during automated UI Tests and manual UI tests (as shown in the upper part of the ice cream cone). That works for sure, but it’s also a waste of time and it’s easy to miss some cases with this approach.
A safer and faster way for testing View Models on Android is to make it a part of the automated integration tests. Doing that helps us turn our ice-cone-shaped test suite into one with a pyramid shape, where most of the tests are automated. (If you wanna know why pyramids are cool, we wrote an article on that as well: Testing Mobile Apps. 😉)
Testing coroutine-based MVI View Models in Kotlin is no magic. A few simple tricks in the test infrastructure will make the test writing an easy and straight-forward task. So let’s dive right in!
How MVI works on Android
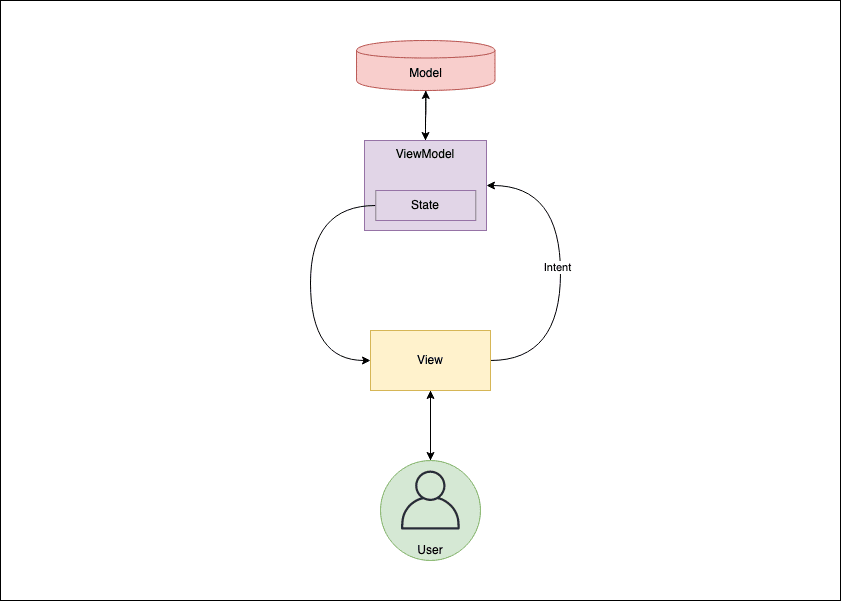
The main concept of MVI is that the View sends events as Intents to the ViewModel. The ViewModel handles these events and communicates with the Model. As a result, the ViewModel updates the View with new states and is then displayed to the user.
In order to test our View Models, we first need to know how our ViewModel looks like. Let’s create one using Coroutines and Flow!
Step ①: Receiving & Handling Intents
For the base of our MVI-ViewModel we’ll first extend the Android ViewModel. First, we add the ability to receive and handle Intents. With this little modification, we get a ViewModel that can react to events from a Fragment, but it can’t communicate back to it:
abstract class IntentViewModel<Intent> : ViewModel() {

    private val intents = Channel<Intent>()

    fun send(intent: Intent) = viewModelScope.launch { intents.send(intent) }

    protected abstract suspend fun handleIntent(intent: Intent)

    init {
        viewModelScope.launch {
            intents.consumeEach { intent ->
                handleIntent(intent)
            }
        }
    }
}
Our IntentViewModel exposes a send function, which receives the intents from the Fragment and sends them to a channel. In the init-block we launch a job, which calls a handleIntent function on each new intent. This function needs to be implemented by all our concrete View Models. It’s where all the View Model logic belongs.
Step ②: Sending States
Next, we’ll extend the IntentViewModel with the ability to send states back to the Fragment as a reaction to received intents:
abstract class StatefulIntentViewModel<Intent, State>(
    val initialState: State
) : IntentViewModel<Intent>() {

    private var state = initialState

    private val statesBroadcast = BroadcastChannel<State>(1)

    private val stateMutex = Mutex()

    val states = statesBroadcast.asFlow()

    protected suspend fun setState(reducer: State.() -> State) =
        stateMutex.withLock {
            state = state.reducer()
            statesBroadcast.send(state)
        }

    protected suspend fun withState(action: (State).() -> Unit) =
        setState {
            this.apply(action)
        }
}
Our StatefulIntentViewModel takes an initialState as a constructor parameter. This will help us later to initialize our views at creation time. (Note: It would be also doable with an initial intent, but since the intent handling is launched on the Coroutine scope of the ViewModel, it’s not guaranteed that this intent is executed immediately.)
The function setState should be used in our View Models to modify the current state. A mutex ensures that the state modification is synchronized and no race condition can occur. After the modification, the state is sent through a broadcast channel and can be collected from the Fragment as a Flow. The function withState is a little syntactic sugar for a use-case where the state needs to be used as a reaction to an intent without being modified.
Examples
In order to get an understanding of how this StatefulIntentViewModel works in practice, let’s have a look at some examples and start with a very simple implementation for a greeting View Model:
class SimpleGreetingViewModel(
    initialState: State = State()
) : StatefulIntentViewModel<Intent, State>(initialState) {

    sealed class Intent {
        data class NewName(val name: String) : Intent()
        data class NewBirthday(val birthday: Date) : Intent()
        object Greet : Intent()
    }

    data class State(
        val name: String = "",
        val birthday: Date = Date(),
        val greeting: String = ""
    )

    override suspend fun handleIntent(intent: Intent) = when (intent) {
        is NewName -> setState { copy(name = intent.name) }
        is NewBirthday -> setState { copy(birthday = intent.birthday) }
        Greet -> setState {
            copy(greeting = "Hi $name!
                Your birthday is the $birthday,
                correct?")
        }
    }
}
The Fragment can send three different intents to the SimpleGreetingViewModel. It can send a new name or a new birthday, which the user might have entered in the user interface. With the third intent Greet, the Fragment can ask the View Model to create a greeting.
(Note: If you’re wondering where the copy functions come from: They are a very handy property of the data classes in Kotlin. When you copy a data class, you just need to define which properties should change and the rest will remain the same.)
For a simple use-case like this, MVI is certainly a bit of an overkill, but most of the time, complexity will be much higher.
For example, we could refine our View Model in a way that it stores the information internally in a persistent storage, which could be accessed by another View Model as well. When a greeting is requested as an intent, the View Model retrieves that information from the storage and formats it to a nice greeting. We also want to format the birthday nicely. For that purpose, we’ll add a DateFormat to our State:
class PersistentGreetingViewModel(
    initialState: State
) : StatefulIntentViewModel<Intent, State>(initialState) {

    sealed class Intent {
        data class NewName(val name: String) : Intent()
        data class NewBirthday(val birthday: Date) : Intent()
        object Greet : Intent()
    }

    data class State(
        val storage: PersistentStorage,
        val dateFormat: DateFormat,
        val greeting: String = ""
    )

    override suspend fun handleIntent(intent: Intent) = when (intent) {
        is NewName -> withState { storage.store(intent.name) }
        is NewBirthday -> withState { storage.store(intent.birthday) }
        Greet -> setState {
            val name = storage.loadName()
            val birthday = dateFormat.format(storage.loadBirthday())

            copy(greeting = "Hi $name!
                Your birthday is the $birthday,
                correct?")
        }
    }
}
Now that we have our View Models ready, let’s have a look at how to test them!
The Ultimate Test (Class)
First, we need a little preparation. We create an abstract class StatefulIntentViewModelTest as a base for all our test classes. It’s generic in the type of intent, the state, and the tested View Model. For testing with coroutines, we can use the TestCoroutineDispatcher from the coroutine test library. This will guarantee an immediate execution for our test coroutines. We initialize the TestCoroutineDispatcher and set it as our main dispatcher:
abstract class StatefulIntentViewModelTest<
    Intent,
    State,
    ViewModel : StatefulIntentViewModel<Intent, State>
> {
    val testDispatcher = TestCoroutineDispatcher()

    @Before
    fun setup() {
        Dispatchers.setMain(testDispatcher)
    }

    protected fun test(...) { ... }

    @After
    fun cleanUp {
        Dispatchers.resetMain()
        testDispatcher.cleanupTestCoroutines()
    }
}
The core of this class is the test function, which we haven’t implemented yet. Let’s do that now!
We model it in a way that it takes three main parameters as inputs:
- the View Model te be tested,
- a list of intents
- and a list of expected states.
We’ll send the intents to the View Model and assert the resulting states against the expected states. Our function signature below contains a fourth parameter assertInitialState, which determines whether to assert the State which is set on View Model creation or not. The test function could look like this:
fun test(
    viewModel: ViewModel,
    intents: List<Intent>,
    assertions: List<State>,
    assertInitialState: Boolean = false
): Unit = runBlockingTest {
    val states = stateCollectionList()
    val stateCollectionJob = launchStateCollectionJob(states)

    sendIntents()

    assertStates(states)

    stateCollectionJob.cancel()
}
Let’s go through this function line by line:
The first step is to initialize a list in which the states coming from the View Model will be collected. The only thing to keep in mind is if we want to assert the initial state or not:
fun stateCollectionList() =
    if (assertInitialState) mutableListOf(viewModel.initialState)
    else mutableListOf()
The second step is where the magic happens: We’ll launch a job on the Coroutine scope of the View Model in which we are collecting the emitted states into our previously initialized list. To make our lives easier, we make use the Flow<T>.toList() extension for this purpose. This extension simply stores all the emitted values of the flow into the provided list.
fun launchStateCollectionJob(stateCollectionList: MutableList<State>) =
    viewModel.viewModelScope.launch {
        viewModel.states.toList(stateCollectionList)
    }
After this setup, we can iterate over all the intents and send them to the View Model:
fun sendIntents() = intents.forEach { intent -> viewModel.send(intent) }
Now the actual testing begins: We use the zip operator to iterate over the expected and the actual states simultaneously. The operator lets us perform an action for each pair of states. In our case, we assert that the expected state and the actual state are the same.
But before we do that, we first assert that the number of emitted states is as expected – otherwise, the pairs wouldn’t be aligned.
fun assertStates(states: List<State>) {
    assertEquals(assertions.size, states.size)
    assertions.zip(states) { assertion, state ->
        assertEquals(assertion, state)
    }
}
When we put all the pieces together, the whole test function looks like this:
fun test(
    viewModel: ViewModel,
    intents: List<Intent>,
    assertions: List<State>,
    assertInitialState: Boolean = false
): Unit = runBlockingTest {
    val states =
        if (assertInitialState) mutableListOf(viewModel.initialState)
        else mutableListOf()

    val stateCollectionJob = viewModel.viewModelScope.launch {
        viewModel.states.toList(states)
    }

    intents.forEach { intent -> viewModel.send(intent) }

    assertEquals(assertions.size, states.size)
    assertions.zip(states) { assertion, state ->
        assertEquals(assertion, state)
    }

    stateCollectionJob.cancel()
}
(Don’t forget to cancel the stateCollectionJob at the end.)
Our Test Class in Action!
Testing the SimpleGreetingViewModel
Now its time for our SimpleGreetingViewModel to prove itself. In order to do that, we simply need to call our test function, hand over the View Model, the intents we want to send, and the asserted output states.
Let’s create a test scenario in which the user first entered a new name “Klaus” (similarities to any actual teammates are purely coincidental 😉) and then a new date of birth: “5 September 1996”. After that, we intend to show a greeting. For these three intents, we’ll need three matching state-assertions. The first asserted state should contain the name “Klaus”, the second one additionally the date of birth, and the last one should also have our friendly greeting.
class SimpleGreetingViewModelTest : StatefulIntentViewModelTest<
    Intent,
    State,
    SimpleGreetingViewModel
>() {

    @Test
    fun testGreeting() = test(
        viewModel = SimpleGreetingViewModel(),
        intents = listOf(
            NewName("Klaus"),
            NewBirthday(Date(96, 9, 5)),
            Greet
        ),
        assertions = listOf(
            State(
                name = "Klaus"
            ),
            State(
                name = "Klaus",
                birthday = Date(96, 9, 5)
            ),
            State(
                name = "Klaus",
                birthday = Date(96, 9, 5),
                greeting = "Hi Klaus! Your birthday is
                    Sat Sept 05 00:00:00 CEST 1996,
                    correct?"
            )
        )
    )
}
Testing the PersistentViewModel
For testing our PersistentViewModel we introduce a little trick: Instead of comparing the instances of the persistent storage service and the date format, we want to assert some of their properties. It doesn’t matter if we really use the same persistent storage. What matters to us is that the stored values contained in that storage are the same.
The Either type
To accomplish this, we change the signature of our function. Instead of a list of states as assertions, we pass a list containing either states or functions with State as receiver. For that purpose, we introduce an Either type.
Either types are a widely known concept in many functional programming languages as the mathematical counterpart for tuples. It’s a powerful little helper in many of our projects. An implementation in Kotlin could look like this:
sealed class Either<out L, out R> {
    data class Left<out T>(val value: T) : Either<T, Nothing>()
    data class Right<out T>(val value: T) : Either<Nothing, T>()
}

inline fun <L, R> Either<L, R>.rightOr(default: (L) -> R): R = when (this) {
    is Left<L> -> default(this.value)
    is Right<R> -> this.value
}

inline fun <L, R> Either<L, R>.leftOr(default: (R) -> L): L = when (this) {
    is Left<L> -> this.value
    is Right<R> -> default(this.value)
}
Every instance is either Left or Right and contains a value with the corresponding type. The functions leftOr and rightOr are either getting the value with the corresponding type or the specified default value. With the Either type inserted, our test function now looks like this:
fun test(
    viewModel: ViewModel,
    intents: List<Intent>,
    assertions: List<Either<State, State.() -> Unit>>,
    assertInitialState: Boolean = false
): Unit = runBlockingTest {
    val states =
        if (assertInitialState) mutableListOf(viewModel.initialState)
        else mutableListOf()

    val stateCollectionJob = viewModel.viewModelScope.launch {
        viewModel.states.toList(states)
    }

    intents.forEach { intent -> viewModel.send(intent) }

    assertEquals(assertions.size, states.size)

    assertions.zip(states) { assertion, state ->
        val fullAssertion = assertion.leftOr { partialAssertion ->
            partialAssertion(state)
            return@zip
        }
        assertEquals(fullAssertion, state)
    }

    stateCollectionJob.cancel()
}
We use the leftOr extension of the Either type. In our case, Left is a full state assertion, and just as before, we assert that the expected and actual state are equal. In the Right case, we apply our assertion function on the actual state and continue with the next assertion.
For assertions, we can now use both full states and functions with a State as receiver. If we want to assert a full state, we need to create an instance of Left, just like this:
Left(State(…))
If we only want to assert the properties of a state, we need to create a new Right instance:
Right {
    assertTrue(…)
    assertEquals(…)
}
ℹ️ If you want to learn more about sealed classes and interfaces, check out our article Kotlin’s Sealed Interfaces & The Hole in The Sealing.
Testing the PersistentGreetingViewModel
With this little trick, we can now easily test our PersistentGreetingViewModel:
 class PersistentGreetingViewModel : StatefulIntentViewModelTest() {
     @Test
     fun testGreeting() {
         val storage = PersistentStorage()
         val dateFormat = MyDateFormat()

         test(
             viewModel = PersistentGreetingViewModel(
                 State(
                     storage = storage,
                     dateFormat = dateFormat
                 )
             ),
             intents = listOf(
                 NewName("Klaus"),
                 NewBirthday(Date(96, 9, 5)),
                 Greet
             ),
             assertInitialState = true,
             assertions = listOf(
                 Left(State(storage, dateFormat)),
                 Right {
                     assertTrue("Klaus" in storage)
                 },
                 Right {
                     assertTrue("Klaus" in storage)
                     assertTrue(Date(96, 9, 5) in storage)
                 },
                 Right {
                     assertTrue("Klaus" in storage)
                     assertTrue(Date(96, 9, 5) in storage)
                     assertEquals("Hi Klaus! Your birthday is
                        Sat Sept 05 00:00:00 CEST 1996,
                        correct?", greeting)
                }
            )
        )
    }
}
Just as before with the SimpleGreetingViewModel, we create an instance of the PersistentGreetingViewModel (with a specified storage and date format) and pass it along to the test function. The intents are the same as for the previous test case. This time, we also want to assert the initial state of our View Model to check if our specified storage and date format are correctly put into the state. For that, we hand over true for the assertInitialState flag. As the last parameter, we pass along the list of assertions:
As our first assertion, we want to check the full state for equality. So we hand over a state containing the same storage and date format as we used to initialize our View Model wrapper in the Left side of our Either type. The next three assertions should be custom assertions, which we represent as Right instances of the Either type. We check if the name and date of birth are stored correctly and that the greeting at the end is as expected.
Conclusion
With this little set of tricks, no-one needs to be afraid of View Model tests anymore. You can easily throw your View Models into the test arena and specify test cases without further boilerplate code. When testing becomes easier, you’re also likely to write more tests. The test creation process already makes us think more and lets us find design flaws at an early stage.
If you like this article, please feel free to share it. You can also follow us on Twitter where we announce every new article in this blog. Thanks for reading! 😊
