iOS App Security: Best Practices
In this article, we focus on iOS App Security. We’ll show you concrete techniques for making your iOS apps more secure. Our best practices cover means for securely storing data as well as sending & receiving data over the network. You’ll see why it is so hard to get security right and how you can improve your app security by using services from Apple and other providers.
In the last blog post, we have discussed app security more generally for both iOS and Android. In another blog post we specifically cover Android App Security.
The basics of iOS App Security
Chances are that your app handles private data that you don’t want to end up in the wrong hands. Therefore, you need to make sure to store this data safely and make data transportation as secure as possible.
We are focussing on three main topics: storing user data safely, secure data transportation, and how to use Apple’s new cryptographic APIs.
Best practices for storing user data
If you are developing iOS apps lots of security features are already provided by the OS. All iOS devices with an A7 processor or later also have a coprocessor called the Secure Enclave. It powers iOS security features in a hardware-accelerated way.
Apple’s App Sandbox
All apps running on iOS run in a sandbox to make sure the app can only access data which is stored in the app’s unique home directory. If an app wants to access data outside of its home directory it needs to use services provided by iOS, like the ones available for accessing iCloud data or the photo album. Therefore, no other app can read or modify data from your app.
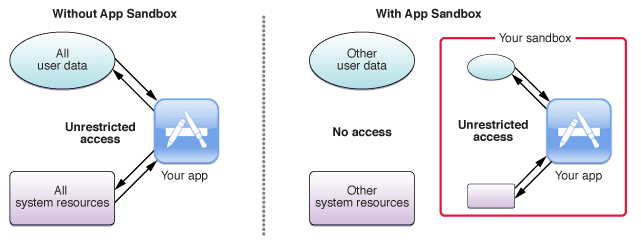
Apple App Sandbox (source)
Apple’s App Sandbox is powered by UNIX’s user permissions and makes sure that apps get executed with a less privileged “mobile” user. Everything outside the app’s home directory is mounted read-only. All system files and resources are protected. The available APIs don’t allow apps to escalate privileges in order to modify other apps or iOS itself.
For performing specific privileged operations an app needs to declare special entitlements. These entitlements get signed together with the app and are not changeable. Examples of services that need special entitlements are HealthKit or audio input. Some entitlements are even restricted to be only used if Apple gives you access to them. This includes services like CarPlay. They are stronger protected because misusing them could have fatal consequences.
Next to entitlements giving you special rights, apps can make use of the iOS extensions system. The OS has many points to be used by app extensions. App extensions are single-purpose executables bundled with the app. They run in their own address space and get controlled by the OS.
Additionally, iOS has methods to prevent memory-related security bugs. Address space layout randomization (ASLR) randomizes the assigned memory regions for each app on every startup. This makes the exploitation of memory-corruption-bugs much less likely. Also, memory pages are marked as non-executable with ARM’s Execute Never (XN) feature to stop malicious code from being executed.
Data Protection API
All iOS versions since iOS 4 have a built-in security feature called Data Protection. It allows an app to encrypt and decrypt the files stored in their app directory. The encryption and decryption processes are automatic and hardware-accelerated. Data Protection is available for file and database APIs, including NSFileManager, CoreData, NSData, and SQLite.
The feature is enabled by default but can be configured on a per-file basis to increase security. Every file can be configured to use one of 4 available protection levels. By default, all files are encrypted until the first user authentication but it might make sense to increase the protection level for certain data.
The four available protection levels include:
- No protection: The file is always accessible and not encrypted at all
- Complete until first user authentication: This is enabled by default and decrypts the file after the user unlocks their device for the first time. Afterward, the file stays decrypted until the device gets rebooted. Locking the device doesn’t encrypt the data again.
- Complete unless open: The file is encrypted until the app opens the file for the first time. The decryption stays alive even when the device gets locked by the user.
- Complete: The file is only accessible when the device is unlocked.
You can specify the protection level when you create files like this:
try data.write(to: fileURL, options: .completeFileProtection)
But you are also able to change the protection level of existing files by setting the resource values:
try (fileURL as NSURL).setResourceValue(
                  URLFileProtection.complete,
                  forKey: .fileProtectionKey)
It is important to understand which protection levels fits your needs. By default, you should use the highest protection level possible. However, if you need access to files in the background while the phone is locked you can’t use complete data encryption for them.
Keychain
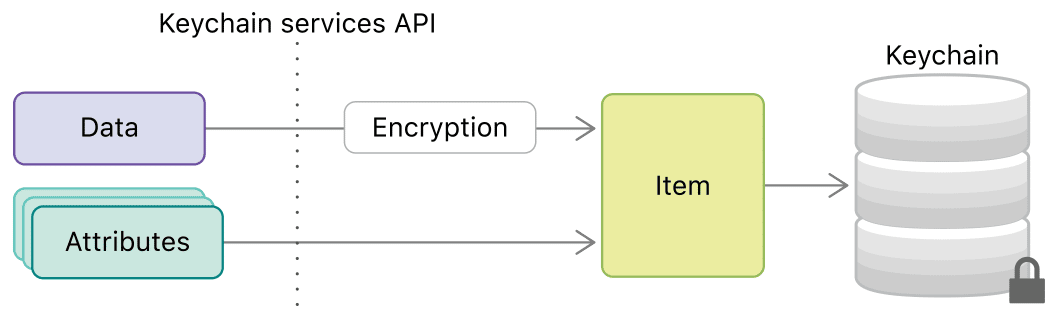
Putting data and attributes into a keychain (source)
The keychain is your secure place to store small chunks of data. It is a hardware-accelerated secure data storage that encrypts all of its contents. It is used by the system to store data like passwords and certificates but you as an app developer have also access to this data storage.
Your app or app group has its own space in the keychain and no other app has access to it. This way, you don’t need to store encryption keys in your app and can rely on the system to provide the highest level of security.
The keychain is the secure key-value storage replacement for NSUserDefaults. NSUserDefaults are not encrypted at all and should be avoided for sensitive data.
For every keychain item, you can define specific access policies for accessibility and authentication. You can require user presence (requesting Face ID or Touch ID unlock) or that the biometric ID enrollment didn’t change since the item was added to the keychain.
As an additional feature of the iOS Keychain, you can decide if you want to store the information in the local keychain which is only available on this specific device, or in the iCloud Keychain which gets synchronized across all Apple devices. This gives you the ability to share the information between your iPhone, iPad and Mac counterparts.
Even though the Keychain Services API should be used whenever possible, its interface is not exactly nice to use in Swift. If you plan to use such functionality more often in your codebase consider wrapping it with a nicer Swift API.
let query: [String: Any] = [
    kSecClass as String: kSecClassInternetPassword,
    kSecAttrAccount as String: account,
    kSecAttrServer as String: server,
    kSecValueData as String: password
]

let status = SecItemAdd(query as CFDictionary, nil)
This code snippet stores some credentials to the keychain. A lot of casting is necessary and in the end, you call SecItemAdd which synchronously stores the credentials and returns either a success or error status code.

Best Practices for Secure Data Transportation
Next to storing the user data safely, you should make sure that the communication between your app and its remote counterparts is secured. This prevents attackers from collecting private data by sniffing the network traffic or by running malicious servers.
HTTPs
Most network communication is done over the HTTP protocol between a client and a server. By default, HTTP connections are not encrypted. It is easily possible for attackers to sniff data from your local network or to perform man-in-the-middle attacks.
Since iOS 9, there is a new feature called App Transport Security (ATS). It improves the security of network communication in your apps. ATS blocks insecure connections by default. It requires all HTTP connections to be performed using HTTPS secured with TLS.
ATS can be configured in many ways to loosen up these restrictions. You can, therefore, allow insecure HTTP connections for specific domains or change the minimum TLS version used for HTTPS.
![]()
If your app contains an in-app browser you should use the NSAllowsArbitraryLoadsInWebContent configuration which allows your users to browse the web normally and still makes sure that all other network connections in your app use the highest security standards.
SSL Pinning
By default, HTTPS connections are verified by the system: it inspects the server certificate and checks if it’s valid for this domain. This should make sure the connected server is not malicious. However, there are still ways for attackers to perform more complex man-in-middle attacks.
The system certificate trust validation checks if the certificate was signed by a root certificate of a trusted certificate authority. To circumvent this security mechanism attackers would need to explicitly trust another malicious certificate in the user’s device settings or compromise a certificate authority. The attacker could then perform a man-in-the-middle attack to read all messages sent between client and server.
To prevent these kinds of attacks an app can perform additional trust validation of server certificates. This is called SSL or Certificate Pinning. You can implement SSL Pinning by including a list of valid certificates (or its public keys or its hashes) in your app bundle. The app can, therefore, check if the certificate used by the server is on this list and only then communicate with the server.
Implementing this validation from scratch should be avoided since implementation mistakes are very likely and lead to even more security vulnerabilities. We recommend using an Open Source framework like TrustKit. If you really need to implement this yourself read Apple’s technical note on HTTPS Server Trust Evaluation.
Introducing SSL Pinning, unfortunately, introduces the risk of bricking your app. Since you hardcode the trusted certificates, the app itself needs to be updated if a server certificate expires. To avoid such a situation, pin the future certificates in the client app before releasing new server certificates.
Push Notifications
To send push notifications to your users you need to use Apple’s APNS services. If you want to use end-to-end encryption or if you just don’t want to give Apple the (theoretical) chance to read your messages you can use UNNotificationServiceExtension extensions to modify the messages on the client-side.
This allows you to send either encrypted messages to your clients or use placeholders for sensitive data. The messages will simply be used as a wakeup call for the app. The app can then decrypt the message or respectively for placeholder messages fetch the necessary information from the local device and replace the placeholders with the sensitive data. The clear text message will then be shown on the user’s lock screen without any sensitive information being sent to Apple’s servers.
In the following example, you can see how easily you can change your message content in your notification service extension.
class NotificationService: UNNotificationServiceExtension {

    override func didReceive(_ request: UNNotificationRequest, withContentHandler contentHandler: @escaping (UNNotificationContent) -> Void) {
        guard let mutableContent = request.content.mutableCopy() as? UNMutableNotificationContent else {
            fatalError("Cannot convert notification content to mutable content")
        }

        mutableContent.title = decryptText(mutableContent.title)
        mutableContent.body = decryptText(mutableContent.body)

        contentHandler(mutableContent)
    }

    // ...

}
End-to-end encryption
End-to-end encryption is the “holy grail” for secure data transportation. It allows you to encrypt messages in a way that only the sender and receiver can decrypt them and neither Apple or your servers can read the cleartext data.
End-to-end encryption is not easy to implement and requires a lot of experience in cryptographic processes. If your team doesn’t have the experience it is very advisable to consult a third party expert helping with the implementation of the encryption mechanism.
CloudKit
If your app doesn’t need a server you can use Apple’s CloudKit. CloudKit allows you to store data in iCloud containers while using your Apple ID as the login mechanism for you app. This way, you don’t need to implement all of these services on your own.
CloudKit was made with security in mind. As an app developer, you don’t have access to concrete user data and the communication is encrypted by default.
All the communication between your app and the server can be done using Apple’s client-side CloudKit framework. If you have an additional Android or Web app you can still use CloudKit using its JavaScript and Web services.
To make this even better: CloudKit is completely free of charge to a certain amount. You can reach millions of users without fearing costs for traffic, data storage or requests. More about Apples CloudKit and its pricing scheme can be found here.
Using cryptographic APIs
The iOS SDK includes APIs to handle common cryptographic tasks for you. As we said above it is generally a good idea to rely on proven crypto implementations and not reimplement them yourself.
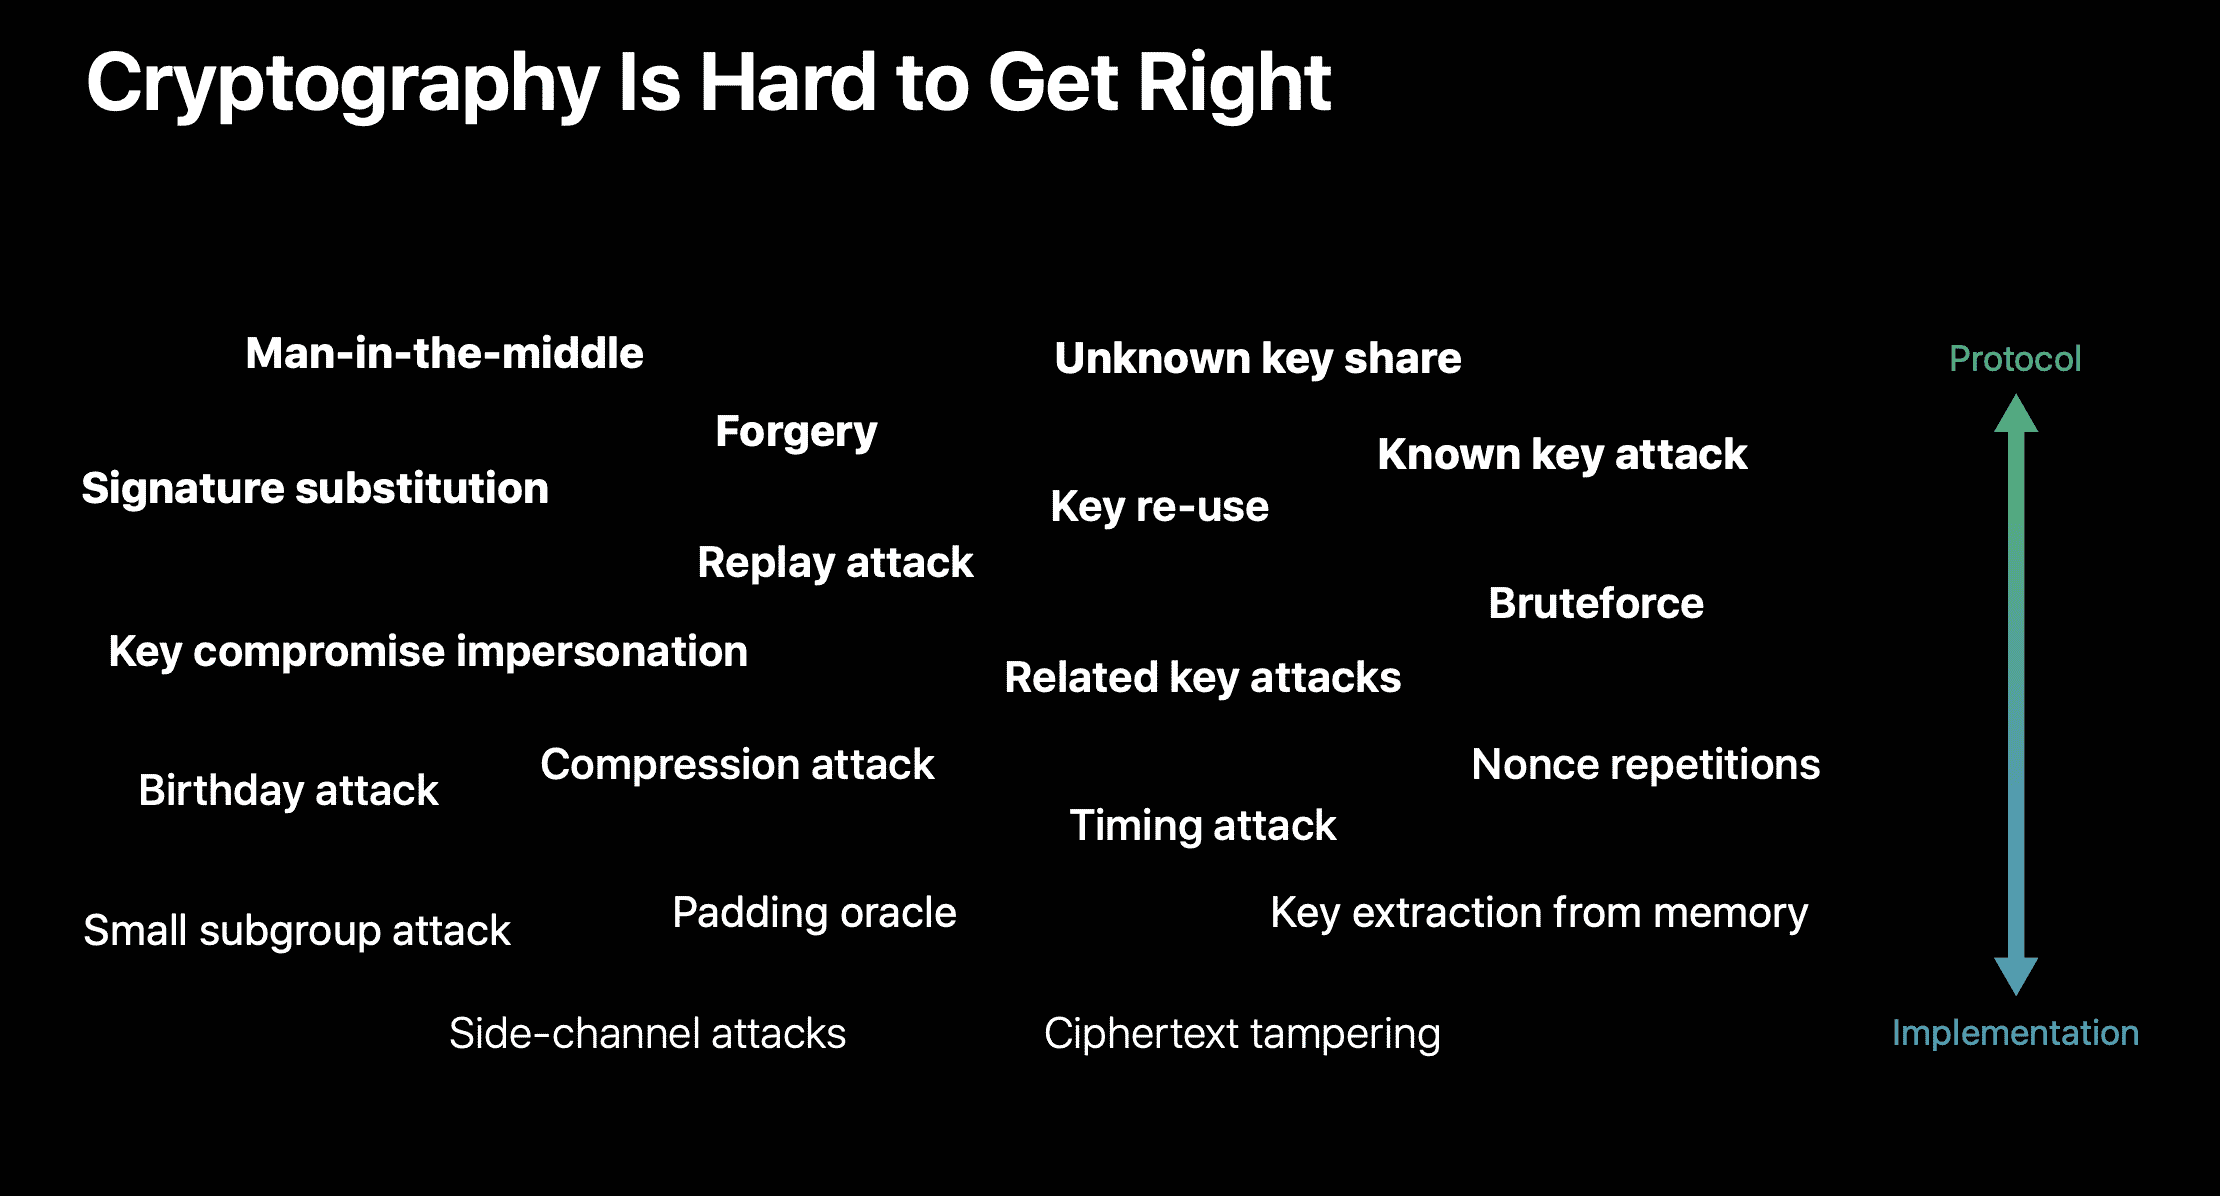
Cryptography is Hard to Get Right – Apple`s Cryptography talk on WWDC 2019 (source)
Apples CryptoKit is a new API that was introduced in iOS 13 and provides lower-level APIs to perform cryptographic operations or implement security protocols.
CryptoKit is based on top of more lower-level APIs. They were available before but introduced additional risk factors since developers often used them in a wrong way.
CryptoKit also allows you to use the SecureEnclave to get cryptographically safe functions that are performant and optimized for the device’s hardware.
If you want to support older iOS versions you can use those lower-level APIs or use well known open-source third-party libraries like CryptoSwift.
Hashing data
Hash functions are functions that convert data of arbitrary size to fixed-size values. Good hash functions should minimize duplication of output values (so-called collisions) and be very fast to compute. Swift includes hashing functionality in the Swift Standard Library, but these functions are heavily focused on being fast and have a relative high collision rate. This makes them a good fit for perfomance-critical operations, but not so much for security related operations.
Securely hashing data is simple using CryptoKit. You just need to call the hash function on one of your Structs and choose a hash algorithm. CryptoKit supports the most common ones from SHA512 to SHA256.
let data = ...
let dataDigest = SHA512.hash(data: data)
let hashString = dataDigest.description
Authenticating Data using Message authentication codes
A message authentication code (MAC) is used to authenticate the sender of a message and confirm the integrity of that message. It allows the receiver to verify the origins of messages and detect changes to the message’s content.
To use this kind of integrity checks you can, for example, use CryptoSwift’s hashed authentication codes, also known as HMACs. The HMAC struct is a generic type that can be used with all the hash functions included in CryptoSwift.
To create a message authentication code you can use this simple code snippet.
let key = SymmetricKey(size: .bits256)

let authenticationCode = HMAC<SHA256>.authenticationCode(for: messageData, using: key)
You can verify the message by using:
let isValid = HMAC<SHA256>.isValidAuthenticationCode(
    Data(authenticationCode),
    authenticating: messageData,
    using: key
)
As you can see, you need to create a symmetric key first and securely share it between the sender and receiver.
Encrypting Data using symmetric keys
Encrypting and decrypting data using a symmetric key is simple, too. You can use one of two available ciphers: ChaChaPoly (ChaCha20-Poly1305) or AES-GCM in CryptoSwift:
let encryptedData = try! ChaChaPoly.seal(data, using: key).combined
let sealedBox = try! ChaChaPoly.SealedBox(combined: encryptedData)

let decryptedData = try! ChaChaPoly.open(sealedBox, using: key)
You should always make sure not to hardcode these symmetric keys in your app though. You can generate a symmetric key at runtime and then store it safely in the keychain. That way, no one has access to your key to decrypt data.
Performing Key Agreement
In a lot of cases, you will need to perform some form of key exchange to exchange cryptographic keys over an insecure channel. With key agreement protocols like Elliptic-curve Diffie–Hellman (ECDH), you can derive a common secret.
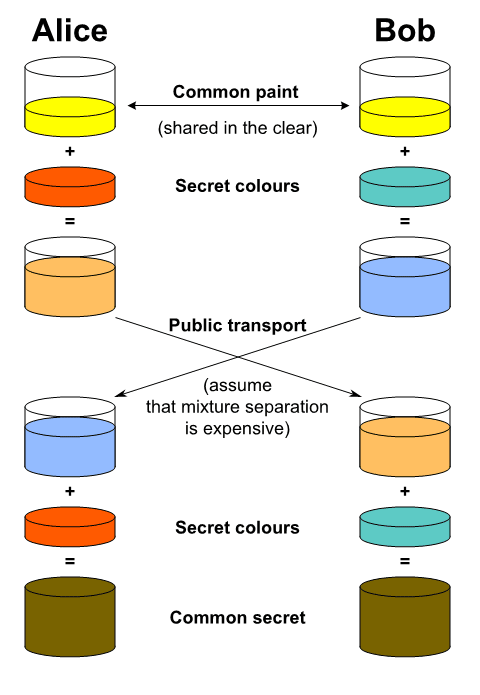
Illustration of the idea behind Diffie–Hellman key exchange (source)
- Create private/public key-pairs for Alice and Bob
let alicePrivateKey = P256.KeyAgreement.PrivateKey()
let alicePublicKey = alicePrivateKey.publicKey
let bobPrivateKey = P256.KeyAgreement.PrivateKey()
let bobPublicKey = bobPrivateKey.publicKey
Both Alice and Bob create their own private/public key-pairs and share their public keys.
- Deriving shared secret
let aliceSharedSecret = try! alicePrivateKey.sharedSecretFromKeyAgreement(with: bobPublicKey)
let bobSharedSecret = try! bobPrivateKey.sharedSecretFromKeyAgreement(with: alicePublicKey)
We were now able to derive a common secret by using the own private key together with the counterpart’s public key. aliceSharedSecret and bobSharedSecret are now the same.
- The created secret number should not be used as an encryption key by itself. Instead it can be used to generate a much larger and more secure encryption key using HKDF or X9.63 key derivation.
let usedSalt = "Secure iOS App".data(using: .utf8)!

let symmetricKey = aliceSharedSecret.hkdfDerivedSymmetricKey(
    using: SHA256.self,
    salt: protocolSalt,
    sharedInfo: Data(),
    outputByteCount: 32
)
That’s generally how you could implement it! Also note that Apple has an implementation of Diffie-Hellman in iOS as part of Secure Transport. Here is the Secure Transport Reference.
Creating and Verifying Signatures
If you want to send messages and make sure that the sender is the person you thought it is you can use signatures. To do so, you need a private/public key pair first.
let signingKey = Curve25519.Signing.PrivateKey()
let signingPublicKey = signingKey.publicKey
Using the private key any form of data can be signed.
let data = ...
let signature = try! signingKey.signature(for: data)
This signature is then sent together with the actual data to the receiver which can use the public key to validate the signature.
let isSignatureValid = signingPublicKey.isValidSignature(signature, for: data)
Conclusion
Creating secure and robust iOS applications is not easy. However, you can improve security in your iOS apps without much effort by sticking to best practices. Protecting user data must be a high priority and should never be ignored.
If you want to read even more about the internals of Apple’s iOS security you should take a look at the iOS security guide. It is a technical guide explaining how data is secured on iOS. It is updated with every iOS release and talks about new technologies and how they are protected.
If you liked this article and are also interested in Android security you should check out our article about Android App Security.
Are you a Software Developer?
Do you want to work with people that care about good software engineering?
Join our team in Munich