
How to Build a Wordle Game With SwiftUI
Have you heard of Wordle? Chances are you have as it really went viral on Twitter the past few weeks. It’s a simple game that’s truly addictive. We were also “infected” with the Wordle hype, played a lot, and realized that it’s the perfect project for getting started with SwiftUI!
So in less than two days, we built the game from scratch in SwiftUI. In this article, we’re going to show you how. You’ll learn about bindings, property wrappers, and observed objects in a practical and fun way. Enjoy!
What’s Wordle?
Wordle is a play on words – in a double sense:
- It’s a game where you have to guess a 5-letter word in 6 attempts.
- Its name is a combination of the word “word” and the second name of the guy who invented this game (and developed the original version): Josh Wardle.
The game is simple. Here is how it works (→ skip this section if you know the game):
- It shows you a matrix of 6×5 squares in each of which you can type a single letter.
- You start typing in the first field and type 5-letter-words line-by-line.
- After completing a line, the word is evaluated: When the typed character in a field…
- … is not included in the solution word, the field remains unchanged
- … is included in the solution word, but not at the right position, the field changes its color to yellow.
- … is included in the solution word and at the correct position, the field changes its color to green.
- When all fields in a row are green (i.e. the user entered the solution word), the user wins and the game ends.
- When the user has entered all 6 rows without guessing the solution word, the game is lost and ends.
If you haven’t played it yet, you can try out the original Wordle game here (but please come back and don’t get lost… 😅):
Now that you’re familiar with the game, let’s build it in SwiftUI! 🚀
Building the View in SwiftUI
With SwiftUI, it’s typically a good approach to start with building the view and its possible states before adding any logic. Let’s do that!
The game consists of a single screen only that shows a grid (or matrix) of letter boxes. Each of these letter boxes has a colored square in the background and a letter in the foreground. The only difference between each letter box is the letter it displays and the color that indicates its evaluation state, so it’s reasonable to use this letter box as a building block and thus implement it as a separate view.
Building the Letter Box
The first question we gotta ask ourselves with any SwiftUI view that we build is what states the view can assume and how these states influence the view’s appearance. Our LetterBox has two properties that determine its (visual) state:
- The actual letter (or character) that it displays.
- The evaluation state that indicates whether the letter is included in the solution word (and if so at the correct position) or not. It determines the box color.
Those are the properties that we’ll model into our LetterBox view:
struct LetterBox: View {
    let letter: Character?
    let evaluation: LetterEvaluation?

    var body: some View {
        // to be implemented
    }
}
For the letter, we simply use the Swift type Character. For representing the evaluation state, we create a custom enumeration and call it LetterEvaluation:
enum LetterEvaluation {
    case notIncluded // not included in the solution word
    case included    // included, but wrong position
    case match       // included and correct position
}
We can add this definition anywhere on global scope, for example, on top of our LetterBox definition. The enum enables us to have 3 distinct states. We can easily map them to the respective box color with a computed property:
private extension LetterEvaluation {
    var color: Color {
        switch self {
        case .notIncluded:
            return Color(.systemGray5)
        case .included:
            return Color(.systemYellow)
        case .match:
            return Color(.systemGreen)
        }
    }
}
We make this extension private and add it to the same file where we defined our LetterBox view. This view is the only one that will ever need this information and it’s always a good practice to restrict access to functions and properties as much as possible to prevent other developers (or your future self) to use them in the wrong context. We use system colors when ever possible because those colors automatically adapt when the user switches the appearance from light mode to dark mode or vice-versa.
Next, we implement the view’s body to compose the actual view. As we want to put a square shape (with slightly rounded corners) in the background and a letter on top of it, we use a RoundedRectangle with an aspect ratio of 1:1 and an optional Text view and wrap them in a ZStack (“Z” for stacking views on the z-axis). The Text will only be visible if a letter has been assigned to the view.
var body: some View {
    ZStack() {
        RoundedRectangle(cornerRadius: 4)
            .style(withStroke: Color.black, lineWidth: 1, fill: boxColor)
            .aspectRatio(1, contentMode: .fit)
        if let letter = letter {
            Text(String(letter))
                .font(.system(size: 36, weight: .bold, design: .rounded))
        }
    }
}
There are two things to note here:
First, we use a boxColor variable here that we haven’t defined yet. So let’s do that inside the LetterBox view:
private var boxColor: Color {
    guard let evaluation = evaluation else {
        return .letterBoxBackground
    }
    return evaluation.color
}
If the letter in this box has already been evaluated, we simply use the LetterEvaluation color that we defined above. Otherwise (e.g. when the user is still typing letters in the current row), we use the same color as if the letter was not included.
Secondly, you might have noticed the .style modifier that we apply on the RoundedRectangle. That’s not a standard SwiftUI-modifier, but it’s super useful when you want to color both the background and the border of a shape – following the shape of the shape (if you know what I mean). (If you try to stroke and fill the shape separately, you’ll end up with one of the two being a rectangle rather than a rounded rectangle.) The idea is taken from a Swift by Sundell blog post. You simply need to add the following Shape extension to your project:
extension Shape {
    func style<StrokeStyle: ShapeStyle, FillStyle: ShapeStyle>(
        withStroke strokeContent: StrokeStyle,
        lineWidth: CGFloat = 1,
        fill fillContent: FillStyle
    ) -> some View {
        stroke(strokeContent, lineWidth: lineWidth)
            .background(fill(fillContent))
    }
}
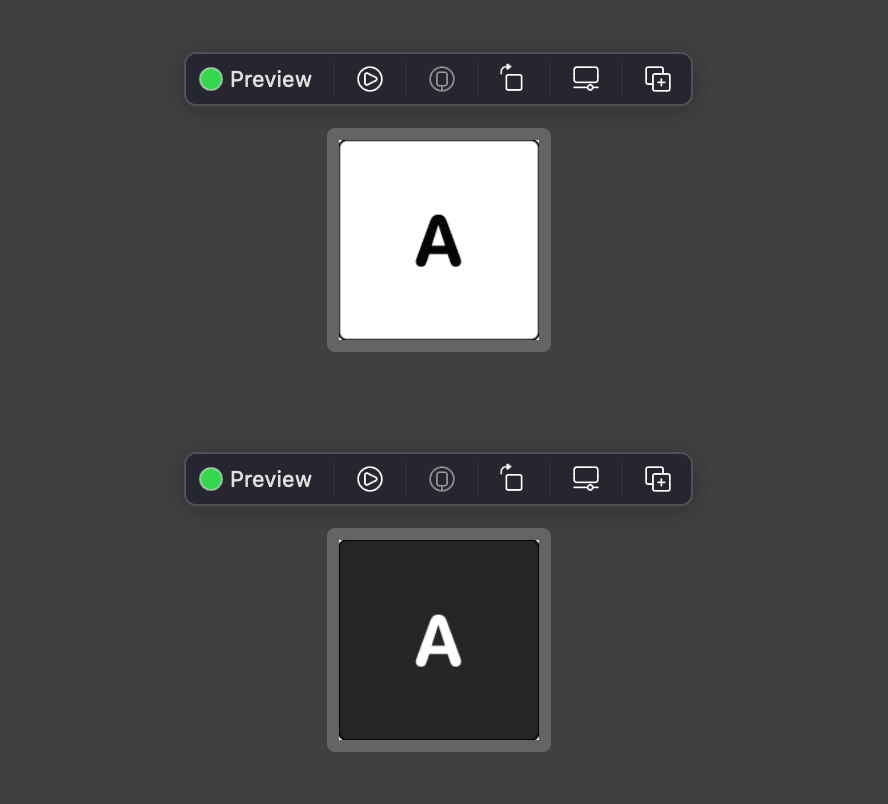
And that’s it already for the LetterBox! But before we continue with creating the next view, let’s quickly add a preview to see what we’ve built in real-time in Xcode:
struct LetterBox_Previews: PreviewProvider {
    static var previews: some View {
        LetterBox(letter: .init("A"), evaluation: nil)
            .previewLayout(.fixed(width: 100, height: 100))
            .environment(\.colorScheme, .light)
        LetterBox(letter: .init("A"), evaluation: nil)
            .previewLayout(.fixed(width: 100, height: 100))
            .environment(\.colorScheme, .dark)
    }
}
It’s always nice to support both light mode and dark mode with your app and this is a convenient way to make sure your view looks as intended on both color schemes. Run the preview in the canvas to see how it looks!
Feel free to add other previews to the Group or play around with the existing ones! For example, you could specify .included or .match for the evaluation parameter.
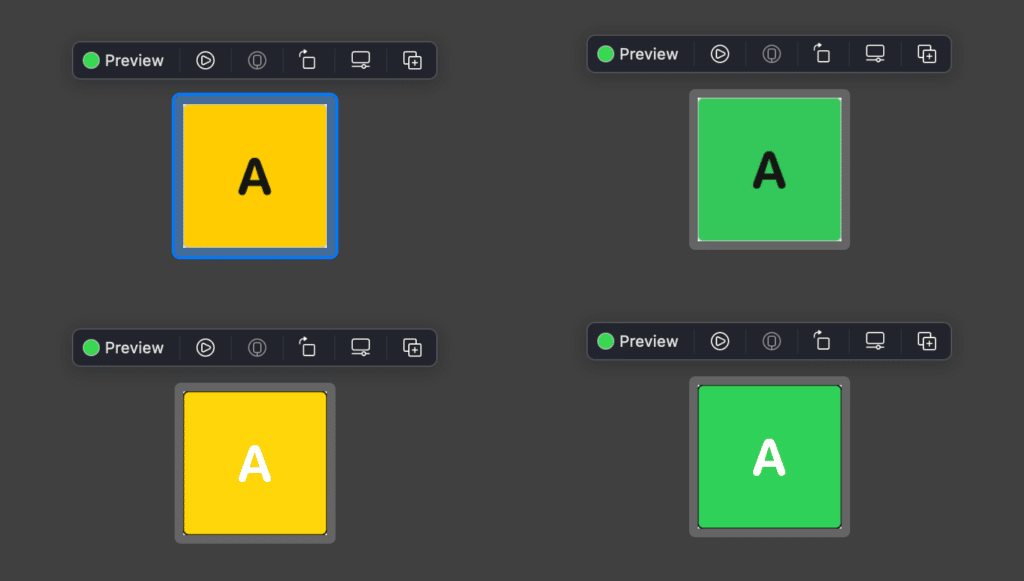
While both yellow colors for light mode (top) and and dark mode (bottom) look very similar, they are actually not the same and differ in the nuances. The same holds true for the two greens. If you wanna learn more about the available system colors and how they look in light/dark mode, check out this SwiftLee article: Dark Mode: Adding support to your app in Swift.
Building a Matrix Grid
In order to create our WordleBoard, we would like to create a 6×5 grid full of these LetterBoxes! An easy way to do that is to use a LazyVGrid. Unfortunately, its syntax is a little verbose (as you can do lots of fancy stuff with it), so let’s first create a wrapper view around it to make it easier to use for our purpose. We’ll call this wrapper view MatrixGrid and this is how we would like to use it:
MatrixGrid(
    width: 5,
    height: 6,
    spacing: 8
) { row, column in
    // Create and return a view for this row and column
}
So we basically don’t want to care about any implementation details. We just want to specify the dimensions of the grid and then specify a view for each (row, column) pair. This is how we can achieve just that:
struct MatrixGrid<Content: View>: View {

    typealias GridItemFactory = (_ row: Int, _ column: Int) -> Content

    let width: Int
    let height: Int
    let spacing: CGFloat
    let gridItemFactory: GridItemFactory

    private var columns: [GridItem] {
        .init(repeating: GridItem(.flexible()), count: width)
    }

    var body: some View {
        LazyVGrid(columns: columns, alignment: .center, spacing: 8) {
            ForEach(0..<height) { row in
                ForEach(0..<width) { column in
                    gridItemFactory(row, column)
                }
            }
        }
    }
}
The LazyVGrid requires us to pass an array of GridItems in its initializer that specify the layout of the grid. If you want to have equally sized items in each row that fill the entire grid, just pass in a GridItem(.flexible()) for each column as we specified in the columns property above. Other than that, all our MatrixGrid does is abstracting away the two ForEach loops. The typealias is just a convenience for better readability. The generic type Content is a placeholder for the type of the views that we’ll use for the grid items (in our case it will be LetterBox).
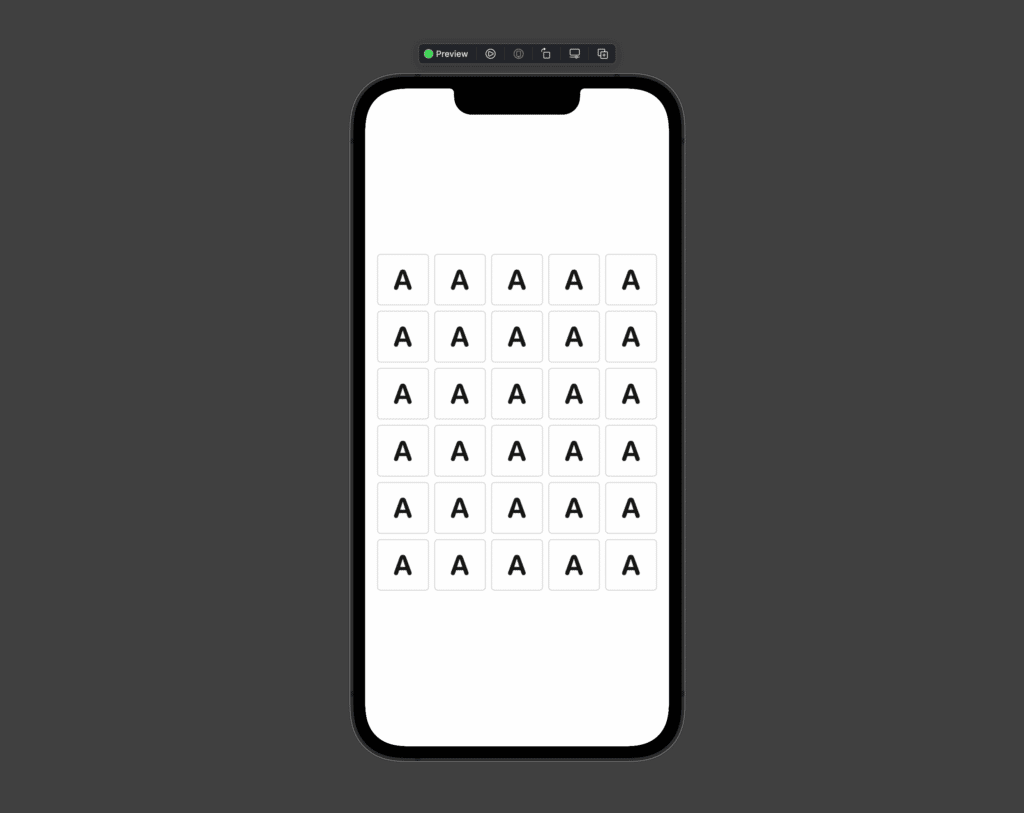
Let’s quickly see if our MatrixGrid works as intended and create a preview:
struct MatrixGrid_Previews: PreviewProvider {
    static var previews: some View {
        MatrixGrid(width: 5, height: 6, spacing: 8) { row, column in
            LetterBox(letter: "A", evaluation: nil)
        }
        .padding()
    }
}
Looks pretty neat, doesn’t it?! 😀
⚠️ Note: You need to make sure that the width and the height of the MatrixGrid don’t change at runtime or your app will crash. This is due to a limitation of the ForEach view in SwiftUI. (It applies only for the initializer that accepts a Range.)
Building the Complete Wordle Board
Now we have all the building blocks together to finally build the actual fullscreen view that the user will see. We call it WordleBoard. The preview above comes pretty close to what we would like to have in the end, but it only shows A’s which is kinda boring, but a good starting point.
Again, we gotta ask ourselves: What are the possible states that determine our WordleBoard‘s appearance? Well, basically it’s the same states that a LetterBox can assume, only multiplied by the number of boxes:
- The (optional) letter that each box displays.
- The (optional) evaluation state (representing the color) of each box.
We can model both of these properties with a 2-dimensional array of the respective type:
struct WordleBoard: View {
    @State var letters: [[Character?]]
    @State var evaluations: [[LetterEvaluation?]]

    var body: some View {
        // to be implemented
    }
}
Now, for the first time, we put a @State keyword in front of each state property. What’s that all about and why didn’t we use it before for the LetterBox when defining its possible states?
Note: If you know all about the @State property wrapper in SwiftUI, you might wanna skip the following part and jump to the next section.
Excursion: Value Types & Property Wrappers
It all boils down to how and when views are (newly) created: Views are not classes, but structs in SwiftUI and that means they are value types. So when the view needs to be updated (for example, to change the color of a letter box), it’s not just one property that is modified – an entirely new instance of the view is created!
ℹ️ If you wanna learn more about value types vs. reference types, check out this short article by Apple: Value and Reference Types
And that’s where SwiftUI’s property wrappers come into play! @State is the simplest property wrapper. It simply tells SwiftUI that a variable marked with this keyword is related to this view, but managed by SwiftUI. Its value is not recreated when the view is refreshed, it remains in storage and is persistent even when the view is recreated.
Another huge advantage of using the @State property wrapper is that SwiftUI tracks any changes to the respective property and redraws the view whenever the property changes. This way, we never need to think (and possibly forget) about refreshing our view when its state changes – we simply change the state and SwiftUI does the refreshing for us, automatically.
➡️ Back to our WordleBoard!
struct WordleBoard: View {
    @State var letters: [[Character]]
    @State var evaluations: [[LetterEvaluation]]

    var body: some View {
        // to be implemented
    }
}
The letters and evaluations are the state of our view and will be kept in memory when the view is refreshed (i.e. recreated). For the LetterBox, we didn’t need to explicitly mark the letter and evaluations properties as @State because that state cannot be changed from inside the view. The LetterBox is just a little piece of our WordleBoard – its state is always set externally when the view is recreated. For that reason, its state doesn’t need to be persisted.
Let’s put the pieces together and implement the WordleBoard‘s body:
struct WordleBoard: View {

    // ... state properties ...

    static let width = 5
    static let height = 6

    var body: some View {
        VStack {
            MatrixGrid(
                width: Self.width,
                height: Self.height,
                spacing: 8
            ) { row, column in
                LetterBox(
                    letter: letters[row][column],
                    evaluation: evaluations[row][column]
                )
            }
            Button("New Game") {
               // start new game, to be implemented...
            }
            .padding(8)
        }
        .padding(24)
        .background(Color(.systemGray6))
    }
}
We simply used our MatrixGrid to create 6×5 LetterBox views, just like we did in the preview provider for the MatrixGrid. We also created constants for the width and the height of the grid. They are marked as static because we will have to use them in the state property initializers below.
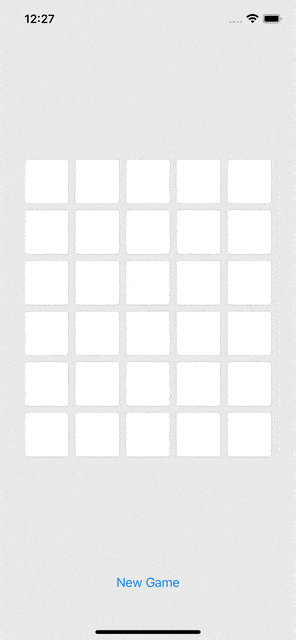
If you run the app now, it will (also) crash because in the view’s body, we access elements in the 2d-arrays letters and evaluations. But we haven’t initialized those arrays yet, so there are no elements at the index pairs that we’re trying to access. Let’s do that next!
@State var letters: [[Character?]] = Array(
    repeating: .init(repeating: nil, count: width),
    count: height
)

@State var evaluations: [[LetterEvaluation?]] = Array(
    repeating: .init(repeating: nil, count: width),
    count: height
)
All we do here is initializing our 2d-arrays and writing a nil value at all the positions that we are going to access. The above is a short form of writing the following:
@State var letters: [[Character?]] = [
  [nil, nil, nil, nil, nil],             ⌃
  [nil, nil, nil, nil, nil],             |
  [nil, nil, nil, nil, nil],           height
  [nil, nil, nil, nil, nil],           times
  [nil, nil, nil, nil, nil],             |
  [nil, nil, nil, nil, nil]              ⌄
]

  < ---- width times ---- >
If you build again, the project should now compile and the app will run. However, it will show nothing exciting in the letter boxes as we initialized all the array elements with nil. Don’t be frustrated! 😉 Instead, temporarily replace the code for the two state properties with the following:
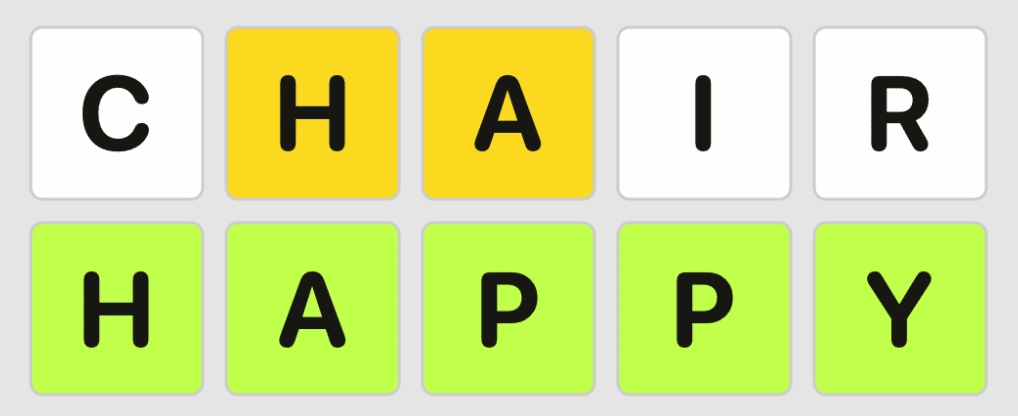
@State var letters: [[Character?]] = [
  ["H", "e", "l", "l", "o"],
  ["T", "a", "b", "l", "e"],
  ["C", "h", "a", "i", "r"],
  ["H", "o", "u", "s", "e"],
  ["H", "a", "p", "p", "y"],
  [nil, nil, nil, nil, nil]
].map { $0.map { $0.map { Character($0) }}}

@State var evaluations: [[LetterEvaluation?]] = [
  [.match, .notIncluded, .notIncluded, .notIncluded, .notIncluded],
  [.notIncluded, .match, .notIncluded, .notIncluded, .notIncluded],
  [.notIncluded, .included, .included, .notIncluded, .notIncluded],
  [.match, .notIncluded, .notIncluded, .notIncluded, .notIncluded],
  [.match, .match, .match, .match, .match],
  [nil, nil, nil, nil, nil]
]
The map–map–map might be confusing here, but it’s needed because we’re dealing with a 2d-array:
- The first
mapiterates over each row (the outer array). - The second
mapiterates over each column inside that row (the inner arrays). - The third
mapmaps theStringliterals ("H","e","l"etc.) to aCharacterwhich is expected by theLetterBoxand makes sure that it doesn’t accidentally display multiple letters.
When you now run the app, you will see that the letter boxes now show the letters we provided and are colored as specified in the evaluations state property. Ain’t that cool?! 😎
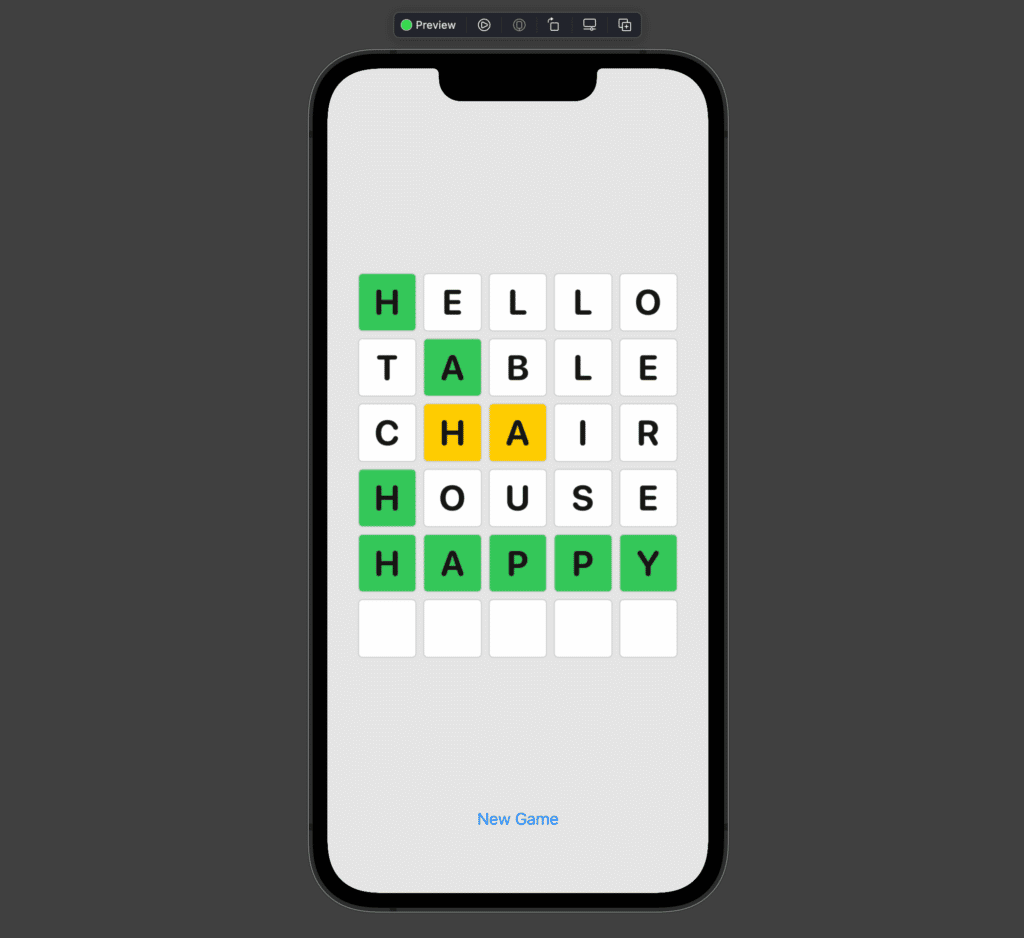
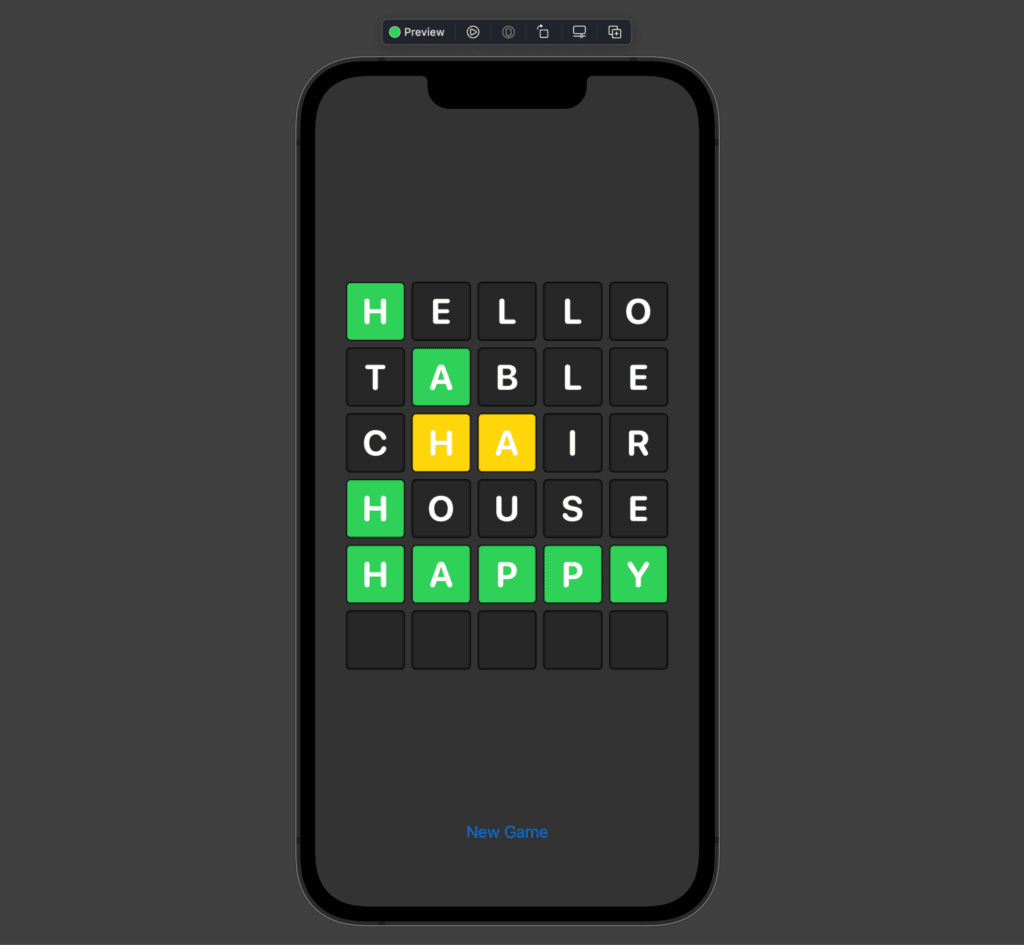
And when you switch to dark mode on your test device or in a custom preview in Xcode, you’ll see that the colors automatically adjust to the environment as well.
So far, so good! We’re basically done with creating our WordleBoard! There is only one tiny, yet important thing missing: a way to type letters into the letter boxes! That’s what we’re going to add next.
Note: Don’t forget to revert the temporary changes and initialize both state array with nil values only!
Accepting User Input
This part is not as easy as it sounds. The most naive approach would have been to use a TextField instead of a (read-only) Text view in each LetterBox. However, we won’t choose this path. On iOS, it is (to our knowledge) not possible to limit text entry to only a single character. So we would need to return from the text field after a single character entry and focus the next text field.
Another major problem is that a TextField‘s onChange method is not always triggered after each character entry. When the user types really fast (e.g. on an external keyboard) and hits multiple keys almost simultaneously, the onChange method is only called once for an input of multiple characters. This makes it really difficult to handle the text input if we spread it over multiple single-letter text fields.
Instead, we try to be smart and use a different approach: We use a single TextField for the user input, but we hide it from the user interface and apply its content to the LetterBoxes after each user input. This way, the user gets the impression that she or he is typing directly into the LetterBoxes when they’re actually typing into a hidden TextField. 💡
🔮 A Hidden Secret
Let’s add this TextField to our view! We go back to our WordleBoard and wrap the MatrixView in a ZStack. This way, we can stack views on top of each other along the z-axis (that points perpendicularly out of the device towards the user). In the following code, the changes to the WorldView‘s body are highlighted:
var body: some View {
    VStack {
        ZStack {
            TextField("", text: $string)
                .keyboardType(.asciiCapable)
                .disableAutocorrection(true)
                .focused($textFieldActive)
                .opacity(0)
            MatrixGrid(
                width: Self.width,
                height: Self.height,
                spacing: 8
            ) { row, column in
                LetterBox(
                    letter: letters[row][column],
                    evaluation: evaluations[row][column]
                )
            }
            .frame(maxHeight: .infinity)
        }
        Button("New Game") {
           // start new game, to be implemented...
        }
        .padding(8)
    }
    .padding(24)
    .background(Color(.systemGray6))
}
We just used two new properties that we haven’t declared yet. Let’s do that and add the following two lines to the state properties of the WordleBoard:
@State private var string: String = ""
@FocusState private var textFieldActive: Bool
The string property keeps track of what the user has entered into the text field. We bind it to the text field in line 4 by specifying $string as the text parameter. The textFieldActive property uses the @FocusState property wrapper and defines whether the text field is currently active (i.e. editable with the keyboard visible) or not. We implement this functionality by applying the .focused($textFieldActive) modifier on the text field in line 7. When we set this property to true, the (hidden) text field will become active and the keyboard will appear. Then we set in to false, it becomes inactive and the keyboard disappears.
For this game, we also want to disable auto correction and automatic word suggestions because that would get in the way of letter-by-letter entry. We do that with line 5 and 6:
.keyboardType(.asciiCapable)
.disableAutocorrection(true)
Spoiler: You need to use the combination of both modifiers. If you only disableAutocorrection, the word suggestions will still be shown (for reasons that only Apple knows). Finally, the .opacity(0) modifier makes the text field invisible without deactivating it (as .hidden() would do!).
⌨️ Making the Keyboard Appear
Cool, so now we got that hidden text field! 😎 But when you run the app, you’ll probably ask yourself a simple question: How the hack am I going to put the cursor into an invisible text field for entering text?! 🤔 Well, you can either try to guess where the text field is and randomly poke your phone’s screen – or you can use another control mechanism to activate it. The latter sounds like the better idea, doesn’t it? 💡
We want the keyboard to appear (or disappear) when the user taps anywhere on the MatrixGrid. So let’s just add an onTapGesture modifier in the MatrixGrid and toggle the property for our text field’s focus state:
var body: some View {
    VStack {
        ZStack {
            TextField("", text: $string)
                .keyboardType(.asciiCapable)
                .disableAutocorrection(true)
                .focused($textFieldActive)
                .opacity(0)
            MatrixGrid(
                width: Self.width,
                height: Self.height,
                spacing: 8
            ) { row, column in
                LetterBox(
                    letter: letters[row][column],
                    evaluation: evaluations[row][column]
                )
            }
            .frame(maxHeight: .infinity)
            .onTapGesture {
                textFieldActive.toggle()
            }
        }
        Button("New Game") {
           // start new game, to be implemented...
        }
        .padding(8)
    }
    .padding(24)
    .background(Color(.systemGray6))
}
When you now run the app and tap on the grid of letter boxes, the keyboard should pop up. When you tap again, it should disappear.
Now we have a way of entering text, but whatever you type into this text field, it’s nowhere to be seen: not in the text field (cause it’s invisible, remember?) and not in the letter boxes, because we haven’t yet connected the text field entry with those boxes! That’s what we’re going to do next, alongside with implementing the game logic.
Implementing the Game Logic
So far, we’ve only worked with views and held the state directly in the view using the @State and @FocusState property wrappers. That made a lot of sense because we didn’t do fancy things with that state: the view itself owned it and it was no-one else’s business. That’s going to change now!
Naturally, we want to keep the game logic outside of our view, so that the view can focus on its sole purpose: Displaying stuff and receiving user input. So we need a place where we do all the “heavy lifting”. As SwiftUI is based on the MVVM design pattern, it’s very reasonable to create a view model (the “VM”) and implement the game logic there.
ℹ️ If you’re interested in the architectural ideas behind SwiftUI, you might want to check out our article SwiftUI Architectures: Model-View, Redux & MVVM.
⚙️ The View Model
Create a new file, name it WordleBoardViewModel.swift and add the following contents:
class WordleBoardViewModel: ObservableObject {

    let width: Int
    let height: Int

    @Published var letters: [[Character?]]
    @Published var evaluations: [[LetterEvaluation?]] = []

    var solution: String = "HAPPY"

    init(width: Int = 5, height: Int = 6) {
        self.width = width
        self.height = height
        letters = Array(
            repeating: .init(repeating: nil, count: width),
            count: height
        )
        evaluations = Array(
            repeating: .init(repeating: nil, count: width),
            count: height
        )
        newGame()
    }

    func newGame() {
        // to be implemented ...
    }

}
If the code looks familiar to you, that’s no coincidence: We moved the letters and evaluations state over from the WordleBoard. When you look closely, you’ll notice a tiny difference: Instead of the @State property wrapper, the properties now use the @Published property wrapper. What’s that all about?
Well, in a minute, we’ll add an instance of this view model class to our WordleBoard and make the view observe it. That’s why we also added the protocol conformance ObservableObject in the first line above. Whenever a @Published property changes, the observing object (i.e. our view) will be notified. the view then “knows” that whatever it is displaying is no longer valid and re-render itself. Obviously, we want our view to re-render when the letters (to be shown in the boxes) or the evaluations (defining the color of the boxes) change.
We no longer assign the initial values for those two properties where we defined them, but in the initializer instead as we now want to pass the width and the height as parameters when creating the view model. The code is for filling up the 2d-arrays with nil values is still the same though. Finally, we added a variable for the solution word to be guessed (we’ll use a fixed word for now) and a function to start a new game that we call before returning from the initializer.
So far, we haven’t changed the game logic, but mostly moved stuff over from the view. But for the move to be complete, we actually need to delete the respective properties in the WordleBoard and use the view model’s properties instead. Let’s do that!
In the WordleBoard, delete the two static properties
❌ static let width: Int = 5
❌ static let height: Int = 6
and the two @State properties:
❌ @State var letters: [[Character?]] = Array(
❌     repeating: .init(repeating: nil, count: width),
❌     count: height
❌ )
❌
❌ @State var evaluations: [[LetterEvaluation?]] = Array(
❌     repeating: .init(repeating: nil, count: width),
❌     count: height
❌ )
Instead, add a new property to the WordleBoard for the view model, right above the only other remaining state variable and wrap it in a @StateObject:
@StateObject private var viewModel = WordleBoardViewModel()
@FocusState private var textFieldActive: Bool
We keep the @FocusState property in the view as it is not related to the game logic and only specifies whether the keyboard is visible or not.
Build the project once (⌘+B). You should now see red compiler errors in all those lines where a state variable is accessed that’s no longer part of the view. Add the prefix viewModel. to these variables and also use the viewModel‘s width and height.
var body: some View {
    VStack {
        ZStack {
            TextField("", text: $viewModel.string)
                .keyboardType(.asciiCapable)
                .disableAutocorrection(true)
                .focused($textFieldActive)
                .opacity(0)
            MatrixGrid(
                width: viewModel.width,
                height: viewModel.height,
                spacing: 8
            ) { row, column in
                LetterBox(
                    letter: viewModel.letters[row][column],
                    evaluation: viewModel.evaluations[row][column]
                )
            }
            .frame(maxHeight: .infinity)
            .onTapGesture {
                textFieldActive.toggle()
            }
        }
        Button("New Game") {
           // start new game, to be implemented...
        }
        .padding(8)
    }
    .padding(24)
    .background(Color(.systemGray6))
}
Make sure that your project builds again. Next, let’s hook up the “New Game” button. Replace the comment in line 27 with the following code:
viewModel.newGame()
Now, whenever the button is tapped, the newGame() function on the viewModel is called. (We’ll implement it soon.) Awesome! 😎
🅰️ Put the letter in the box!
Unfortunately, we still don’t see what we type. So it’s finally time to hook up our hidden text field with the letter boxes! In order to do that, we need to do something in our view model whenever the string in the hidden text field changes. SwiftUI provides a handy modifier .onChange that we can use for this purpose. Let’s append it to the other modifiers on the text field (insert after line 8 in the code above):
TextField("", text: $viewModel.string)
    .keyboardType(.asciiCapable)
    .disableAutocorrection(true)
    .focused($textFieldActive)
    .opacity(0)
    .onChange(of: viewModel.string) { [old = viewModel.string] new in
        viewModel.validateString(new, previousString: old)
    }
The .onChange modifier accepts a closure and passes the new value to it as a parameter. We can capture the old value directly from the viewModel with a capture list.
ℹ️ If you’re unfamiliar with this syntax, there’s a really great article by objc.io:
Swift Tip: Capture Lists
If you build the project now, the compiler will complain as there is no function named validateString yet. Let’s switch back to our WordleBoardViewModel and create it!
func validateString(_ newString: String, previousString: String) {
    // 1️⃣ Validate newString and modify if necessary
    // 2️⃣ Assign the validated string back to the hidden text field
    // 3️⃣ Map the validated string to the letter boxes
}
This function consists of 3 parts. We’ll fill in the code step-by-step, but first explain what we need to do in each step:
- First, we perform the actual validation: We check if the
newStringmatches certain criteria, for example, it must only contain letters, no numbers or special characters. We’ll also need to make sure that the user cannot edit previous rows that have already been evaluated. In other words: We need to transform thenewStringsomehow to get avalidatedString. - In order to always be in sync with the text field, we need to reflect the transformations we applied to the
newStringback to the text field. As it’s bound to our view model’s string property, we achieve this by simply assigning thevalidatedStringto the@Publishedstringproperty. - Lastly, we need to map the
validatedString(which is now equal tostring) to our 2d-arraylettersin order to make the string’s characters show up in the letter boxes.
Step 1 is the most complex one, so we’ll start without any transformations and pretend that the newString is already the validated string. We’ll add the validations later. Step 2 is pretty straightforward as it’s just simple assignment.
func validateString(_ newString: String, previousString: String) {
    // 1️⃣ Validate newString and modify if necessary
    let validatedString = newString // transformations to be added
    // 2️⃣ Assign the validated string back to the hidden text field
    string = validatedString
    // ❌ 3️⃣ Map the validated string to the letter boxes
}
Step 3 could be done here, but a smarter move is to do this in the string‘s didSet property observer. After step 2, string and validatedString have the same value, so we can simply remove step 3 from the validateString function and move it to the string property definition:
@Published var string: String = "" {
    didSet {
        mapStringToLetters(string)
    }
}
Now every time the string is set, the mapStringToLetters function is called. We haven’t yet defined how that works, so let’s create another (private) function in the view model that does just that. It iterates over all rows and columns and assigns the character at the the matching string index to the corresponding (row, column)-index pair for the letters 2d-array:
private func mapStringToLetters(_ string: String) {
    for row in 0..<height {
        for column in 0..<width {
            let index = row * width + column
            if index < string.count {
                letters[row][column] = [Character](string)[index]
            } else {
                letters[row][column] = nil
            }
        }
    }
}
If the entered string is longer than the number of boxes, we can discard the letter and simply map it to nil.
Run the app again. You should now be able to freely type into the letter boxes. Everything you type immediately appears in the boxes. You can also delete characters with backspace. Ain’t that awesome?! 🎉
🛂 String Validation & Transformation
So the mapping works, but as you can see above, we can still hit any available key on the keyboard and it will show up on screen. That’s a problem because, folks, we’re building a word guessing game, not a number or punctuation guessing game! So the first part of our actual validation needs to check the input string for disallowed characters and ignore them. Let’s add a private function to the view model that validates all characters of a given string against the allowed characters! Fortunately, Swift already provides a CharacterSet that contains only letters and nothing else:
private func isValidInput(_ string: String) -> Bool {
    let allowedCharacters = CharacterSet.letters
    return string.unicodeScalars.allSatisfy(allowedCharacters.contains)
}
With this function, we can now easily create a second function that returns a string to be displayed in the letter boxes. It returns the newly entered string if it only contains allowed characters, otherwise it returns the previous valid string (to be passed in as a parameter):
private func validateAllowedCharacters(_ string: String,
                                       previousString: String) -> String {
    guard isValidInput(string) else {
        return previousString
    }
    return string
}
Now we need to apply that validation function to the new string passed to the validateString method that is called whenever the string in the text field changes. For a more comfortable way of validating a given string in multiple steps, we add a little helper function in an extension on the String type (add the code to the bottom of your view model file, for example):
extension String {
    func transform(_ transform: (String) -> String) -> String {
        transform(self)
    }
}
This will allow us to use the dot-syntax to perform multiple validations (i.e. mutations on a string).
let validatedString = string
    .transform { ... } // validation 1
    .transform { ... } // validation 2
    ...
Let’s use this helper function to apply our character validation before mapping the validatedString to the letters (i.e. boxes):
func validateString(_ newString: String, previousString: String) {
    let validatedString = newString
        .transform { string in
            validateAllowedCharacters(string, previousString: previousString)
        }
    string = validatedString
}
Run the app again. Now everything should work as expected: You cannot type any numbers or special characters into the letter boxes and you don’t have any weird side effects. Pretty neat! 👌
✋ Restricting Input to The Current Row
Next, we need to make sure that the user can only type in the current row, so we need to truncate any characters of the string that exceed the highest index of the current row. Similarly, we need to make sure that the user cannot delete any characters from a previous row. In order to do that, we need a means of knowing what the current row is that the user is currently typing into, so let’s add a new private property to the WordleBoardViewModel for this purpose:
private var activeRow: Int = 0
Using this property, we can now write a function that ensures that string edits are only allowed in the activeRow. The startIndex is the index of the first character in the active row, the endIndex is the index of the last character in the active row.
private func validateActiveRowEdit(_ string: String,
                                   previousString: String) -> String {
    let startIndex = activeRow * width
    let endIndex = startIndex + width - 1
    guard string.count <= endIndex + 1 else {
        // string flows into the next row:
        // → Keep old string in previous rows,
        //   use new string in current row,
        //   discard subsequent rows
        return String(previousString.prefix(startIndex))
             + string.prefix(endIndex + 1).suffix(width)
    }
    guard string.count >= startIndex else {
        // string is now shorter and doesn't reach the current row:
        // → Keep old string in previous rows, discard new string
        return String(previousString.prefix(endIndex))
    }
    return string
}
This logic is a little more complex. Feel free to take a minute to understand what’s going on and why we do that. Next, we need to apply this function to our input string. We’ll make use of our String.transform function again:
func validateString(_ newString: String, previousString: String) {
    let validatedString = newString
        .transform { string in
            validateAllowedCharacters(string, previousString: previousString)
        }
        .transform { string in
            validateActiveRowEdit(string, previousString: previousString)
        }
    string = validatedString
}
When you run the app you will see that you can now only edit the first row of letter boxes, nothing else. That’s a bit frustrating. 😔 In order to allow editing the subsequent rows, we still need a mechanism to increment the activeRow. But we’ll only do that after evaluating the current row, i.e. after checking which of the characters that the user entered are included in the solution word. For doing that, we need three more private functions.
👩⚖️ Win or Lose?
First, we need a function that checks if the active row has been completed and should be evaluated. Other than the original Wordle game, we simplify things a bit: We don’t use an dedicated “Enter” button to trigger an evaluation. Instead, we want to evaluate the word automatically when all five letters in the active row have been entered. We check if that’s the case and if so, we return the word that has been entered in the active row. Otherwise, we return nil to indicate that the user hasn’t finished a full row and no evaluation is needed.
private func guessedWord() -> String? {
    let finishedFullWord = string.count - activeRow * width == width
    guard finishedFullWord else {
        return nil
    }
    return String(string.suffix(width))
}
Secondly, we need a function that takes a 5-letter word as an input and actually performs the evaluation for this word. As we only show capital letters in the letter boxes and want to ignore the case, we first convert both the guessed word and the solution word to their uppercase representation. We then perform an evaluation for the activeRow and assign it to 2d-evaluation array at the respective index:
private func evaluateWord(_ word: String) {
    let solution = Array(solution.uppercased())
    let rowEvaluation: [LetterEvaluation] = word
        .uppercased()
        .enumerated()
        .map { index, character in
            if character == solution[index] {
                return .match
            } else if solution.contains(character) {
                return .included
            } else {
                return .notIncluded
            }
    }
    evaluations[activeRow] = rowEvaluation
    checkWinOrLose(rowEvaluation) // to be implemented...
    activeRow += 1
}
After the evaluation, we increment the activeRow by 1 so the user can type into the next row. But before we do that, we need to check if the user has guessed the right word and thus wins the game or if the user has filled in the last row and still not guessed the solution (i.e. loses). Before we implement the checkWinOrLose function, we create another little helper in an Array extension. Add this code to the bottom of your WordleBoardViewModel file:
extension Array where Element == LetterEvaluation {
    var solved: Bool {
        allSatisfy { $0 == .match }
    }
}
We’ll also need two more Boolean properties to indicate if the game is solved or lost. Add these properties next to the other properties in the view model:
@Published var solved: Bool = false
@Published var lost: Bool = false
We marked them with @Published because we want our view to show an alert when any of these properties change. With all this in place, we can finally check if the game is over (for the worse or better):
private func checkWinOrLose(_ rowEvalutation: [LetterEvaluation]) {
    if rowEvaluation.solved {
        solved = true
    } else if activeRow == height - 1 {
        lost = true
    }
}
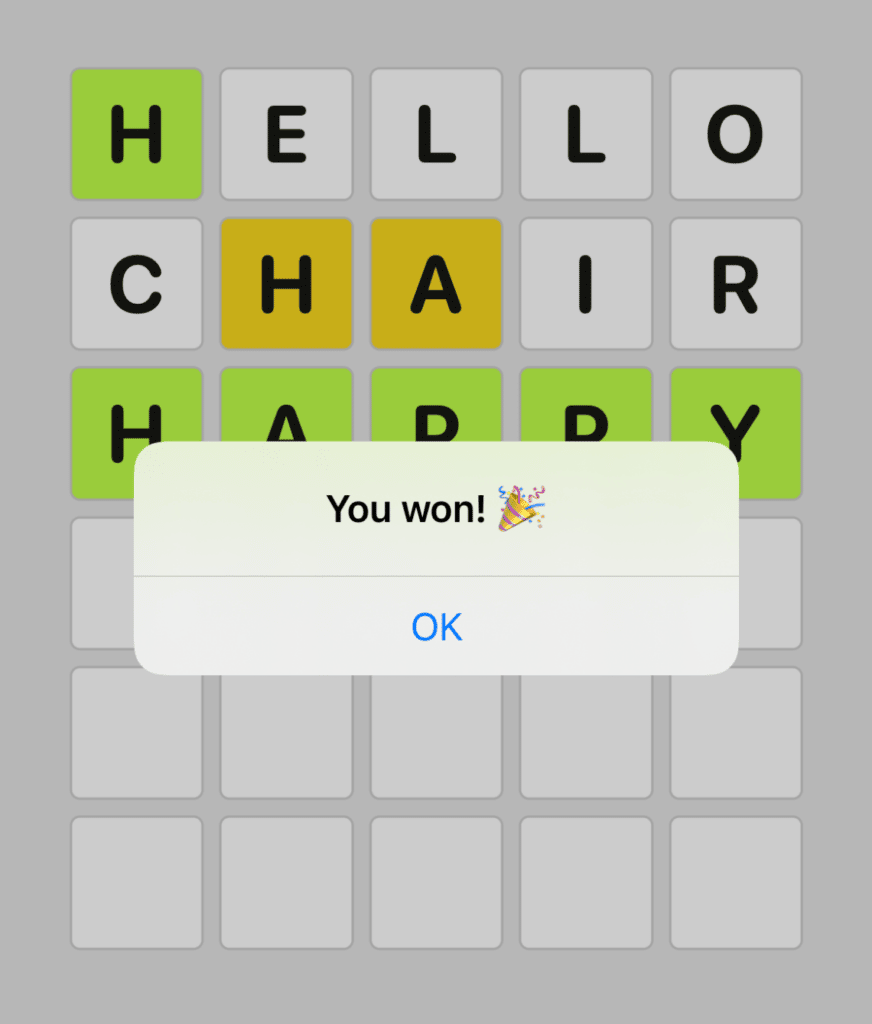
Run the app. When you type a 5-letter word in a row, it will now be evaluated and you’ll see the letter boxes color up yellow or green if the respective letter is included in the solution word! 😎
However, when we’ve guessed the solution word, nothing happens. And to be honest, that’s a bit frustrating. Let’s do something about it! We’ve already prepared the necessary logic in the view model with the @Published solved and lost properties. So all we gotta do now is hooking up those properties with our WorldeBoard and display an alert when either one of them is true.
Showing an alert is pretty easy in SwiftUI: You simply have to apply an .alert modifier to the view’s body and bind it to a Boolean variable that defines whether the alert is to be shown or not. So in order to show an alert when the user has solved the game, we add the following modifier. The Boolean binding in this case is $viewModel.solved:
.alert("You won! 🎉", isPresented: $viewModel.solved) {
    Button("OK", role: .none) {
        viewModel.solved = false
    }
}
Of course, we need to dismiss the alert when the user taps the “OK“-button. We do that be setting the Boolean variable solved back to false.
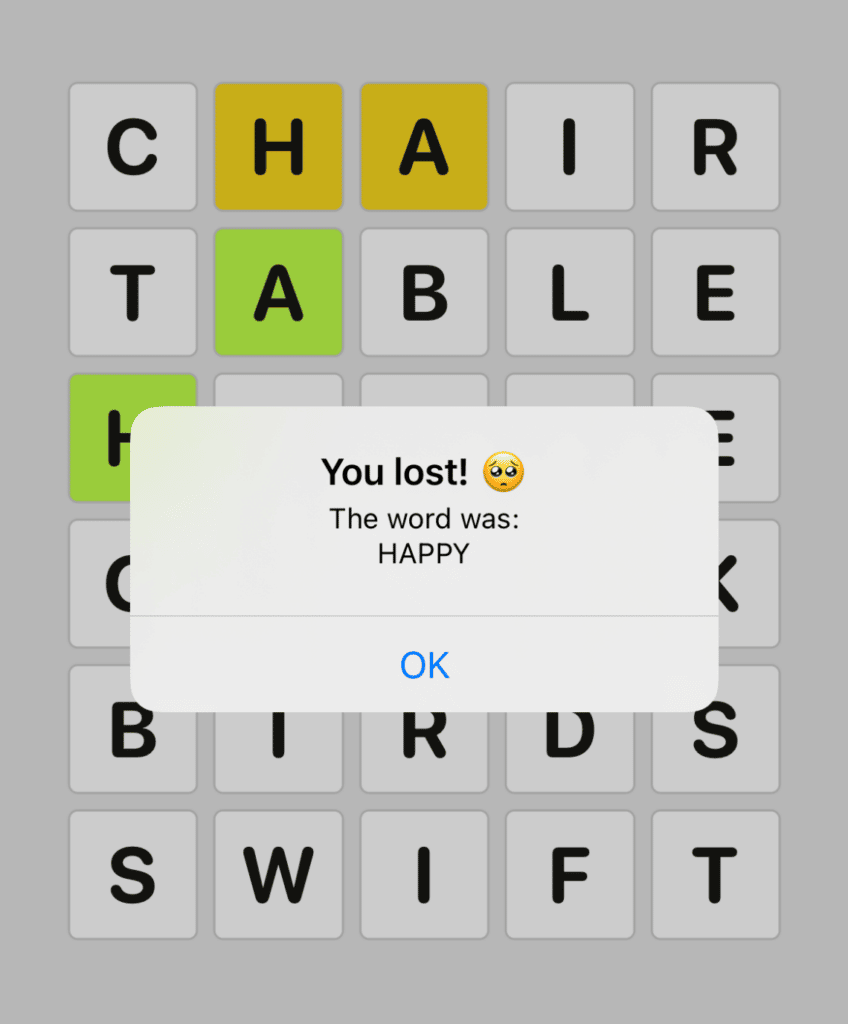
Finally, we add another alert that we show when the game is lost. In this case, we want to show the solution word to the user in the alert, using the alert’s message parameter. This is how our WordleBoard‘s body look now with both alerts in place: (We removed the main content and only indicate its presence with comments to focus on the important stuff here.)
var body: some View {
    VStack {
        ZStack {
            // TextField ...
            // MatrixGrid ...
        }
        Button("New Game") {
           viewModel.newGame()
        }
        .padding(8)
    }
    .padding(24)
    .background(Color(.systemGray6))
    .alert("You won! 🎉", isPresented: $viewModel.solved) {
        Button("OK", role: .none) {
            viewModel.solved = false
        }
    }
    .alert("You lost! 🥺", isPresented: $viewModel.lost) {
        Button("OK", role: .none) {
            viewModel.lost = false
        }
    } message: {
        Text("The word was:\n" + viewModel.solution.uppercased())
    }
}
Great! Now we’ve implemented the game and it’s even fun to play! 🥳 This is how the alerts look when you win or lose a game:
🆕 Time For a New Game!
Folks, we’ve completely neglected the “New Game” button! When we launch the app, we can happily play around of Wordle, but when the game is over and we hit that button, nothing happens. 🤷♀️ We need to change that of course, by finally implementing the newGame function:
func newGame() {
    activeRow = 0
    string = ""
    evaluations = evaluation.map { $0.map { _ in nil }}
    solution = WordProvider.generateWord()
}
All that we do here is super straightforward: We reset the activeRow to the first row, we reset the string and thereby empty the hidden text field, we reset all letter evaluations to nil (double-map because of the 2d-array) and we generate a new word for the solution. Run the app again and try it out! Works like a charm, doesn’t it?
Final Tweaks
The beauty of any iOS app is in the details, isn’t it? ❤️ Let’s add a few of these details to make the game more fun!
👆 Haptic Feedback
The game feels more interactive and winning a game will be more rewarding when the phone gives haptic feedback when the game is over. In SwiftUI, that’s super easy to do! Just create a simple private modifier function in your WordleBoard:
private func vibrate(type: UINotificationFeedbackGenerator.FeedbackType) {
    let generator = UINotificationFeedbackGenerator()
    generator.notificationOccurred(type)
}
and add the following modifiers below the .alert modifiers at the bottom of your view:
.onChange(of: viewModel.solved) { solved in
    if solved {
        vibrate(type: .success)
    }
}
.onChange(of: viewModel.lost) { lost in
    if lost {
        vibrate(type: .error)
    }
}
Run the app again, play a round to win or lose – and feel the vibe! 🏝
🪄 Animations
When you finish the game and start a new game, it’s a pretty hard cut, don’t you think? Fortunately, SwiftUI offers us a super simple way out with just one line of code (and a curly brace)! 😉
Just wrap the action of the “New Game” button in an animation closure like this:
Button("New Game") {
    withAnimation {
        viewModel.newGame()
    }
}
This is all we need for a basic animation. SwiftUI will now automatically perform the standard animation on all views that are rerendered as a result of the button tap. It’s a smooth fade-out transition. Looks much better, don’t you think?

🔠 More Words to Guess!
We have a pretty neat Wordle game now, but it’s still a little boring to play because you always have to guess the same word (and you know it already)! 😕 We don’t wanna let you go without at least adding a few more words.
Create a new file WordProvider.swift and add the following implementation:
struct WordProvider {
    static let allowedWords: [String] = [
        "Happy",
        "Table",
        "Chair",
        "Hello",
        "Quick",
        "Birds",
        "Swift",
        // add any solution word ...
    ]

    static func generateWord() -> String {
        Self.allowedWords.randomElement()!
    }
}
In the WordleBoardViewModel, we only need to change a single line to magically use a random word from the allowedWords list as the solution. Just replace the solution assignment in the newGame() method as follows:
func newGame() {
    activeRow = 0
    string = ""
    evaluation = evaluation.map { $0.map { _ in nil }}
    solution = WordProvider.generateWord()
}
Feel free to paste any 5-letters word list you find on the internet or use a publicly accessible API from an online dictionary to generate solution words. Anything is possible – you’re an iOS developer! 💪
It’s a wrap!
Congratulations! You have just rebuilt the Wordle game from scratch in SwiftUI! 🎉 Your app supports different color schemes (dark mode & light mode), includes haptic feedback and animations. It’s fun to play and most of all: Doesn’t it have a pretty and clean user interface?! 😍 You can check out the entire project in this GitHub repo:
One thing that we haven’t implemented yet is to only allow the user to guess valid (i.e. real) words in each row. That’s out of scope for this article (you might have noticed it’s quite a long read) and leave that as an exercise up to you. (Hint: It’s more challenging that you might think…)
This article introduced you to many of the core concepts of SwiftUI, including bindings, property wrappers, view modifiers and observed objects. It hopefully provided you with a clean pattern to organize your code, to create modular and reusable views by extracting components into their own views.
⚠️ Warning and info for super nerds:
In this article, we used a hidden text field for getting the keyboard input, because we wanted to use the native iOS keyboard. However, this approach has its limitations. Text fields on iOS have an internal state that is not always in sync with the external state (that we control in the view model). In particular, when the external state does not change, it doesn’t update its internal state accordingly. While that sounds like the right behavior, it’s not in our case: If the user types happily into the text field and we want to replace the text field’s text with another (constant) string multiple times in a row, the text field will update its internal state the first time, but the second, third, … time it will “think” that nothing has changed and keep its internal state. This is a challenging problem that comes into play when checking for valid words before performing a row evaluation. You can read more about this issue on Stackoverflow.
Where to go from here…
If you want to take a deeper dive into property wrappers in general, this article is a great starting point:
If you’re building (or planning to build) larger apps with multiple screens that have a proper routing and support deep links, we got you covered with these articles:
By the way, if you still can’t get enough of Wordle: Our developer Marvin has also developed a German version of the Wordle game in Flutter and it’s available online! Feel free to try it out and play a few rounds:
Thanks for reading! If you enjoyed reading the article, please support us by sharing it. And if you have any questions or ideas, don’t hesitate to get in touch with us on Twitter! Peace! ✌️
